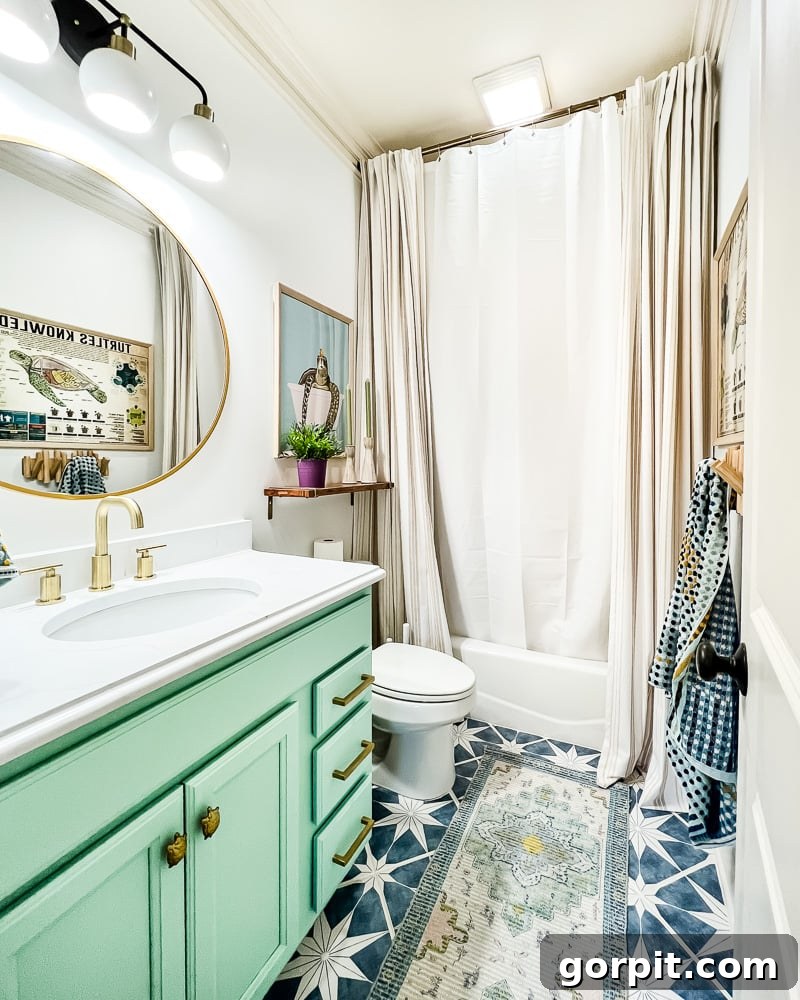
Welcome to a truly remarkable transformation where we took Avery’s once-uninspired, very beige, and decidedly boring bathroom and turned it into a wonderfully fun and aesthetically pleasing sanctuary. The best part? We achieved this dramatic overhaul without draining our wallets or resorting to a single piece of demolition! This project stands as a testament to what’s possible when creativity meets a smart, budget-conscious approach to home design.
Navigating this whirlwind bathroom makeover was an adventure, but one I absolutely cherished. This isn’t our first rodeo when it comes to rejuvenating bathrooms. In our previous home, we tackled a complete gut and remodel of our girls’ bathroom ourselves, a project that taught us invaluable DIY skills. More recently, we gave our primary bathroom an incredibly affordable refresh just before we moved. Yet, I must confess, this particular transformation might just be my all-time favorite. The blend of ingenuity, personal touch, and significant impact within a tight budget truly made it stand out.
If you’ve followed along with our journey, especially the post where I detailed the ambitious plans for Avery’s budget-friendly bathroom makeover, you’ll know that the to-do list was extensive, even without the messy business of ripping everything out. Initially, I optimistically thought I could conquer most of it in a single day. Spoiler alert: that was a tad ambitious! The project stretched into a rewarding two and a half days, partly due to the unexpected wait for cabinet paint to arrive (the irony of being held up by paint!). A huge shout-out and heartfelt thank you to everyone who followed along on my Instagram stories, offering endless encouragement and cheers. Your support made the entire process so much more enjoyable and truly fun!
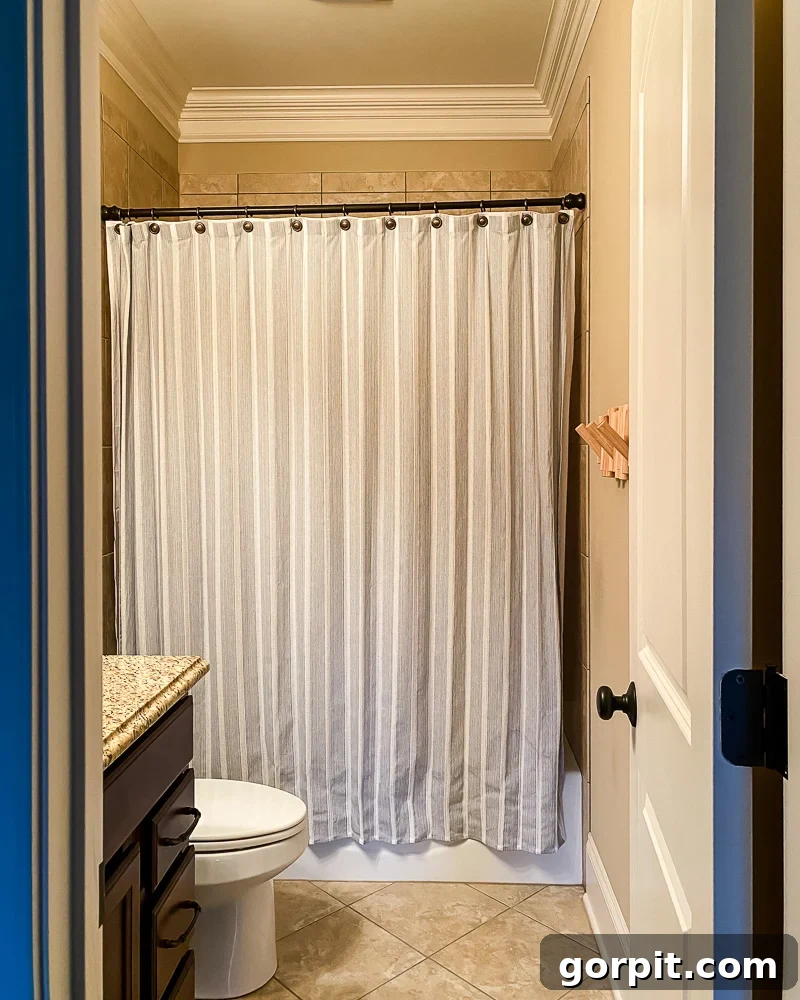
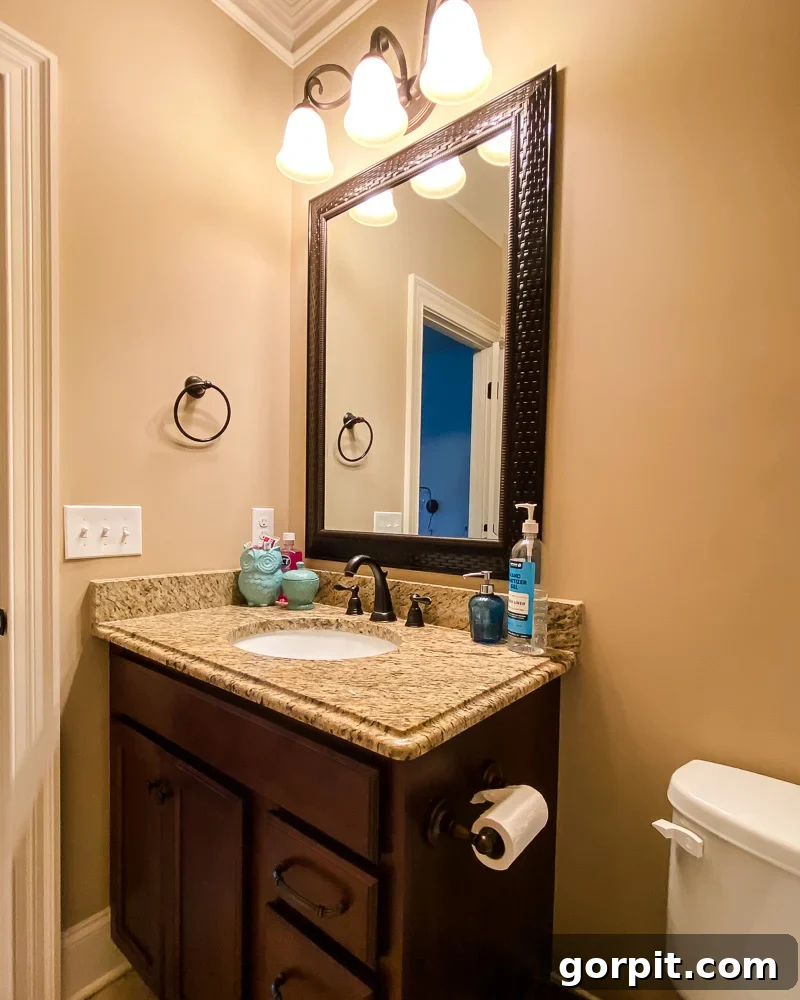
For those joining us for the first time or looking for a quick overview, our fundamental decision was to work with Avery’s bathroom’s existing materials. While undoubtedly outdated, the room was structurally sound and functionally flawless. The layout was already excellent, there were no plumbing issues or leaks, and crucially, not a single cracked tile in sight. The bathtub, sink, and vanity, though aesthetically dated, were all in perfectly usable condition. Confronted with this reality, the idea of tearing everything out and starting from scratch felt profoundly wasteful, both in terms of materials and, more critically, our budget. We were determined to prove that a stunning transformation doesn could be achieved without such drastic measures, championing smart, sustainable, and affordable design.
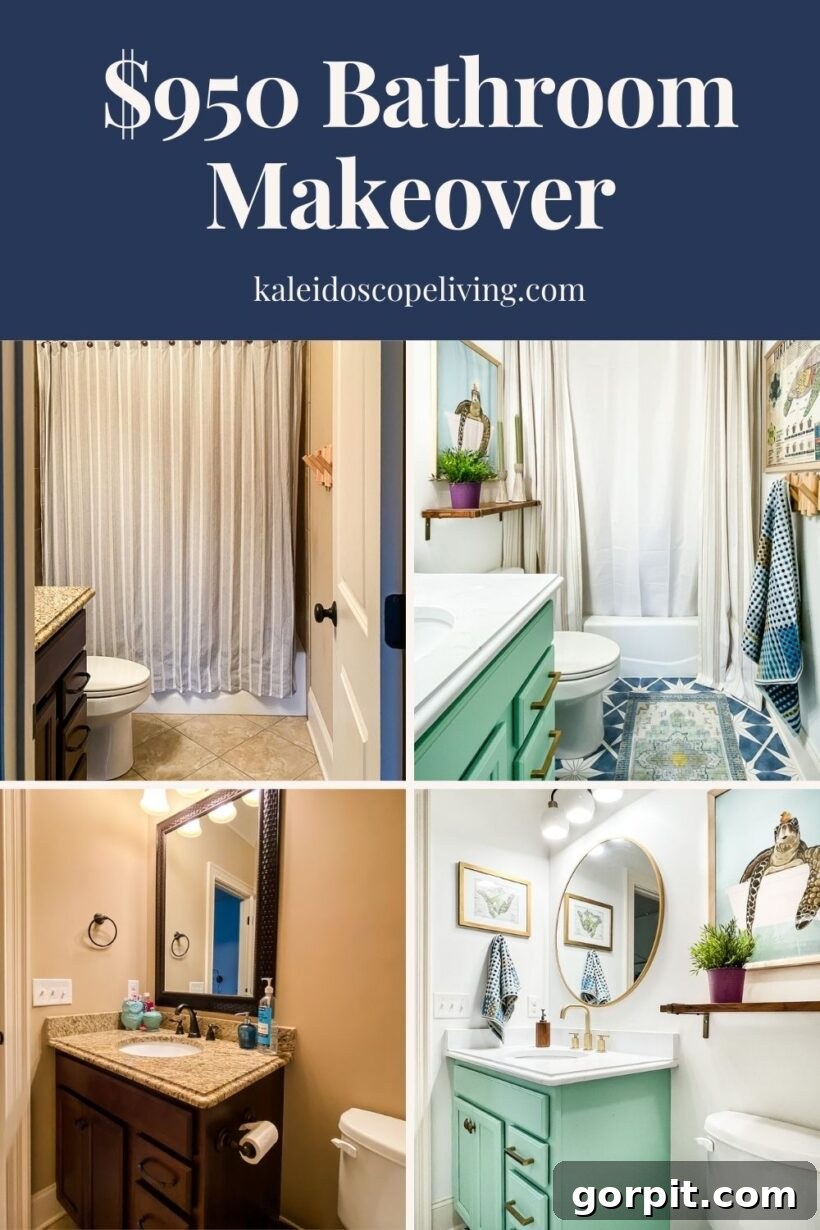
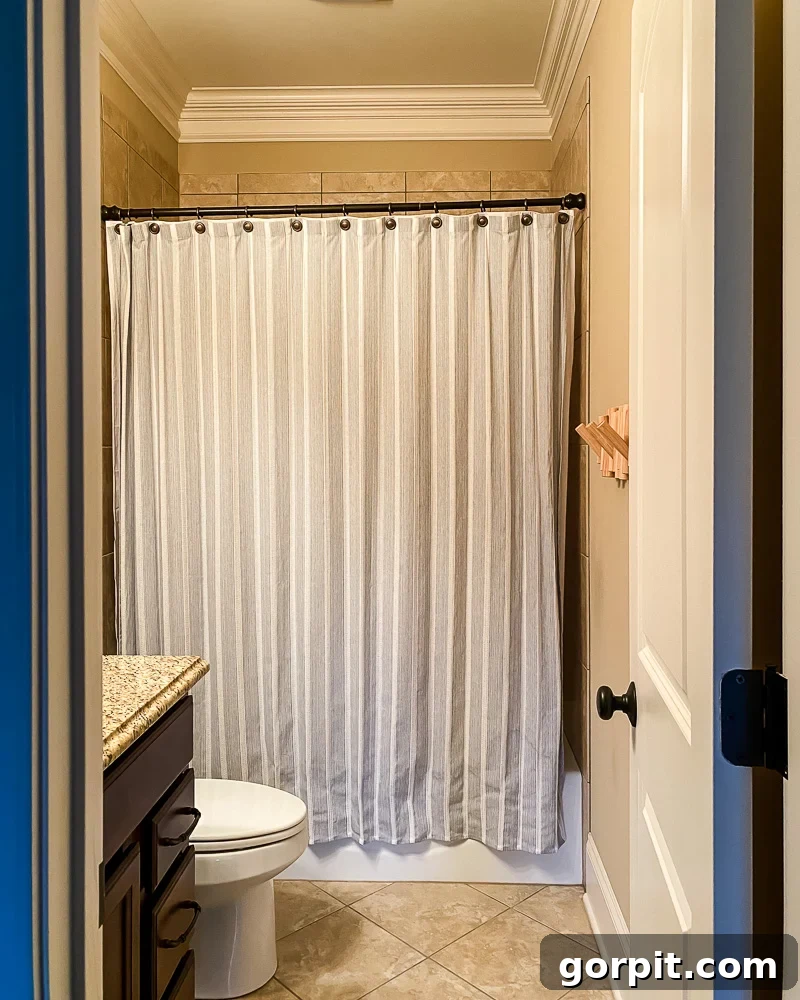
Our goal was nothing less than an aesthetic total transformation for her bathroom, which, just a few days prior, presented a rather dull and uninspired picture, as you can see from these before images.
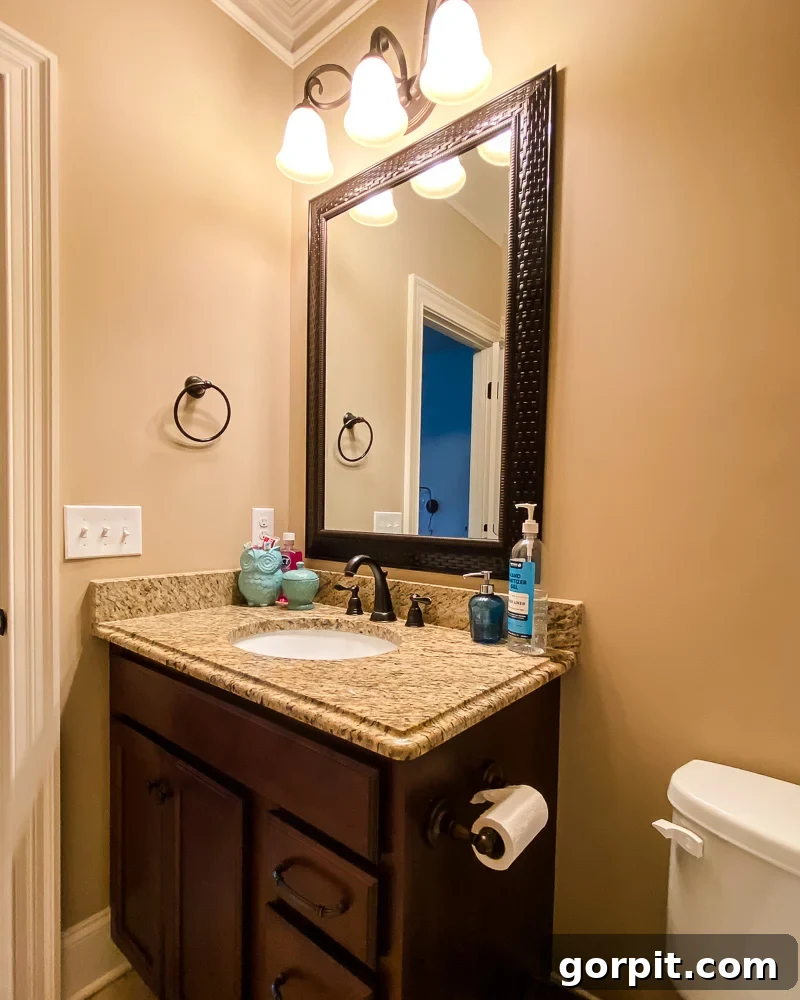
With this clear vision in mind, I meticulously crafted a design plan, embracing a fresh, vibrant aesthetic that still worked harmoniously with the existing features. Our inspiration was drawn from Avery’s favorite marine creature – the majestic sea turtle, which brought a playful yet sophisticated thematic element into the space. The transformation was set to begin, armed with paint, innovative surface solutions, and carefully chosen accessories. You’ll find a comprehensive source list detailing all the products used at the conclusion of this post.
Please note: This post incorporates affiliate links for your convenience. Click here for my full disclosure policy.
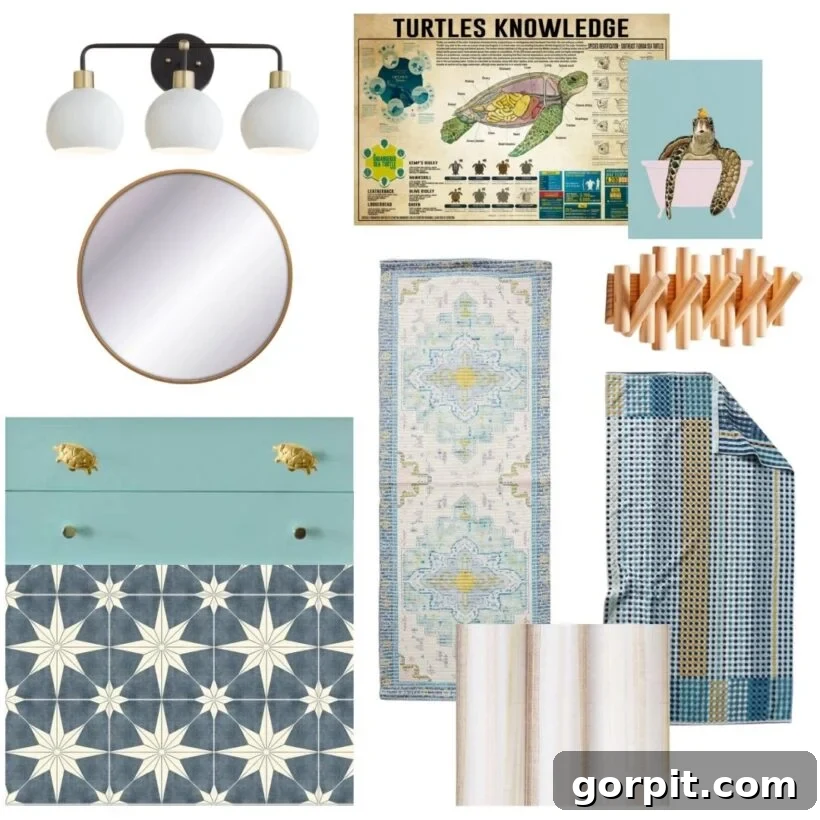
Explore the products that brought this vision to life. Click on any image for full product details.
The Budget-Friendly Bathroom Makeover Reveal: A Bright and Playful Haven
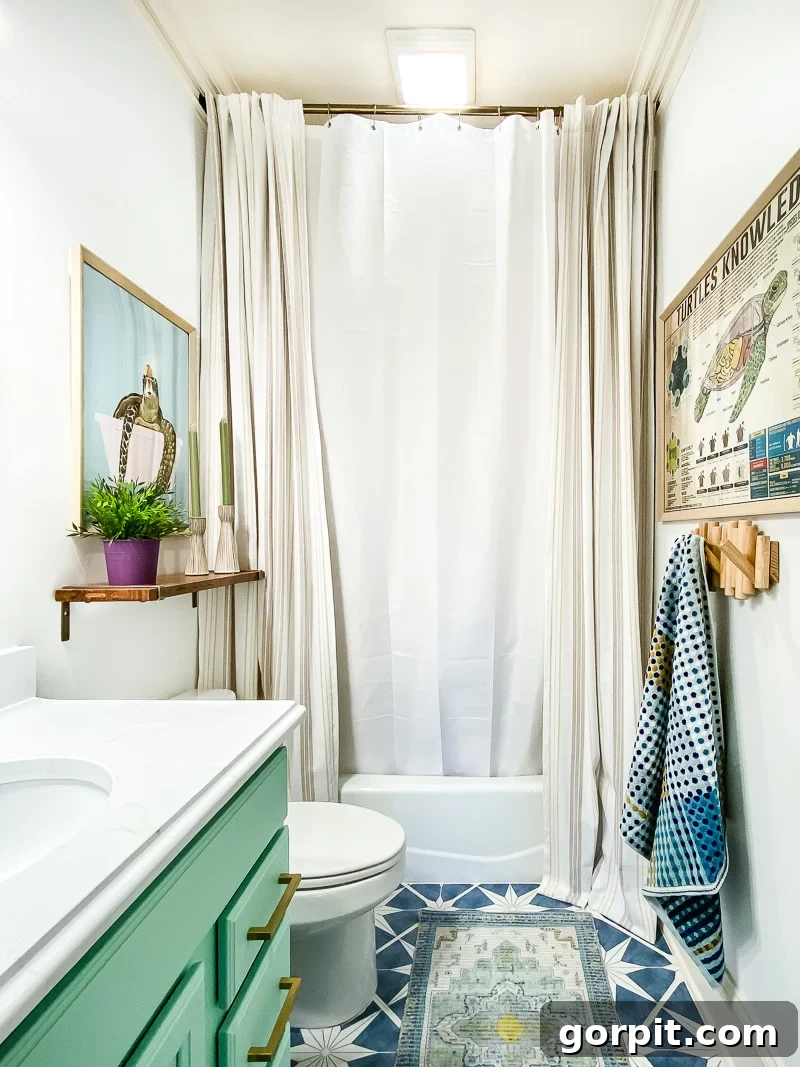
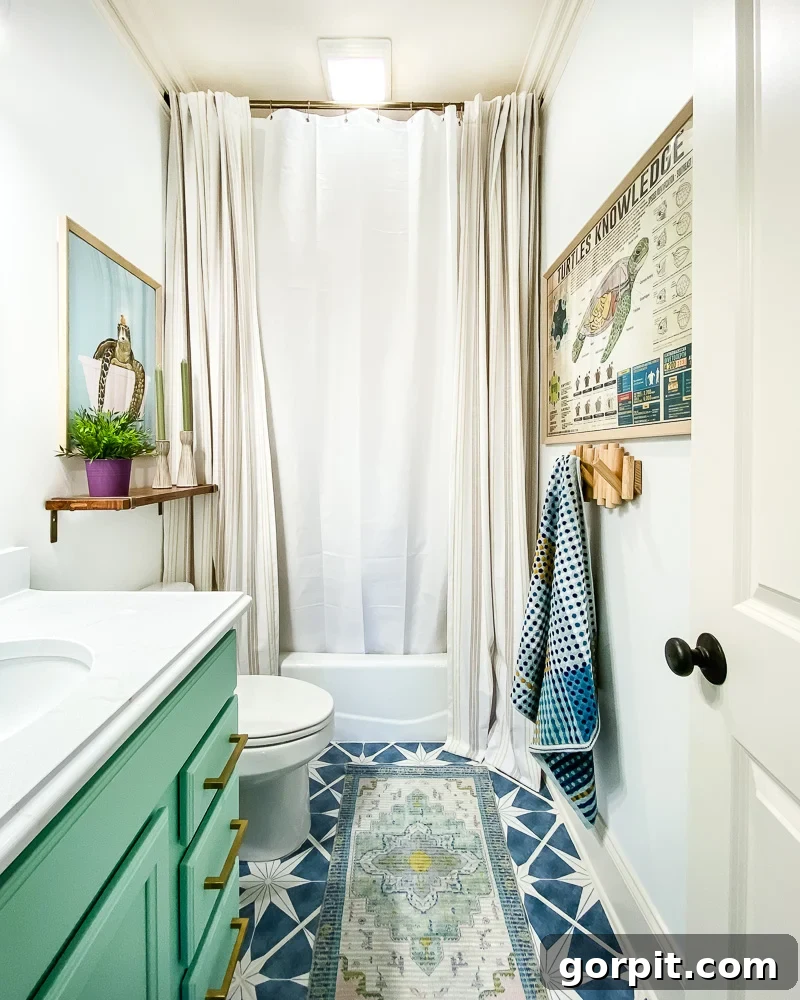
We are absolutely thrilled with the outcome of this budget-friendly bathroom makeover. One of the initial challenges was the complete absence of natural light, which often left the bathroom feeling dim and unwelcoming. However, that issue was gloriously resolved when we recently had a VELUX Sun Tunnel installed in Avery’s bathroom. Now, the space is perpetually flooded with glorious natural light, transforming its entire ambiance and making it feel much larger and more inviting. This single addition elevated the room’s energy, perfectly complementing our design choices. Prepare to be amazed as you take a look at the stunning ‘after’ results!
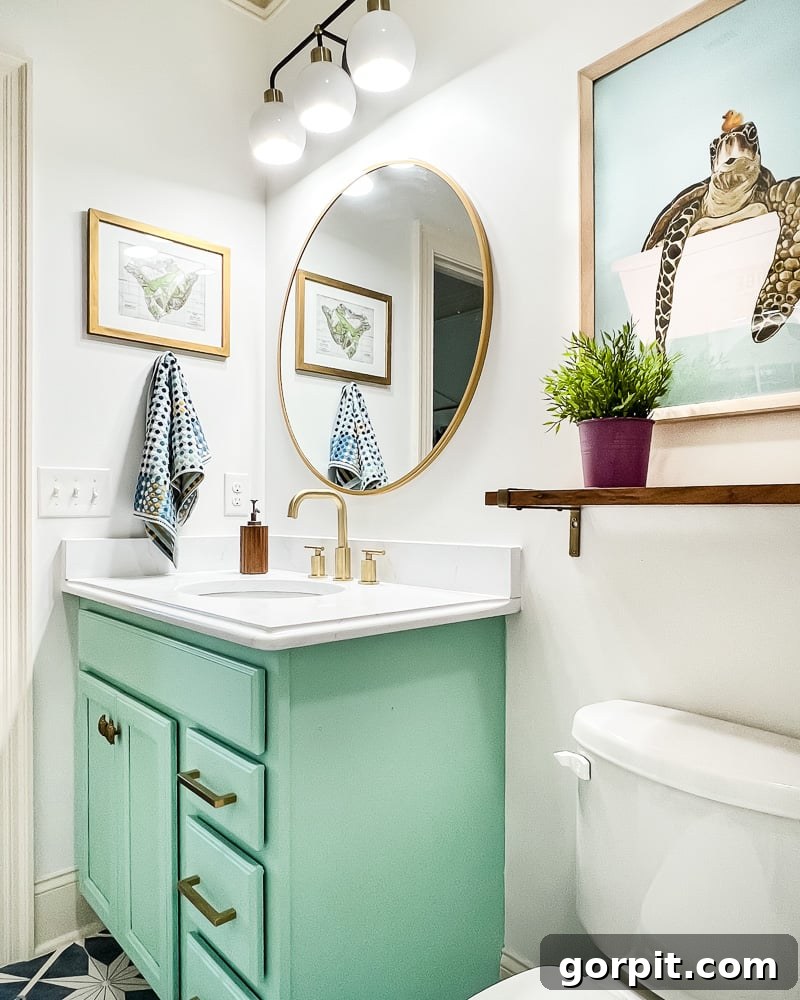
A Recap of the Work: Smart Upgrades, Big Impact
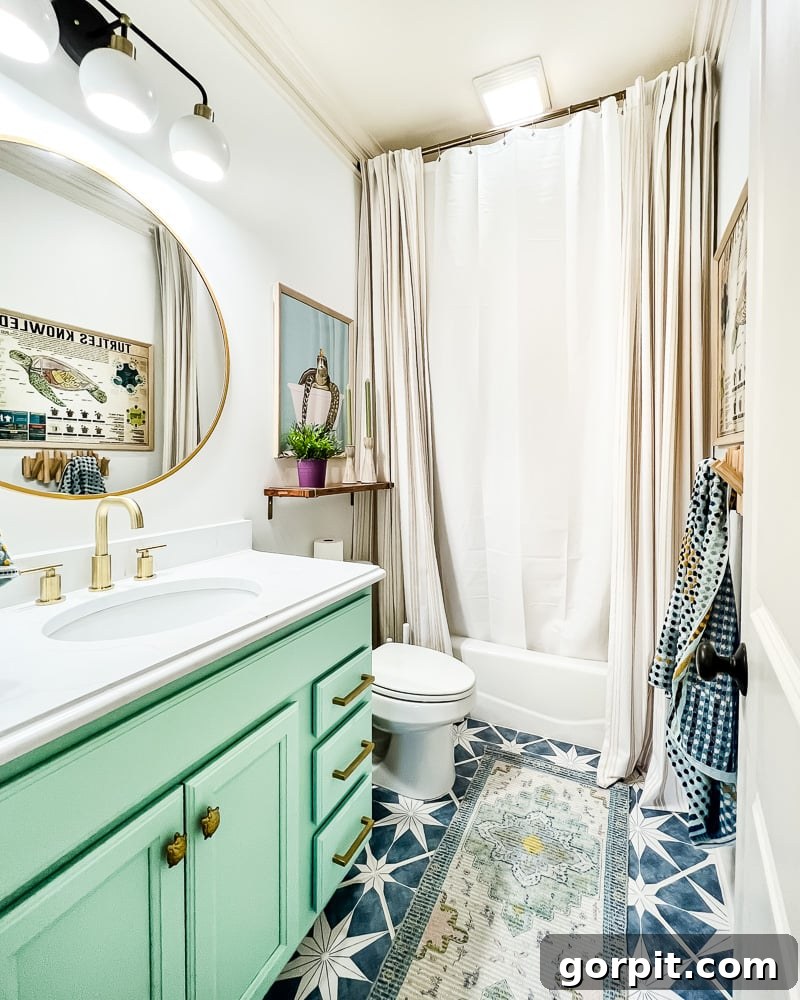
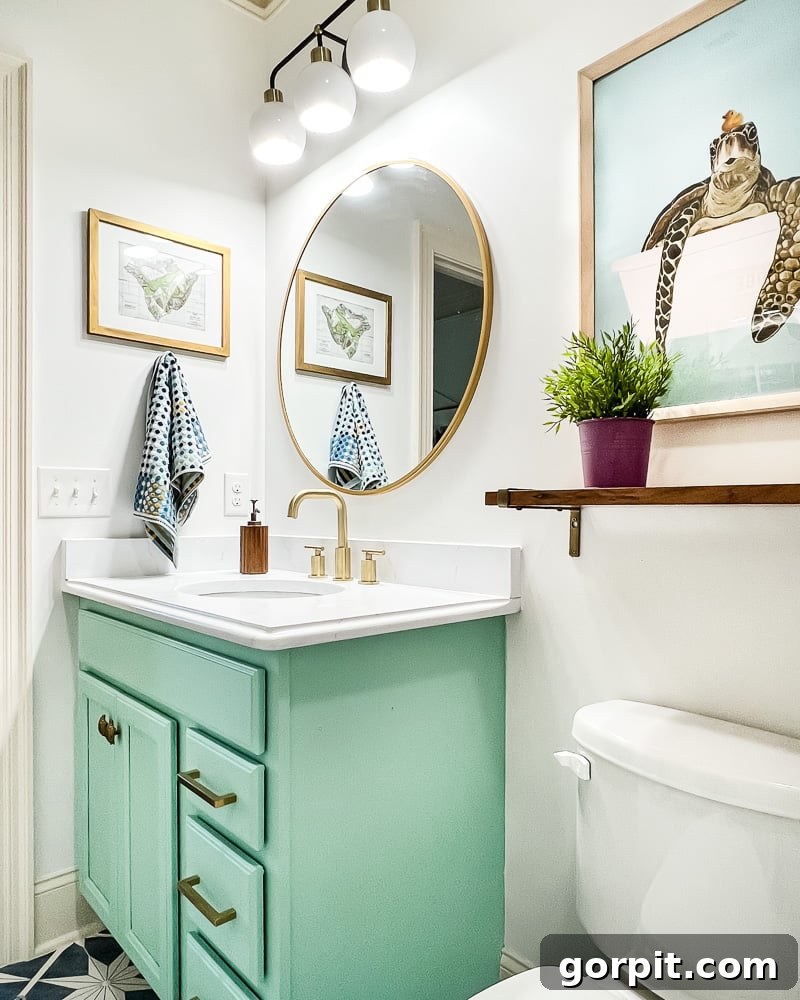
Our journey began by tackling the most noticeable element: the walls. I meticulously painted the tired brown walls with Sherwin-Williams’ Pure White, an instant brightener that provided a clean, fresh backdrop for Avery’s vibrant personality. This simple yet impactful change immediately expanded the visual space and made the bathroom feel more inviting. Next, we swapped out the outdated, heavy mirror for a sleek, modern alternative that perfectly complements the new aesthetic. To further enhance the updated look, I replaced the old light fixture with a stunning new beauty, chosen for its contemporary design and ability to cast a warm, inviting glow. Finally, a more modern faucet was installed, instantly upgrading the sink area and tying together the refreshed hardware elements of the room. Each of these changes, though seemingly minor on their own, collectively contributed to a remarkably cohesive and modern feel.
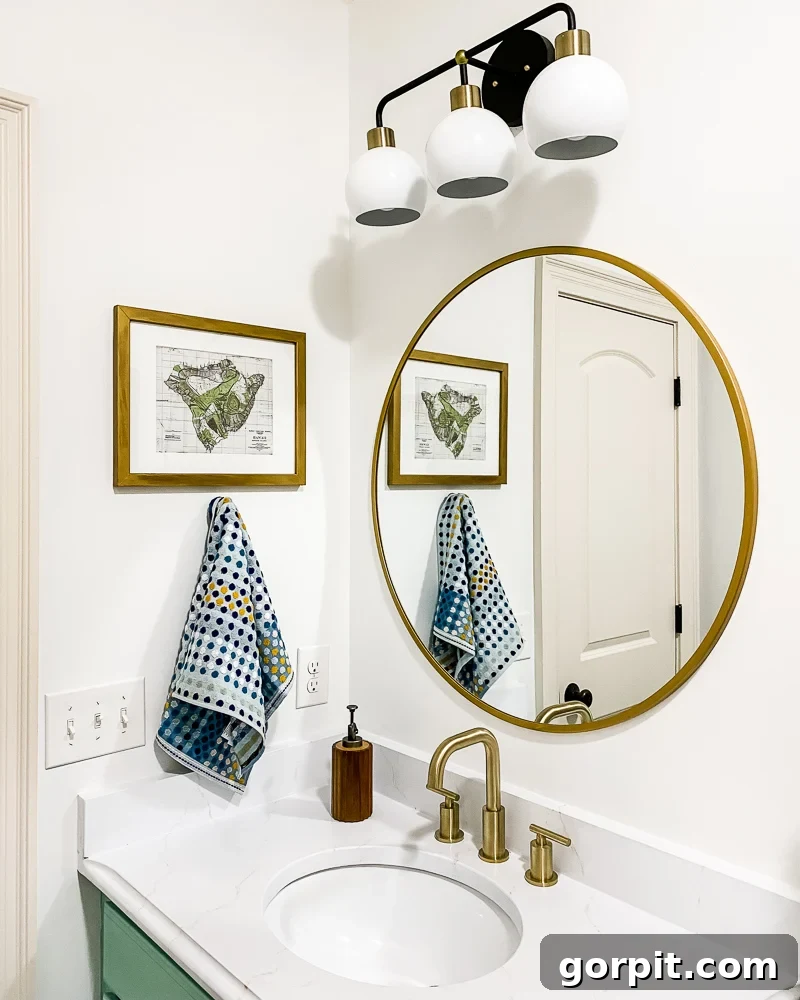
One of the most transformative and budget-friendly solutions we employed was addressing the floor tiles. Instead of the costly and labor-intensive process of ripping them out, I covered the existing brown floor tiles with these absolutely gorgeous tile stickers. You might recall that we successfully used tile stickers in our laundry room several months ago, a testament to their durability and aesthetic appeal. These stickers offer an incredible way to completely revamp the look of your floors without the mess, expense, or commitment of traditional tiling. The installation process is surprisingly straightforward, allowing for a dramatic visual upgrade in a fraction of the time. Unfortunately, using tile stickers within the shower enclosure isn’t advisable due to constant water exposure, so we opted to retain the brown shower tiles for now. While I could have painted them using a specialized method, I preferred not to invest the significant time required, especially since I wasn’t aiming for plain white tiles in that specific area. For a visual guide on how easy it is to install these innovative tile stickers, you can watch the short video demonstration below.
And for those curious about the longevity and performance of these remarkable tile stickers, you can observe firsthand how they’ve held up more than 16 months later. This follow-up video provides a transparent look at their durability, ease of maintenance, and continued beauty in a real-world bathroom setting, addressing common questions about their waterproof capabilities and lifespan. It’s a testament to their quality and a smart investment for any budget-conscious renovator.
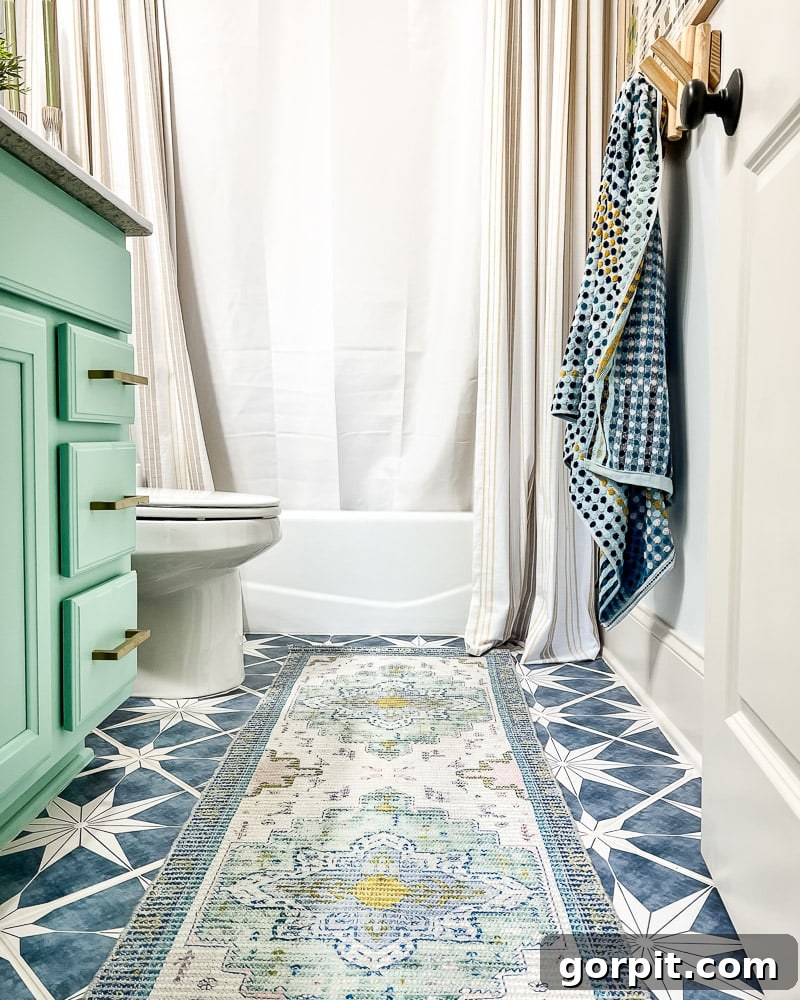
To artfully conceal the brown shower tiles that remained, and to maintain the cohesive aesthetic of the room, I implemented a clever curtain strategy. We hung two elegant 9-foot curtains on either side of the shower opening, flanking a central, matching 9-foot shower curtain. This arrangement creates a luxurious, floor-to-ceiling drapery effect that not only draws the eye upward but also effectively masks the brown tiles unless one is actually inside the shower. It’s a simple, cost-effective, and incredibly stylish way to manage an undesirable existing feature without resorting to permanent alterations, providing both beauty and function.
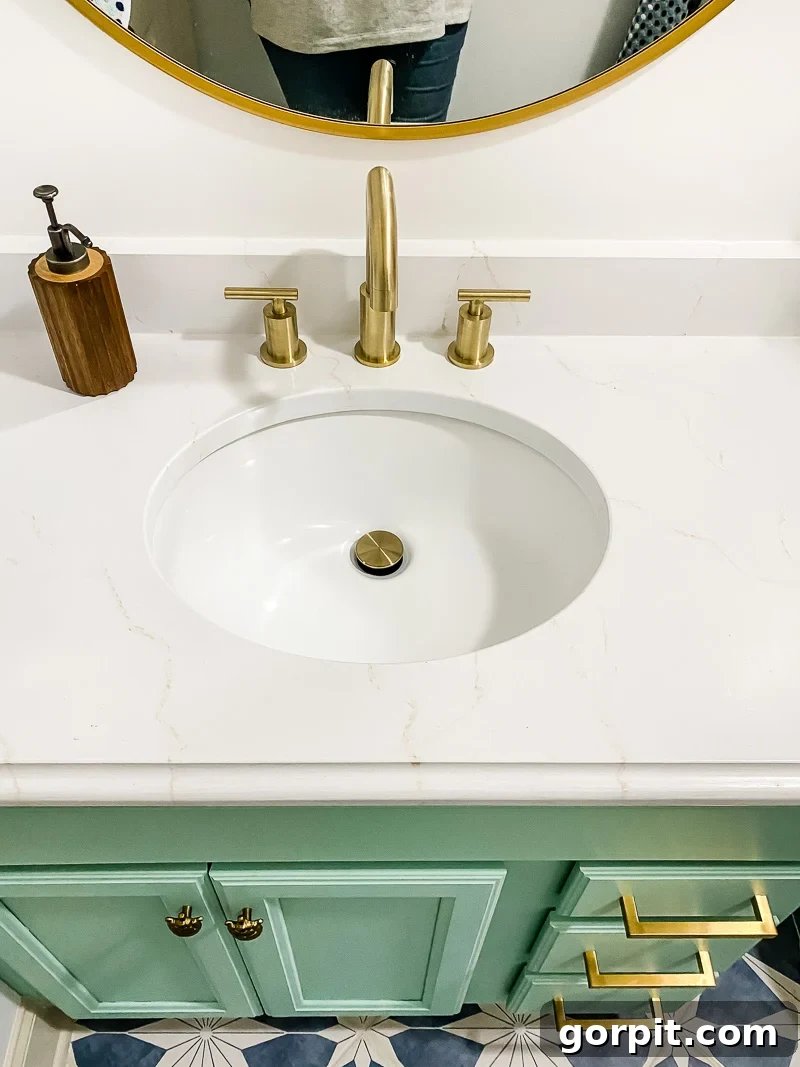
The vanity, a central feature of any bathroom, also received a complete overhaul. I began by painting the cabinet base using a proven method that guarantees a durable and beautiful finish, instantly updating its dated appearance. But the real magic happened with the granite countertop. Instead of replacement, I brilliantly painted the granite surface using a technique that mimics the luxurious look of marble. This DIY solution saved hundreds, if not thousands, of dollars, creating a high-end look on a budget. To complete the vanity’s stunning transformation, I replaced the old hardware. I discovered these incredibly inexpensive yet stylish drawer pulls, which perfectly complement the fresh paint, and for a personal touch, added these absolutely adorable turtle knobs that Avery adores beyond measure. The combination of these updates has rendered the vanity virtually unrecognizable, now exuding a chic and personalized charm.
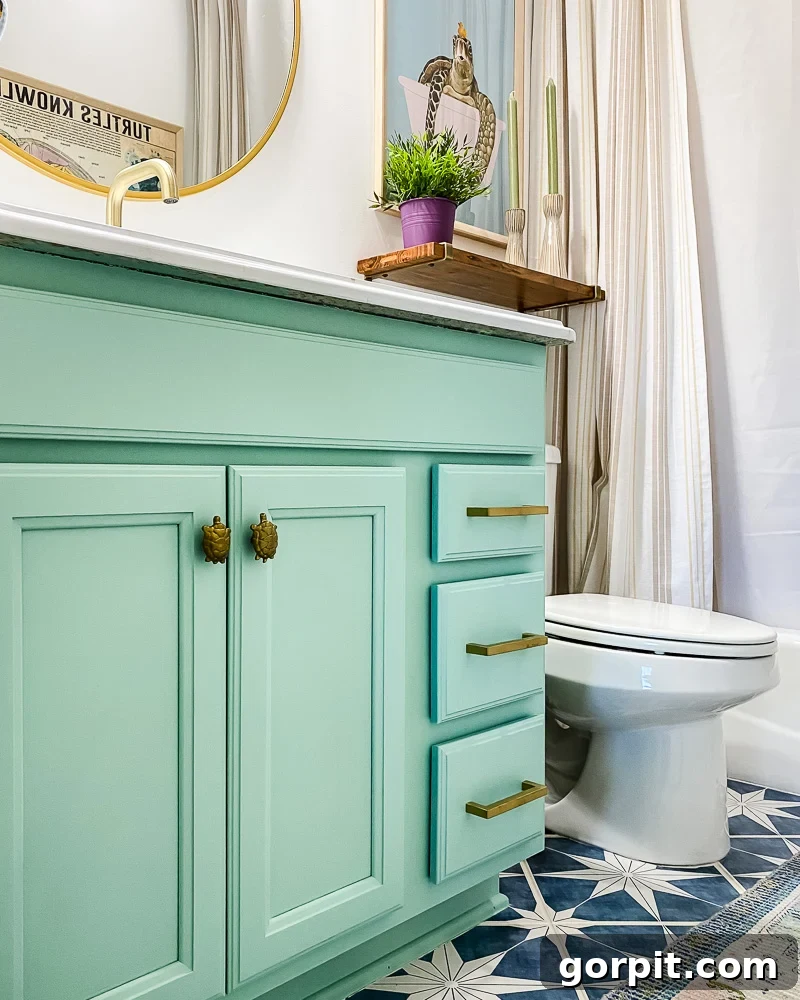
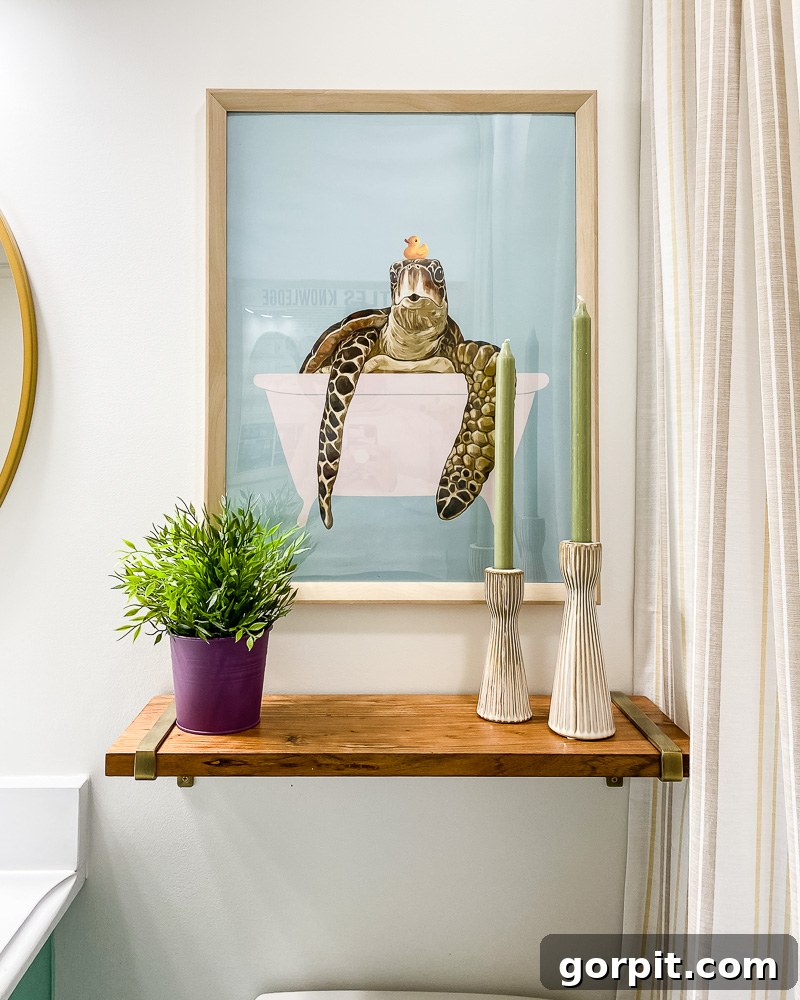
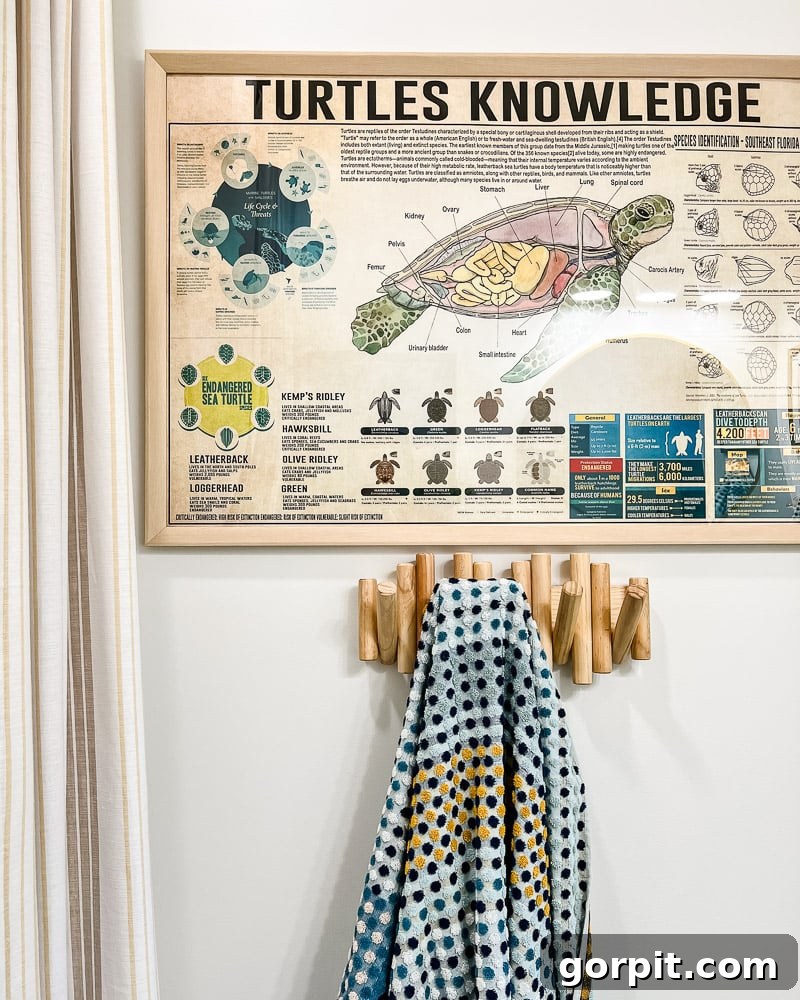
Finally, to truly infuse Avery’s personality into her newly transformed bathroom, we carefully selected artwork and accessories that reflect her deep love and undeniable obsession with turtles. The star of the show is the captivating “Turtles Knowledge” poster (we chose the impressive 24 x 36 size), a delightful and educational piece that instantly adds character. Complementing this, a charming print of a sea turtle enjoying a bathtub brings a whimsical touch. Both pieces were elegantly framed with an inexpensive poster frame, making them look far more costly than they were. Avery absolutely adores both, and their presence makes the space uniquely hers, a testament to how thoughtful, personalized decor can elevate a room from merely functional to truly beloved.
So, what are your thoughts on this incredible transformation? I, for one, am completely smitten with it! But most importantly, Avery absolutely adores her new bathroom, which truly makes all the effort worthwhile. This project serves as a powerful illustration that dramatic bathroom transformations don’t require an exorbitant budget or extensive, disruptive demolition. By intelligently working with the existing elements—like tiles and vanities—and applying creative, budget-friendly solutions, you can achieve a stunning, high-impact refresh. I think we can all agree that this space now looks dramatically different from its former self, showcasing the incredible potential of smart DIY design. For a satisfying visual comparison, take a look at these side-by-side images that highlight the impactful changes.
Again, this post may contain affiliate links for your convenience. Click here for my full disclosure policy.
Budget Breakdown: Achieving a High-End Look for Less
Curious about the financial aspect of this impressive bathroom makeover? It’s often assumed that significant transformations come with hefty price tags, but our project proves otherwise. We meticulously tracked every expense to demonstrate just how affordable a stylish update can be without compromising on quality or aesthetics. Below, you’ll find a detailed breakdown of how much this remarkable transformation cost, highlighting the smart choices that kept us well within a budget-friendly range:
- Tile stickers (pack of 24): $105
- New vanity light: $259
- New mirror: $90
- New sink faucet: $85
- Pair of 9-foot curtains: $78
- 9-foot shower curtain: $18
- 1-gallon wall paint (Pure White by Sherwin-Williams): $60 (note: paint prices are currently higher than usual)
- Cabinet paint: $22
- Countertop paint: $0 (we smartly utilized leftovers from previous projects, but purchasing new would typically cost $44. All you need for this stunning countertop effect is this white base coat and this kit for creating beautiful veining, followed by a polycrylic topcoat for durability.)
- Polycrylic: $0 (again, we used leftovers; a new purchase would be around $10)
- New cabinet hardware (drawer pulls and charming turtle knobs): $26
- Inside curtain rod mounting brackets: $5
- Curtain rod: $32
- Decor (including the bath mat, captivating artwork, elegant frames, fresh towels, and functional hooks): $170
Our total out-of-pocket expenditure for Avery’s completely transformed bathroom was an astonishingly low $950. Had we not been able to reuse some leftover materials from other DIY ventures, the total would still have been an incredibly reasonable $1,044. This figure is particularly impressive when you consider that the national average for a bathroom renovation hovers around $8,098. Our project is living proof that exceptional design and significant upgrades can be achieved on a tight budget, offering incredible value and a truly personalized space without the typical financial strain.
Bathroom Source List: Everything You Need to Recreate This Look
To help you bring a similar budget-friendly transformation to your own home, we’ve compiled a comprehensive list of the key products and materials used in Avery’s bathroom makeover. Each item was carefully selected for its quality, style, and value, proving that a stunning aesthetic doesn’t have to come with a premium price tag. Explore the specific components that contributed to this beautiful and functional space:
- Wall color: Pure White by Sherwin-Williams
- Trim and ceiling color: Divine White by Sherwin-Williams
- Cabinet paint
- “Turtles Knowledge” poster (we opted for the 24 x 36 size for maximum impact)
- Charming turtle knobs
All other products featured in Avery’s bathroom, for which we can secure direct links, are detailed below. Simply click on any image to access full product information and easily shop the look!
Other posts you may enjoy: Dive deeper into our world of DIY and design with these related articles, offering more inspiration and practical advice for your home projects:
- Sun Tunnels: Are They Right for Your Home? Exploring the Benefits of Natural Light Solutions
- How to Install a Toilet: A Step-by-Step Guide for Beginners
- Attley’s Affordable Bathroom Makeover: Another Inspiring Budget Transformation
- Affordable Master Bathroom Remodel REVEAL: Achieving Luxury on a Budget
- The Easy Way to Update Bathroom Tile Without Replacing It! Innovative Solutions for a Fresh Look
- Bathroom Art: Top Designer Picks to Elevate Your Space
- 25 Stunning Powder Room Makeovers: Small Spaces, Big Impact
As always, I approached this design project with the same systematic methodology I apply to all my home transformations. I consulted my trusted Designer in a Binder® and diligently worked through each step. For fellow Designer in a Binder® customers curious about the process for Avery’s space, the bathmat emerged as the “crucial element.” This initial, perfect find simplified all subsequent design decisions, making the entire selection process remarkably cohesive and easy!
If you’re eager to learn more about my systematic and successful approach to transforming rooms and spaces throughout our home, I highly recommend exploring Designer in a Binder®. It’s a comprehensive guide designed to empower you with the tools and confidence to create beautiful, functional spaces you’ll love, all on your own terms and budget.
For exclusive content, behind-the-scenes sneak peeks into our latest projects, and insider tips delivered directly to your inbox, be sure to subscribe to our newsletter before you go! Join our community and never miss out on our inspiring home design journeys.