
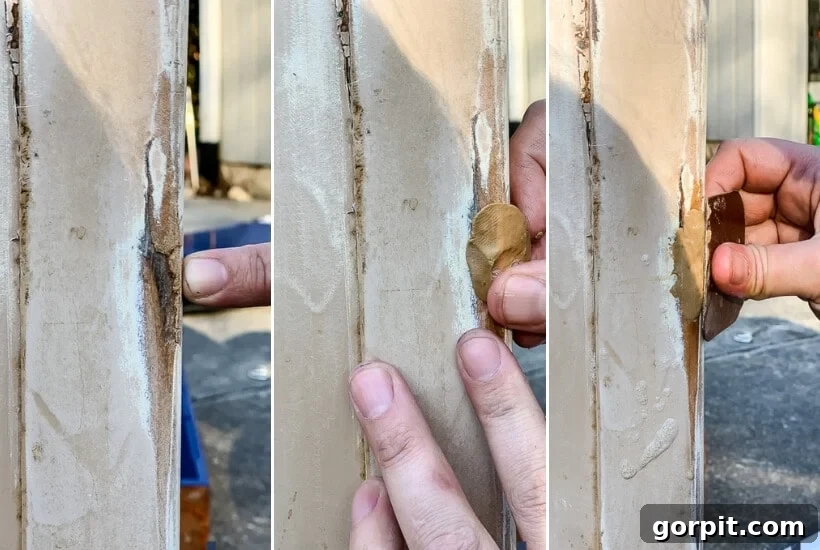
There’s immense satisfaction in breathing new life into old furniture, transforming forgotten pieces into cherished home decor. However, the joy of upcycling can quickly turn into a challenge when faced with extensive wood damage, such as large areas of wood rot, deep gouges, or unsightly holes. While traditional wood fillers might suffice for minor imperfections, severe damage demands a more robust and lasting solution. Enter epoxy wood filler – a versatile and incredibly strong material that makes even the most daunting wood repairs quick, easy, and incredibly durable. This comprehensive guide will walk you through the process, demonstrating how to achieve perfect, seamless repairs that stand the test of time, regardless of your prior experience.
Hey there, fellow DIY enthusiasts! If you’ve been following my journey on Instagram, you know I’ve been busy transforming the “playroom” section of our family room into a more organized and functional space. Our DIY pipe table has served us well, and for a couple of years, we genuinely thought open storage for art supplies like pens and markers on top of the art table wouldn’t be an issue. But as life happens, and clutter accumulates, we realized the undeniable need for some smart, closed storage solutions.

Our quest was simple: find pieces with character that wouldn’t break the bank, especially with our upcoming kitchen renovation demanding a significant portion of our budget. My hunt led me through local thrift shops and the ever-popular Facebook Marketplace, where I finally stumbled upon these hidden gems. They were structurally sound and sturdy, holding immense potential. However, they were definitely in need of some serious tender loving care (TLC) to bring them back to their former glory, with several areas showing signs of wear and tear, including deep gouges and areas of deteriorated wood.
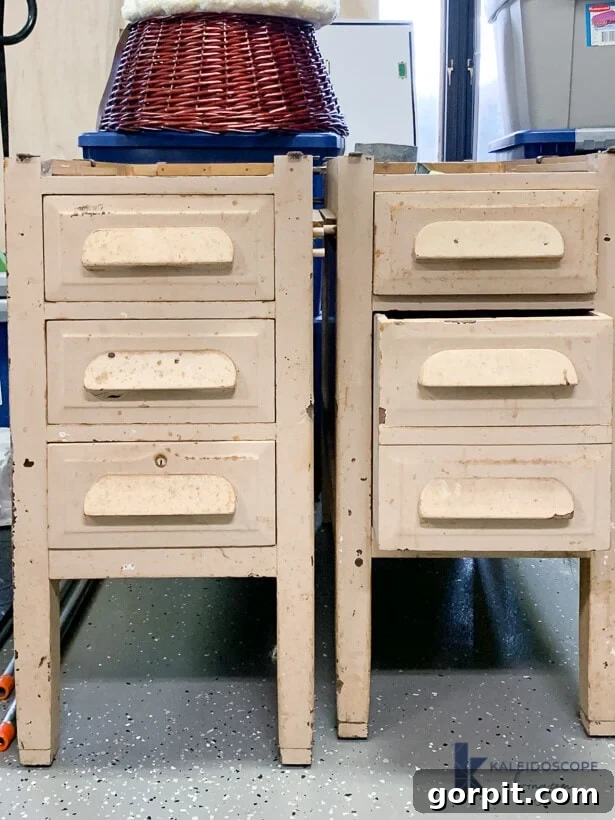
I’m never one to shy away from a good DIY challenge! And this project was the perfect opportunity to demonstrate the power of epoxy wood filler. Below, you’ll find the exact method I used to tackle these repairs, transforming severely damaged wood into a smooth, pristine surface ready for a fresh finish. No special skills or prior woodworking experience are required – I pinky promise. This technique is accessible to everyone, empowering you to tackle your own furniture restoration projects with confidence.
A special thank you to Mohawk Consumer Products for sponsoring this post. As always, all opinions expressed are 100% my own, based on my personal experience with the products used. This post also contains affiliate links for your convenience. To understand more about how this works, please click here to read my full disclosure policy.
Mastering Wood Repair: A Comprehensive Guide to Epoxy Wood Filler
Before diving into the step-by-step process, it’s worth highlighting the incredible versatility of epoxy wood filler. While I’m demonstrating this method on the drawer bases of my thrift store finds, its applications extend far beyond. We’ve successfully used it to fill a large hole left by old hardware on our front door (a project that also involved a complete front door update and adding a DIY kick plate). It’s also perfect for securing old screw holes that have stripped out and no longer hold fasteners. Furthermore, epoxy wood filler is an absolute lifesaver for repairing areas prone to wood rot, such as exterior trim, window sills, and even exterior doors. Its waterproof and durable nature makes it ideal for both interior and exterior applications, truly making the possibilities for repair endless.
Why Epoxy Wood Filler is Your Ultimate DIY Solution for Damaged Wood
Traditional wood fillers often fall short when dealing with significant damage. They can shrink, crack, or lack the structural integrity needed for large repairs or outdoor exposure. Epoxy wood filler, however, is a two-part system (resin and hardener) that chemically bonds to the wood, creating a repair that is often stronger and more durable than the original material. Its unique properties make it stand out:
- Unmatched Durability: Once cured, epoxy becomes incredibly hard, resisting shrinking, cracking, and decay. It can withstand drilling, sanding, staining, and painting just like natural wood.
- Superior Adhesion: It creates a powerful, lasting bond with wood, filling gaps and voids seamlessly.
- Waterproof and Weather-Resistant: A critical advantage for exterior applications, protecting against moisture damage and rot.
- Moldability: Its putty-like consistency allows you to sculpt it into any shape, making it perfect for recreating missing pieces of molding or filling irregular holes.
- Versatility: Ideal for everything from repairing rotten window frames and exterior trim to filling large holes in furniture or doors.
Essential Materials for Your Epoxy Wood Repair Project:
- Mohawk Epoxy Putty Stick: This product combines both resin and hardener in one convenient stick. While I opted for a neutral putty color, these sticks are available in a variety of wood tones. If you’re working on stained wood and plan to re-stain, choose a color that closely matches your wood for the best results. For painted projects, the putty color is usually fine as it will be covered.
- A leveler card or an old credit card: This simple tool is indispensable for smoothing the epoxy and removing excess material, ensuring a flush finish with the surrounding wood surface.
- A small dish of soapy water: This is your secret weapon! Keeping your fingers and tools slightly damp with soapy water prevents the epoxy from sticking, making the kneading and application process much smoother.
- A sharp knife: Essential for precisely cutting off the desired amount of epoxy putty from the stick.
- Sandpaper: You’ll need various grits. Start with a medium-coarse grit (e.g., 80-120) for initial shaping and then move to a finer grit (e.g., 180-220) to achieve a perfectly smooth, ready-to-finish surface.
- Optional: Disposable gloves for mess-free handling.
Step-by-Step Guide: Repairing Wood Flaws with Epoxy Wood Filler
1) Prepare Your Workspace and the Damaged Area
Before you begin, ensure your workspace is clean and well-ventilated. Thoroughly clean the area of the wood you intend to repair. Remove any loose debris, dust, dirt, or flaking paint. If dealing with wood rot, use a chisel or screwdriver to remove all soft, punky wood until you reach solid, healthy wood. The area must be dry before applying epoxy. Wearing disposable gloves can help keep your hands clean throughout the process.
2) Mix Your Epoxy Putty
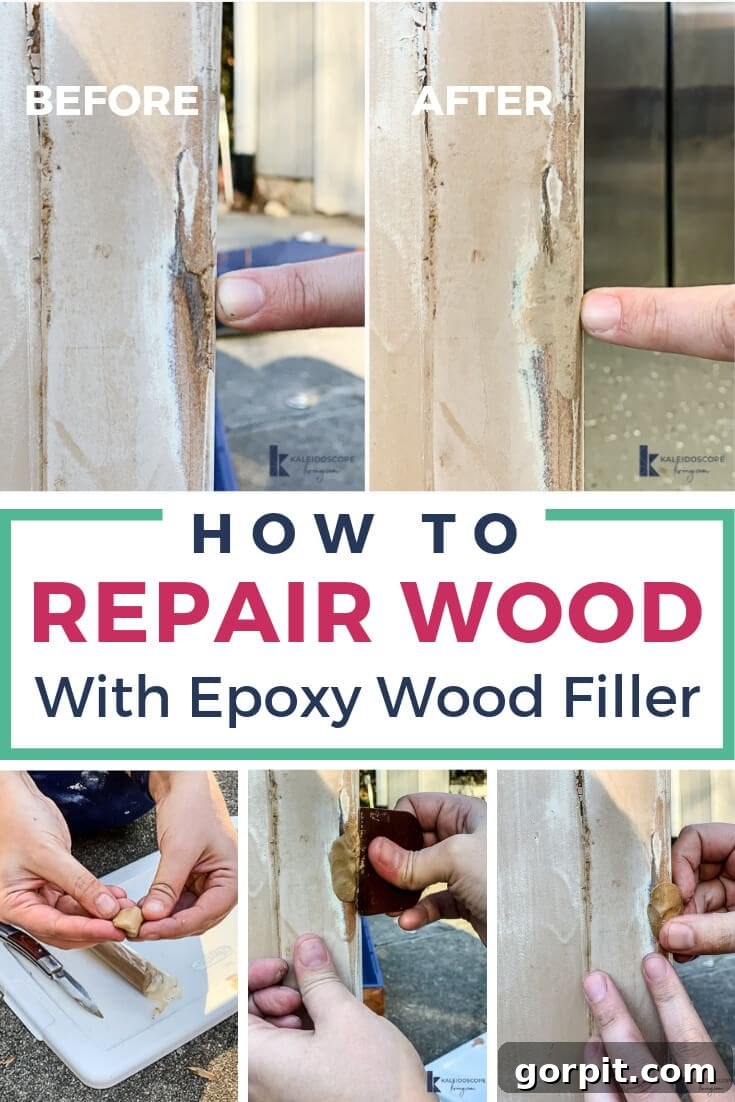
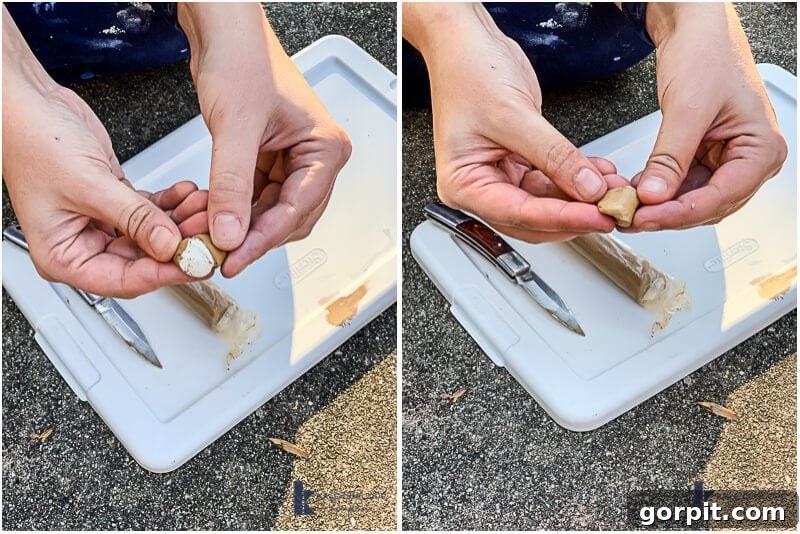
First, prepare your soapy water mixture by mixing a small amount of liquid dish soap into about 2 ounces of water. This will be your anti-stick solution. Now, using your sharp knife, cut a small piece of your Epoxy Putty Stick off. The amount will depend on the size of your repair. With your fingers, knead the putty vigorously until the color is completely uniform, meaning the inner and outer parts are thoroughly mixed. You’ll notice it start to get warm in your fingers – this is a chemical reaction indicating the resin and hardener are activating. It’s crucial to work quickly, as the working life of the epoxy is short, typically only about 6 minutes after mixing. If the epoxy starts sticking to your fingers, simply dip them in the soapy water and continue kneading until a consistent color and texture are achieved.
3) Apply and Shape the Epoxy
Once the epoxy putty is uniformly mixed and activated, immediately press it firmly into the area you are repairing with your fingers. Make sure to pack it in tightly, forcing it into all crevices and voids to ensure a strong bond and a complete fill. Overfill the damaged area slightly; this allows for sanding to achieve a perfectly flush surface later. While the epoxy is still pliable, use your leveler card or an old credit card to smooth out the surface and remove any excess putty that protrudes higher than the surrounding wood. Glide the card across the surface with gentle pressure. If the epoxy starts to stick to the card or your fingers during this smoothing process, just lightly rub the surface of the epoxy with your soapy water mixture – it acts as a release agent, allowing for easy shaping.
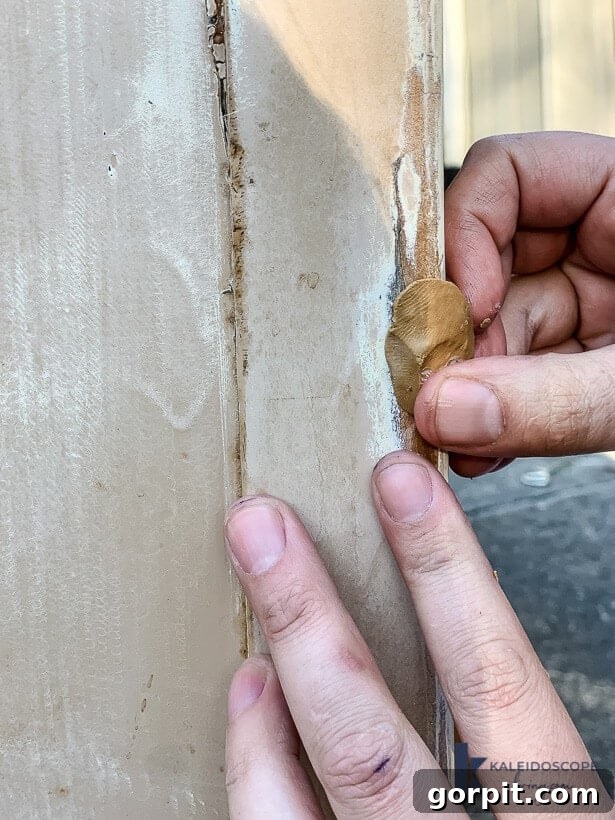
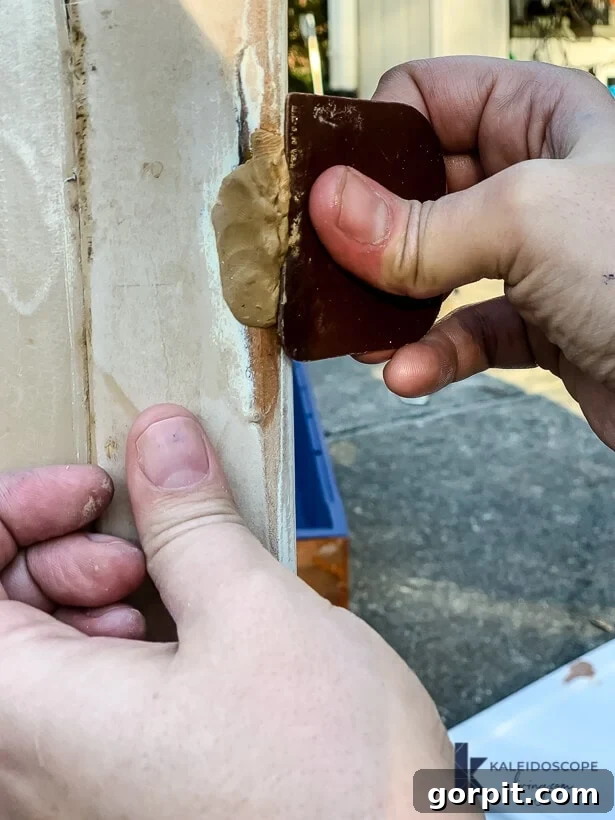
4) Allow for Complete Curing
Once you’ve applied and shaped the epoxy, it’s crucial to allow the filled area to cure completely. While the epoxy putty might feel firm to the touch within a few minutes, give it at least 20 minutes to fully harden and reach its maximum strength. For deeper repairs or in colder temperatures, allowing more curing time (e.g., an hour or two, or even overnight) is highly recommended. Here’s the truly impressive part: because epoxy putty is made from a resin and hardener, the cured repair becomes incredibly robust. It’s not just a filler; it’s a structural repair. This makes it the perfect moldable putty for filling large holes, extensively rotted areas, and even intricately broken molding. Once fully cured, the repaired surface will be even harder and more resilient than the original wood itself!
5) Finish to Perfection
After the epoxy putty has fully cured and reached its ultimate hardness, it’s time to sand it down. Start with a medium-coarse grit sandpaper (like 80 or 120-grit) to quickly remove any excess epoxy and bring the repair flush with the surrounding wood surface. Work slowly and evenly to avoid creating depressions. Once you’ve achieved a smooth, level profile, switch to a finer grit sandpaper (180 or 220-grit) to refine the surface, removing any sanding marks and creating a perfectly smooth finish that is indistinguishable from the original wood. At this stage, your repaired wood is ready for whatever finishing treatment you desire; surfaces can be sanded, drilled, stained, or painted with complete confidence, just like untouched wood.
Take a look at the dramatic before and after transformation of the damaged area. The difference is truly remarkable, isn’t it? What once seemed like a challenging and time-consuming repair was actually a quick and straightforward process with the right tools and technique.
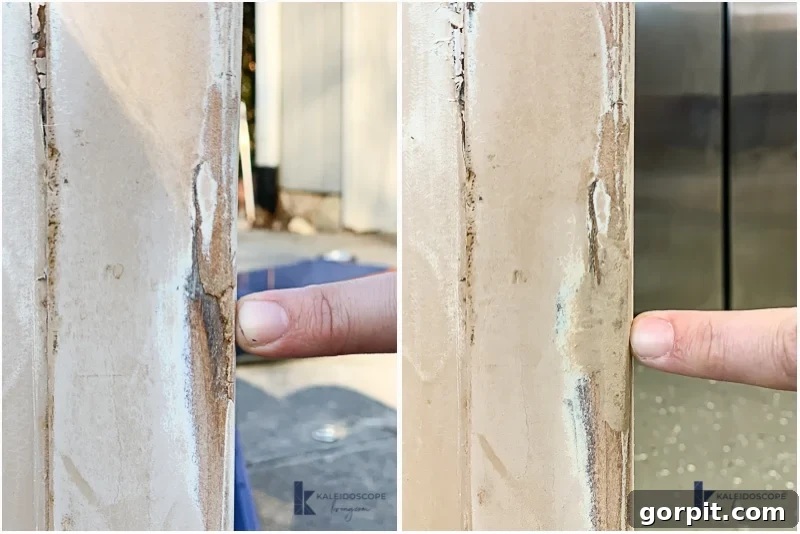
That’s all there is to it! Soon, I’ll be sharing my best general tips for prepping furniture for paint, unveiling how these once-damaged drawer bases turned into stunning, functional storage pieces. I genuinely hope this comprehensive tutorial has demystified the process and shown you just how easy it can be to repair even large areas of damage in wood. There’s absolutely nothing to be afraid of when you have the right materials and a clear guide. Go forth and restore!
If you’re more of a visual learner and prefer to see demonstrations in action, you can watch yours truly applying this method on a piece of scrap wood in the video below. It’s a great way to grasp the texture and application technique.
