Are you tired of staring at outdated, uninspiring bathroom tile floors but feel stuck because a full replacement seems financially impossible and overwhelmingly complex? Many homeowners face this dilemma, dreaming of a refreshed space without the nightmare of demolition, high costs, and weeks of disruption. The good news is, achieving a stunning bathroom makeover doesn’t require ripping out your old tiles or investing in expensive power tools. The secret lies in a revolutionary, budget-friendly, and incredibly easy solution: tile stickers. These innovative adhesive coverings are not only simple to install, transforming your bathroom floor in mere hours, but they are also remarkably durable when applied correctly. Prepare to unlock the potential of your existing floors and discover how tile stickers can deliver the bathroom refresh you’ve always wanted, without breaking the bank or your back.
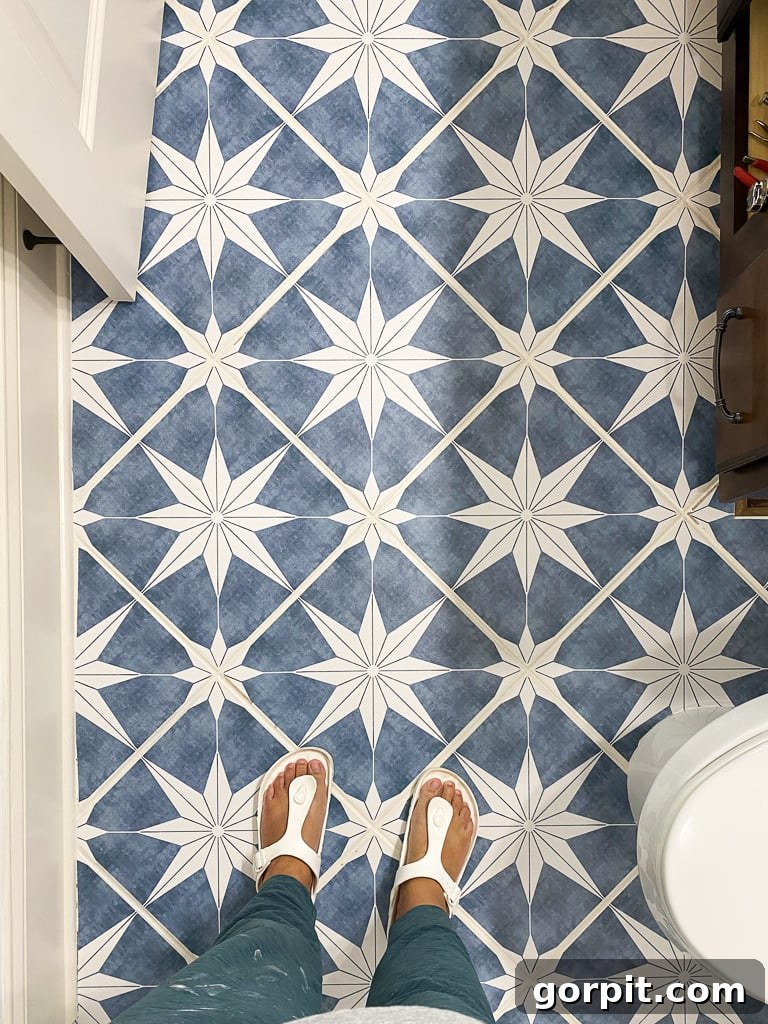
Table of Contents
Why Choose Tile Stickers? A Cost-Effective & Hassle-Free Solution
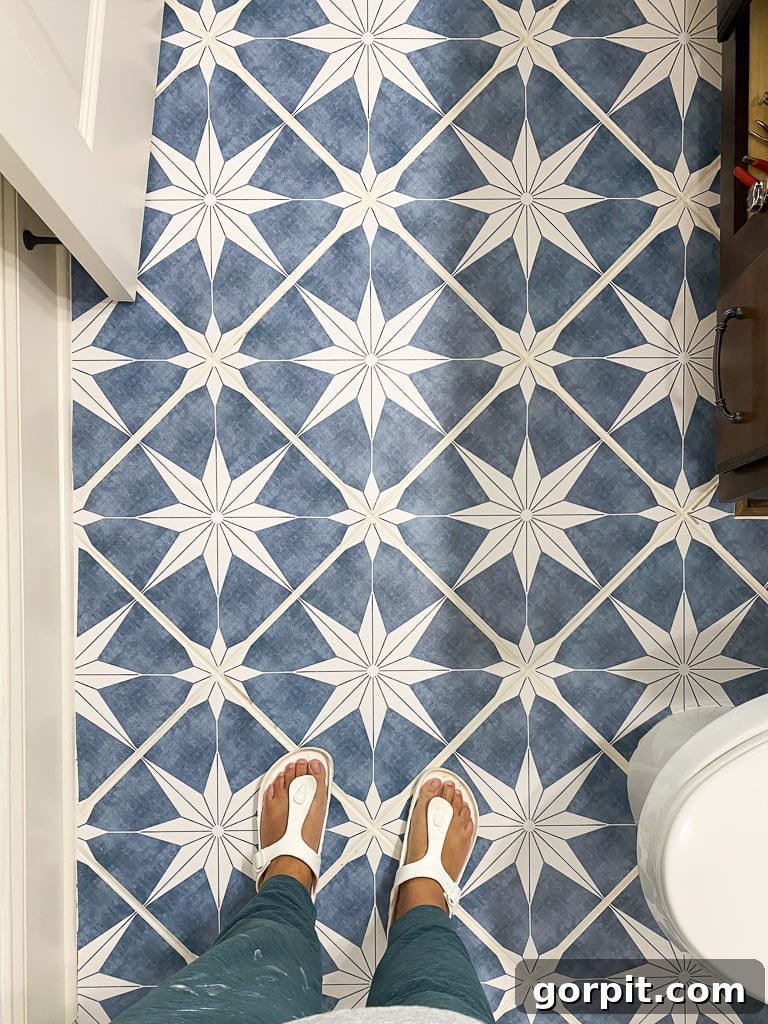
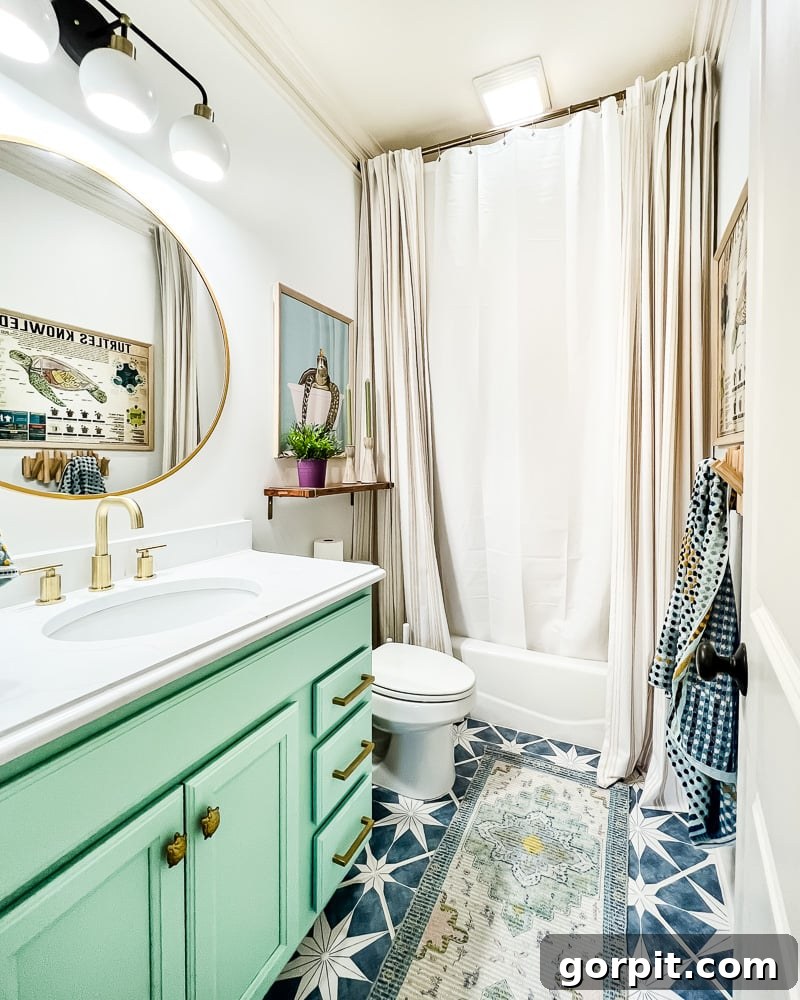
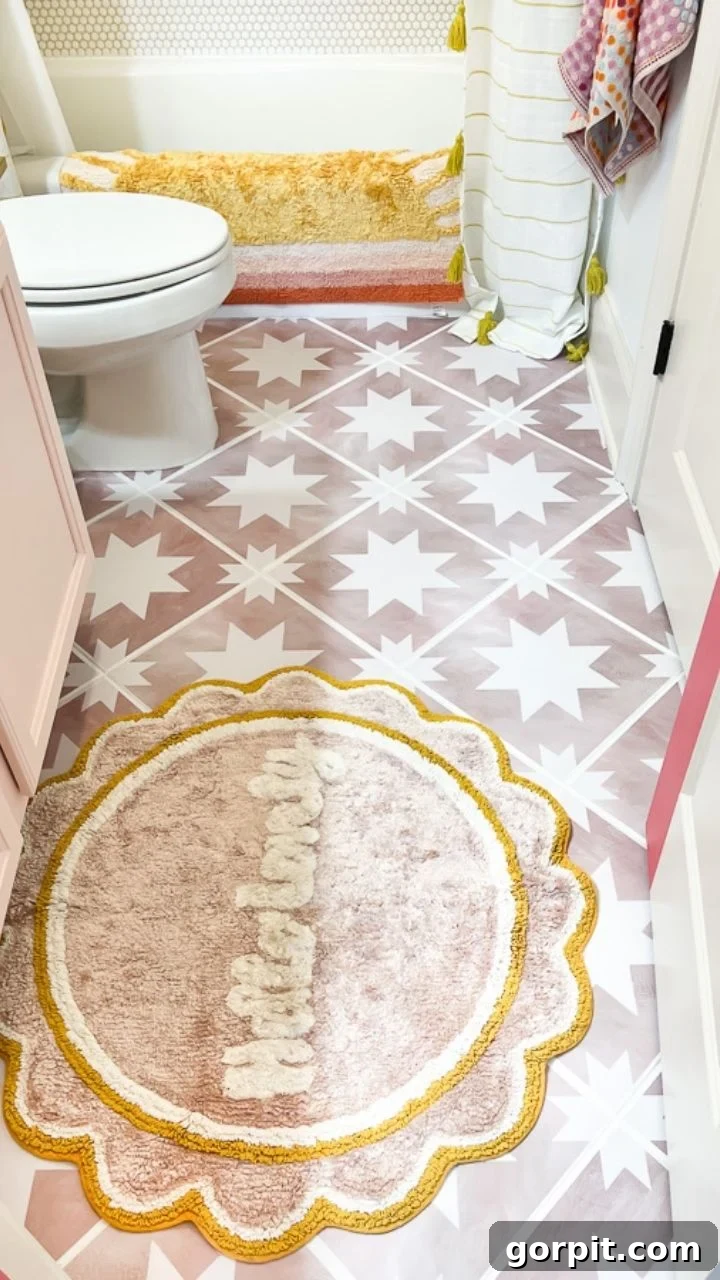
That stunning floor you admired in the first image? Those are actually premium quality floor tile stickers! For years, I yearned to transform the drab, outdated brown tile floor in my daughter’s bathroom. However, the thought of a traditional renovation was daunting. Replacing tile involves a cascade of challenges: first, painstakingly removing the toilet and vanity, then the messy, dusty, and laborious process of chiseling out old tiles, followed by the significant expense of new materials and professional installation. We simply didn’t have the time, energy, or budget for such an extensive undertaking.
While some sources suggest the option to tile directly over existing tile, I personally find this approach less than ideal for floors. It inherently doubles the thickness of the flooring, creating an awkward height transition at doorways and between different floor surfaces in adjoining rooms. This can also lead to issues with door clearances and overall aesthetics. Instead, I was determined to discover the most effective and aesthetically pleasing way to update our bathroom floor tile without resorting to a full replacement. After considerable research and experimentation, I found the perfect answer: giving the existing floor tiles a fresh, modern look with high-quality tile stickers.
Through my experience, I’ve gathered invaluable insights into the proper application of floor tile stickers to ensure they adhere securely and maintain their beauty for years to come. There are a few crucial techniques and tips you’ll need to master for long-lasting results, so keep reading for all the details!
The Before & After: Witnessing a Remarkable Transformation
The Challenge of Outdated Tiles
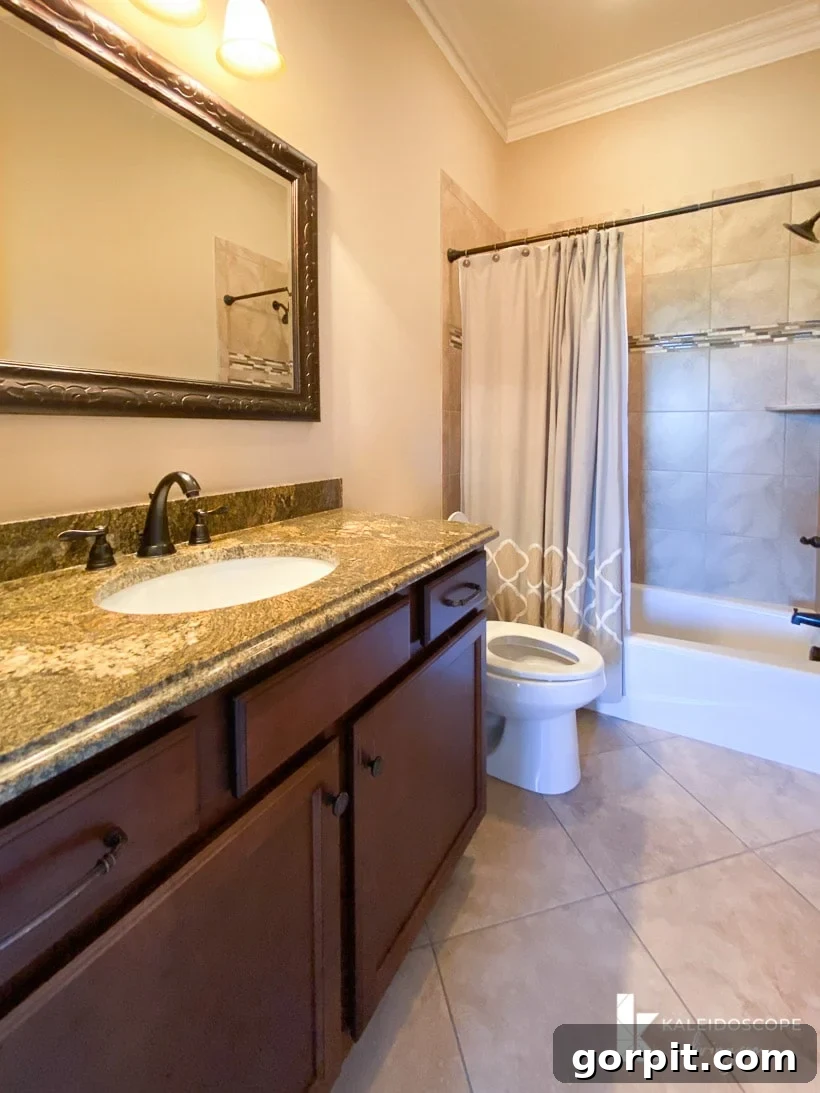
Before embarking on Avery’s budget-friendly bathroom makeover, the space was undeniably functional but aesthetically uninspiring. The dominant feature was a dated, dark brown tile floor that anchored the room in a past decade. It was the kind of tile that made the whole bathroom feel heavy and unwelcoming. This mundane flooring stood in stark contrast to the fresh, vibrant vision I had for a modern and cheerful space for my daughter. It was clear this floor needed a dramatic facelift to match the overall design aspirations for her room.
This post contains affiliate links for your convenience. Click here for my full disclosure policy.
The Vision and the Sticker Solution
As I meticulously planned Avery’s bathroom design (a process I always streamline using Designer in a Binder® to visualize every detail), I curated the perfect elements: stylish light fixtures, a charming shower curtain, plush towels, a cozy rug, and elegant knobs. The final piece of the puzzle was the floor—it needed an exact shade of blue and a pattern that would tie everything together beautifully. That’s when I discovered these incredible floor tile stickers, and I instantly knew they were the ideal solution. Avery and I were both captivated by the vibrant blue hue and the playful star pattern, which perfectly complemented her personality and the room’s new aesthetic.
The transformation was nothing short of miraculous. Once the tile stickers arrived, the installation itself took me only about an hour to complete. This incredibly swift DIY project yielded instant gratification, and perhaps even more impressively, the cost was significantly less than purchasing and installing new ceramic tile. In just a short amount of time and with minimal expense, Avery’s bathroom was completely revitalized, boasting a brand new, gorgeous floor that perfectly reflected our design vision. It was not only a simple upgrade but a total, transformative overhaul.
Extending the Success: Attley’s Bathroom Makeover
The success of updating Avery’s bathroom tile floors without replacing them was so resounding that just a few months later, we confidently used these versatile tile stickers for Attley’s equally budget-friendly bathroom makeover. Following the exact same meticulous process, the results were just as beautiful, and the ease of installation was consistently impressive. This double success solidified my belief that tile stickers are a game-changer for anyone looking to refresh their bathroom floors efficiently and affordably.
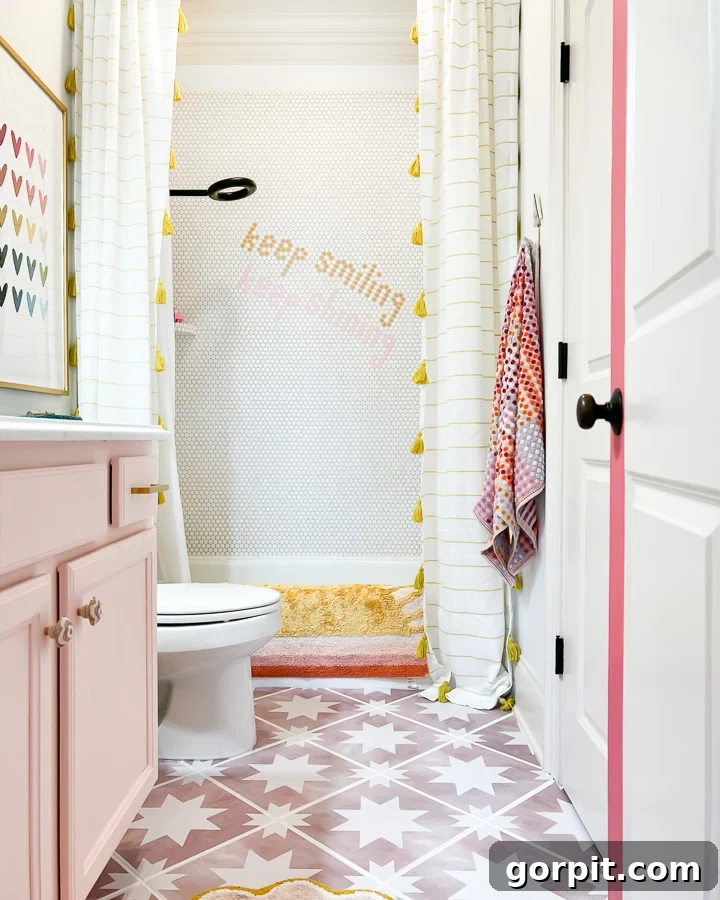
You can explore some of my favorite tile sticker designs that offer endless possibilities for your next project.
Click on any image for full product details.
DIY Installation: How to Apply Floor Tile Stickers Like a Pro
The process of installing floor tile stickers is remarkably straightforward, making it an ideal DIY project for renovators of all skill levels. With just a little preparation and attention to detail, you can achieve professional-looking results in a surprisingly short amount of time. Generally, expect to dedicate about 1 to 1.5 hours for a standard bathroom floor, depending on its size and complexity. Just follow these simple steps to ensure a flawless and long-lasting application.
Time needed: 1 hour and 30 minutes
Transform your bathroom floor with ease! This tutorial will guide you through the simple steps of installing durable and beautiful tile stickers.
-
Step 1: Selecting and Sizing Your Perfect Tile Stickers
The market is flooded with an incredible array of gorgeous patterns, colors, and styles of tile stickers, allowing you to perfectly match any design aesthetic. However, the most critical aspect for a successful and durable installation is accurate sizing. It is absolutely paramount to order your tile stickers approximately 1/8″ SMALLER THAN YOUR ACTUAL TILES on each side. This slight border is crucial because it ensures the sticker adheres only to the perfectly flat surface of your existing tile, rather than extending over or onto the grout line. Many tiles have a subtle slope or bevel near the grout, and if the sticker adheres to this sloped edge or, worse, to the porous grout itself, it significantly increases the risk of peeling and premature wear.
Most reputable tile sticker companies understand this requirement and offer custom cutting services. Even if you only see standard sizes listed (e.g., 12″ x 12″), don’t hesitate to reach out to the vendor and inquire about custom dimensions. They will almost certainly accommodate your request and provide clear instructions on how to measure and place your order correctly to achieve that vital 1/8″ gap. This small detail is the cornerstone of a professional-looking and long-lasting finish.
-
Step 2: Thorough Cleaning is Key
Before applying any adhesive, a meticulously clean surface is non-negotiable for optimal adhesion. You must prepare your existing tile floor by cleaning it exceptionally well. Any dirt, grime, soap scum, or residue will compromise the sticker’s ability to bond properly, leading to lifting edges and a shorter lifespan. I highly recommend using a heavy-duty degreaser and cleaner like TSP (trisodium phosphate). TSP is excellent for cutting through years of buildup and ensuring a pristine surface. Follow the product instructions for dilution and application, making sure to rinse thoroughly to remove all cleaning solution residue. Allow the floor to dry completely before proceeding to the next step.
-
Step 3: Grout Line Perfection (Optional but Recommended)
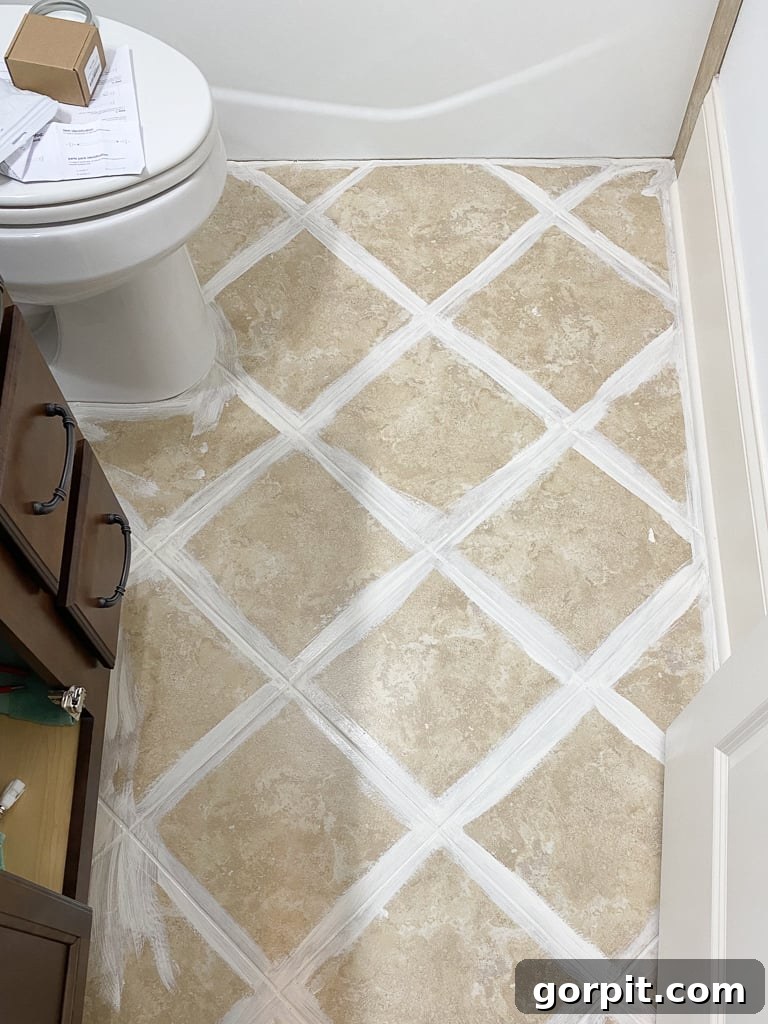
When you are covering an old tile floor, especially one with dark or discolored grout lines that might clash with your chosen tile sticker design, painting the grout lines beforehand is a highly recommended, albeit optional, step. In our case, the original dark brown grout would have created an unsightly contrast with the vibrant blue star stickers we selected. By painting the grout lines with a color that complements your new stickers (often white or a light neutral), you achieve a cohesive and fresh foundation.
Simply use a small brush and a durable porch and floor paint to carefully cover the grout and the very outer edges of each existing tile. This technique not only gives you crisp, fresh-looking grout lines but also helps those crucial borders on the tile (where the sticker won’t reach) blend seamlessly into the overall floor design. This step contributes significantly to the polished, “brand new” look of your updated floor.

-
Step 4: Mastering the Peel-and-Stick Application
Once your floor is sparkling clean and any painted grout lines have thoroughly dried, you are ready for the exciting part: installing your peel-and-stick tile stickers! As I’ve emphasized, this is genuinely a very beginner-friendly DIY project that yields dramatic results. The key to a smooth, bubble-free finish is to work patiently and methodically.
Start by peeling back a small section of the backing paper from one corner of the tile sticker. Carefully align the sticker with the edges of your existing tile, remembering to maintain that essential 1/8″ gap around all sides. Once the initial corner is perfectly placed, slowly peel away the remaining backing paper while simultaneously smoothing the sticker onto the tile surface. A soft felt-edged squeegee or even a credit card can be incredibly useful here to push out any air bubbles and ensure firm contact. Work from the center outwards to achieve the best adhesion. For areas around obstacles like toilets or vanity bases, you may need a sharp utility knife to carefully trim the stickers to fit. Don’t rush this step; precision in placement and smoothing will guarantee a beautiful and durable final product.
Now that you’re equipped with the know-how for installation, let’s address the most common and pressing questions about tile stickers. When I first shared this DIY makeover, I received an overwhelming number of comments and questions on Instagram, far more than I ever anticipated! It’s clear that many of you are intrigued by this innovative solution, but naturally, you want to know if it truly stands the test of time. So, let’s dive into your burning questions, starting with the big one…
Are Tile Stickers Durable? Our Long-Term Performance Review
This is often the first question on everyone’s mind, and for good reason. With any DIY flooring solution, durability is paramount. I’m thrilled to report that we installed the tile stickers in both of our daughters’ bathrooms over 16 months ago, and they are holding up absolutely PERFECTLY! This is despite a significant amount of skepticism and numerous comments on social media questioning the longevity of such a project. Despite the doubts, our experience has been overwhelmingly positive.
The stickers show no signs of peeling, lifting, or wear, even with daily use, spills, and regular cleaning in high-traffic areas. To truly demonstrate their performance and put any lingering doubts to rest, I created a video specifically to showcase their current condition. You can see for yourself how impeccably they’ve performed over time (it will play after a brief ad).
FAQs About Updating Your Bathroom Floor with Tile Stickers
Q: How do I choose the correct size tile stickers?
This question is incredibly important and often overlooked, yet it’s absolutely critical for the success and longevity of your tile sticker project. About ten months before I successfully installed tile stickers in Avery’s bathroom, I made a crucial mistake when ordering for our laundry room. I had those stickers custom cut to the exact size of our ceramic tiles. This was a significant oversight that became clear only after my positive experience with Snazzy Decal on Etsy for Avery’s bathroom.
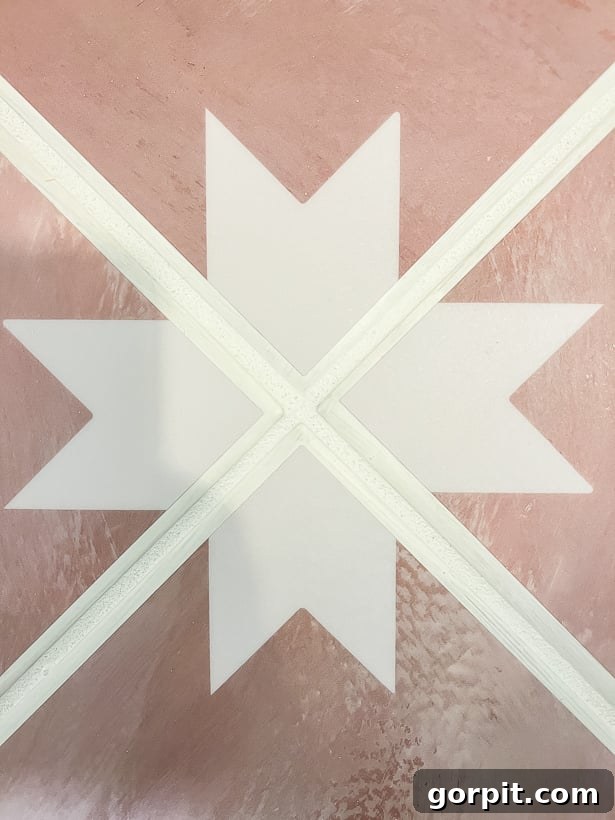
Snazzy Decal provided very clear and specific instructions: you should order your stickers approximately 1/8″ SMALLER THAN YOUR TILES on each side. This strategic sizing creates a small, consistent border around each tile sticker, ensuring that the sticker adheres exclusively to the perfectly flat surface of the existing tile. It prevents the sticker from encroaching upon any subtle slopes, bevels, or, most critically, the porous grout line itself. Adhesion to a perfectly flat surface is key; if the sticker overlaps or touches the grout, moisture can seep in, and the edges are far more prone to lifting and peeling.
To be absolutely clear: the tile sticker should not extend all the way to or over the grout line at any point. Observe the image below of the tile stickers in Attley’s bathroom; notice how they intentionally do not reach the very edge of the tile. This is precisely the desired outcome and the “secret” to durable installation.
Remember, the vast majority of tile sticker manufacturers offer custom cutting services. So, even if their standard listings don’t match your tile dimensions, don’t hesitate to message them with your exact measurements (minus the 1/8″ border on each side), and they will almost certainly guide you through the custom ordering process.
Q: How do floor tile stickers hold up? How long will tile stickers last?
When installed correctly, with careful attention to the sizing guidelines discussed above, tile stickers are designed to last a very, very long time and withstand daily wear and tear beautifully. As I’ve mentioned, the floor tile stickers in both of our daughters’ bathrooms have now been installed for well over a year, enduring daily use and exposure to moisture, and they are performing perfectly. We’ve observed absolutely no peeling, ripping, or signs of deterioration. We are, to put it mildly, absolutely thrilled with their performance and longevity.
Our experience in the laundry room, however, serves as a clear illustration of what can go wrong if the sizing is incorrect. Because we mistakenly ordered stickers cut to the exact size of the tiles, the edges inevitably started to lift and peel due to moisture exposure and traffic. This issue ultimately necessitated a more involved solution, where we had to install a floating tile floor over the old tile. This cautionary tale reinforces just how vital proper sizing is. But given the flawless performance in the bathrooms, I have no doubt these floors will continue to look fantastic for many years to come.
Q: What are tile stickers made of?
Tile stickers are primarily crafted from a high-quality, durable vinyl material. Think of it as a specialized, heavy-duty vinyl similar to what is often used for commercial car wraps or outdoor signage. This particular type of vinyl is engineered for its exceptional stickiness, remarkable durability, and, crucially, its waterproof properties. This makes them ideal for environments prone to moisture, like bathrooms and kitchens. The material is designed to be flexible enough for easy application, yet robust enough to resist scuffs, scratches, and everyday spills, ensuring your revamped floors maintain their pristine appearance.
Q: What kind of prep work is required?
One of the most appealing aspects of updating your floors with tile stickers is the minimal amount of prep work required compared to traditional tile replacement. The primary tasks involve a thorough cleaning of your existing tile floor to ensure excellent adhesion, and optionally, painting the grout lines if their current color doesn’t complement your new sticker design. That’s essentially it! There’s no demolition, no messy thin-set mortar, and no need for specialized tools for leveling. Just a clean surface and, if desired, a fresh coat on the grout will set you up for success.
Q: Is using tile stickers a better option than painting the floor?
I’ve personally experimented with both methods. In our old kitchen, I painted and stenciled the floor, and I also mastered how to paint a vinyl floor in our previous laundry room. Both painted floors looked fantastic and held up beautifully for years, thanks to durable floor and porch paint. However, while you can certainly achieve similar patterned looks using floor paint and a stencil, there are distinct advantages to tile stickers that often make them the superior choice, especially for intricate spaces like bathrooms.
Painting and stenciling a floor is an incredibly time-consuming process. The meticulous application required to get clean, crisp lines with a stencil, particularly in tight corners and around fixtures like toilets, vanities, and tubs, can be extremely challenging and frustrating. The lines achieved with a stencil, no matter how careful you are, are rarely as perfectly sharp as those on professionally printed tile stickers. For larger, more open spaces, a painted and stenciled floor can be a fantastic, artistic DIY. But for the confined and complex layouts of bathrooms, installing tile stickers is undeniably quicker, significantly easier, and provides a much cleaner, more precise aesthetic with less effort. Both options offer durability, but for efficiency and precision, tile stickers often win out.
Q: Can you feel the tile stickers on the floor?
This is a frequently asked question, and I can confidently say that your brain does not register the tile stickers as anything other than a regular tile floor. They integrate seamlessly into the existing surface. While they are not perfectly smooth – which is actually a beneficial feature, as a perfectly slick surface could be dangerously slippery – they possess just the tiniest bit of texture. This subtle texture is comparable to the feel of a durable vinyl binder cover, providing a comfortable and safe walking surface without feeling artificial or raised. The sensation is entirely natural, blending the aesthetic transformation with an uncompromised tactile experience.
Q: What kind of floor can I use tile stickers on?
Tile stickers are remarkably versatile and can be applied to virtually any flat, smooth floor surface. This includes common bathroom flooring types such as smooth ceramic tile (which we successfully used), porcelain tile, linoleum, vinyl, and even hardwood floors. The crucial prerequisite is a clean, dry, and flat substrate to ensure optimal adhesion and a smooth finish. However, I must caution against using tile stickers on heavily textured tiles, such as slate, travertine, or any tile with a pronounced uneven surface. The stickers require a relatively smooth and consistent surface to bond properly, and textured tiles will prevent full contact, leading to air pockets, uneven wear, and premature peeling.
If you’re applying them over linoleum, vinyl, or hardwood, you have the option to butt the tile stickers directly against each other, completely eliminating the appearance of grout lines for a seamless look. Alternatively, if you prefer the aesthetic of grout lines, you can paint the underlying floor in your desired “grout” color and then space the stickers out slightly to create those defined lines, offering endless customization possibilities.
Q: Can you use tile stickers in showers?
While tile stickers are waterproof and highly durable, I strongly advise against using them inside showers or bathtubs, or any area subject to constant, direct water immersion. My primary concern for such applications revolves around the potential for mold and mildew growth along the minuscule edges of the stickers, especially where water can persistently sit. Furthermore, the use of harsh scrubbing cleaners typically employed for shower maintenance could potentially degrade the adhesive or the vinyl material over time. While some individuals have reportedly used them successfully as decorative accent lines at the very top of a shower wall (where direct water exposure is minimal), for full coverage in wet zones, it’s best to stick with traditional tiling methods.
However, tile stickers are an excellent choice for other bathroom surfaces! They are perfectly suited for updating bathroom wall tiles or creating a stylish backsplash behind a vanity or sink, where they will transform the look without the intense water exposure of a shower enclosure.
Q: How do you clean tile stickers? Can you get water on tile stickers?
This is a common concern, but rest assured, vinyl tile stickers are indeed waterproof! You can confidently clean them just as you would a regular tile floor. Mopping with standard floor cleaners presents no issues whatsoever. If water spills on them, simply wipe it up, and they will be perfectly fine. The key is to avoid overly caustic or abrasive tile cleaners, as these can potentially damage the vinyl finish or the adhesive over prolonged use. A mild soap and water solution, or a gentle, all-purpose floor cleaner, is more than sufficient for everyday maintenance.
Regarding painted grout lines, some people worry about them getting dirty. My perspective is that it’s far easier and quicker to lightly brush on a touch-up coat of paint if needed, rather than engaging in vigorous scrubbing of traditional grout that never truly looks clean again!
Q: What happens if you don’t order the correct size tile stickers?
Having learned this lesson the hard way in our laundry room, I can tell you precisely what will go wrong if you neglect the crucial sizing advice. If your tile stickers are cut too close to the grout line, or worse, if they overlap the grout even slightly, you will inevitably experience issues. The most common problem is that the corners and edges of your tile stickers will begin to peel up. This occurs because the sticker is either adhering to an uneven or sloped part of the tile’s edge, or it’s trying to stick to the porous, often slightly recessed, grout itself. Over time, foot traffic, moisture, and cleaning will exacerbate this, causing the edges to lift, trap dirt, and eventually compromise the entire appearance and durability of the floor.
In our laundry room, this peeling became such a persistent problem that we ultimately decided to install a floating tile floor over the old tiled surface as a more permanent solution. While floating tile is another excellent option for updating floors without demolition, it’s a more involved project than simply applying stickers. Our laundry room experience underscores the absolute importance of proper sizing to avoid headaches down the line.
Overall, we couldn’t be happier with this ingenious option for updating our outdated bathroom tiles. It truly was a quick, easy, and incredibly effective fix, and I adore the endless variety of colors and patterns available to suit any design aesthetic. Tile stickers offer a powerful way to achieve a high-impact transformation with minimal effort and expense.
So, what are your thoughts? Are you ready to embrace the simplicity and transformative power of tile stickers to update your bathroom tile without the hassle and expense of replacing it? It truly is the most straightforward and budget-friendly way to cover old or ugly tile and achieve a completely brand-new, customized look for your space.
More BATHROOM IDEAS
SEE ALL bathroom POSTS
-
Tips for a Budget Bathroom Makeover + Attley’s Bathroom Reveal
-
Cute Bathroom Signs for Your Doors & Walls
-
25 Genius Powder Room Ideas
-
Tiling Over Existing Tile: What You NEED To Know
-
15+ DIY Bathroom Remodel Ideas to Save You Money
-
Everything You Need to Know About Tile Stickers
Here are some other posts you may enjoy for further inspiration:
- Gorgeous But Cheap Flooring Ideas
- DIY Vanity Makeover : Concrete Overlay
- 15 Affordable DIY Countertops That Will Blow Your Mind
- 18+ Budget Friendly DIY Backsplash Ideas
- How to Paint a Tile Backsplash in 5 Simple Steps
Wondering how I approach transforming rooms and spaces in our home from concept to stunning reality? Be sure to check out my comprehensive guide, Designer in a Binder®. It’s designed to make professional-level interior design accessible and simple for every homeowner.
And if you crave exclusive content, behind-the-scenes sneak peeks into our latest projects, and cutting-edge DIY tips delivered straight to your inbox, be sure to subscribe to our newsletter before you leave!