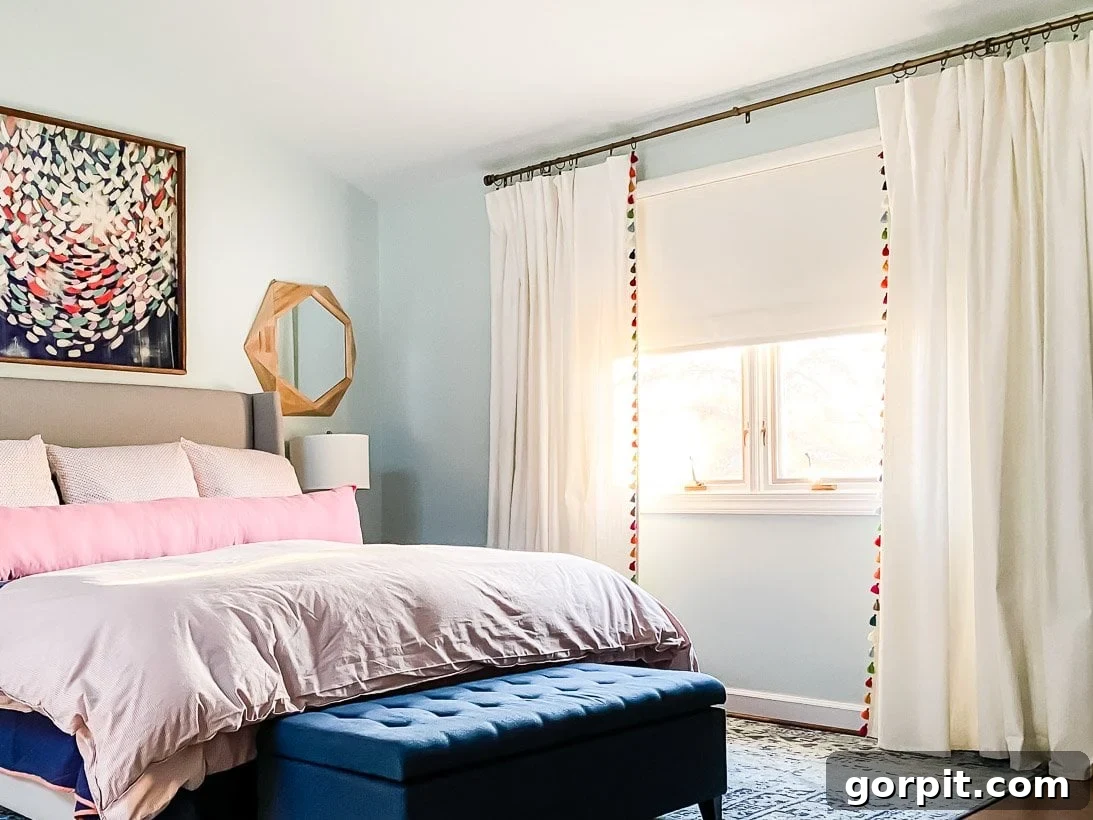
Have you ever dreamed of luxurious, custom curtains but cringed at the astronomical price tag? You’re not alone! Custom window treatments can easily become one of the most expensive elements of a room makeover, often costing hundreds or even thousands of dollars. But what if you could achieve that coveted high-end, custom look for a tiny fraction of the cost, all while adding a unique touch of personality to your space? Prepare to be amazed, because I’ve uncovered an incredibly simple, budget-friendly method to create stunning DIY tassel curtains that look professionally made, even if you’ve never touched a sewing machine in your life!

For years, these eye-catching colorful tassel curtains have garnered countless compliments and questions from friends, family, and online followers. They first graced the windows of the primary bedroom in our previous home, adding a vibrant splash of personality, and later found a new home in our daughter Attley’s room in our current residence, bringing a playful yet chic vibe. The most common question? “Where did you buy them?” And much to many people’s surprise, I can’t simply share a link because, technically, I “made” them myself!
I use the word “made” rather loosely, as the process is far simpler than traditional curtain making. My secret? I merely enhanced pre-made, affordable curtain panels by adding beautiful tassel trim. This ingenious hack delivers the sophisticated appearance of expensive custom curtains without the hefty price tag or the need for advanced sewing skills. It’s truly a game-changer for anyone looking to elevate their home decor on a budget. Ready to transform your windows? I’ve put together this comprehensive, easy-to-follow tutorial so you can create your own personalized tassel curtains and impress everyone with your DIY prowess!
This post contains affiliate links for your convenience. Click here for my full disclosure policy.
DIY Tassel Curtains: Your Ultimate Guide to Affordable Custom Window Treatments
Welcome to the ultimate guide for creating stunning DIY tassel curtains! This tutorial will walk you through every step of transforming basic, inexpensive curtain panels into bespoke window treatments that exude style and charm. Whether you’re a seasoned crafter or a complete beginner, you’ll find this project incredibly rewarding. Say goodbye to plain windows and hello to colorful, custom flair!
Why Choose DIY Tassel Curtains? The Benefits of Custom Style on a Budget
Custom curtains offer unparalleled style and the perfect fit for your windows, but their cost can be prohibitive. This DIY project eliminates that barrier, providing numerous advantages:
- Significant Cost Savings: Pre-made curtain panels are dramatically cheaper than custom-sewn alternatives. Adding trim is a budget-friendly way to achieve a high-end look.
- Personalized Design: With countless colors and styles of tassel trim available, you can truly customize your curtains to match your unique decor and color scheme.
- Beginner-Friendly: This project is designed for everyone. If you can use a sewing machine for a straight stitch, great! If not, high-quality fabric glue works just as effectively, making it a perfect no-sew option.
- Quick & Easy Transformation: You can complete this project in just a few hours, giving your room an instant, impactful update.
- Unique & Eye-Catching: Tassel curtains are a stylish trend that adds texture, color, and a touch of bohemian elegance or playful charm, making your windows a focal point.
Gathering Your Materials: What You’ll Need for Your Tassel Curtain Project
Before diving into the creation process, ensure you have all your supplies ready. Selecting the right materials is key to a successful and beautiful outcome. Here’s a detailed list:
- Pre-made Curtain Panels: The foundation of your DIY project! Choose a color and fabric that complements your room. Opt for panels with a clean, simple edge for easy trim application. I personally recommend these inexpensive yet high-quality panels as a fantastic starting point. Consider the length carefully – typical lengths are 84″, 96″, or 108″.
- Tassel Trim: This is where the magic happens and your curtains get their signature flair! Select a tassel trim that speaks to your style – colorful, monochromatic, small, large, bohemian, or elegant. For 96″ long panels, you’ll need just over 2.5 yards of trim per edge. So, for a pair of curtains with trim on the inner edges, you’d need approximately 5-6 yards total. The vibrant trim I used adds a cheerful pop of color. Make sure to buy enough to cover all the edges you plan to embellish.
- Straight Pins: Essential for holding the trim in place securely before permanent attachment. Look for pins with a ball head for easy handling.
- Sewing Machine OR Fabric Glue: You have options!
- Sewing Machine: If you’re comfortable with basic sewing, a sewing machine offers the most durable and professional finish. You only need to sew a simple straight stitch. I personally love and use this sewing machine.
- Fabric Glue: No sewing skills? No problem! Fabric glue is an absolute lifesaver for this project. It provides a strong, lasting bond and is incredibly easy to use. This particular fabric glue comes highly recommended for its reliability and ease of application.
- Iron and Ironing Board (Optional but Recommended): While I admit to often skipping this step myself (I detest ironing!), a well-pressed curtain panel will provide a smoother surface for applying trim and yield a more polished final look.
- Fabric Scissors: For cleanly cutting your tassel trim to the exact length needed.
Step-by-Step Tutorial: How to Make Your DIY Tassel Curtains
Let’s get started on transforming your plain curtain panels into custom masterpieces! Follow these simple steps for a beautiful result. While written instructions are detailed below, many find visual aids helpful. If you prefer a video walkthrough, a tutorial showcasing this process is often available on the original creator’s platform.
(Video tutorial placeholder: A visual guide to making DIY tassel curtains would typically be embedded here.)
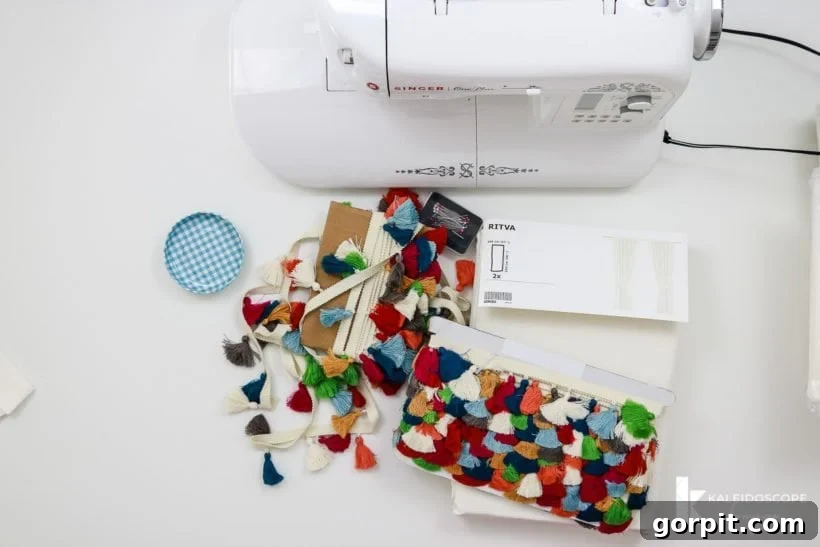
Step 1: Prepare Your Curtain Panels
Begin by gathering all your chosen supplies. Find a large, clean, flat surface—your floor or a spacious table works perfectly. Lay your pre-made curtain panels out side-by-side, mimicking how they will hang on your window. This crucial step helps you determine precisely which edges will receive the decorative tassel trim. Typically, you’ll want to add trim to the inner edges of each panel, where they meet in the middle when closed. Use a piece of chalk, a fabric marker, or even a small sticker to clearly mark these specific edges on each panel.
This is also an opportune moment to iron your curtain panels if they are wrinkled. A smooth, crease-free panel provides the best surface for trim application, ensuring a crisp and professional finish. While I sometimes confess to my aversion to ironing, taking the extra few minutes here truly makes a difference in the overall appearance of your finished curtains.
Step 2: Precisely Pin Your Tassel Trim
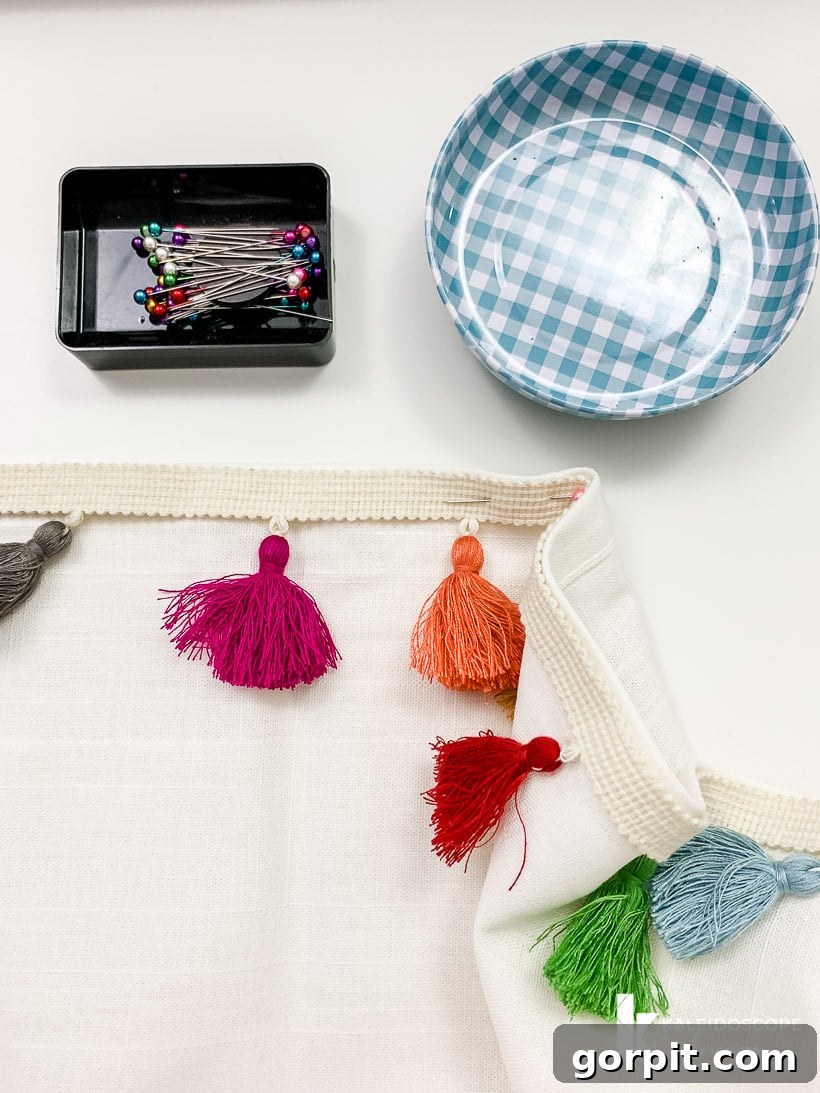
Now, carefully position your chosen tassel trim along the marked edges of your curtain panels. The goal is to align the flat “webbing” or ribbon part of the tassel trim directly onto the edge of your curtain. Use your straight pins to firmly attach the trim into place. Start from the top corner, pinning every few inches down the entire length of the curtain panel.
Pro Tip for a Flawless Finish: Ensure you leave a slight overhang of about 1/2 inch (approximately 1.25 cm) of the trim’s webbing at both the top and bottom ends of the curtain panel. This small overlap allows you to fold the trim neatly over the edge when sewing or gluing, creating a clean, finished appearance that looks truly custom and prevents fraying. Pin securely, making sure the tassels themselves hang freely and are not pinned flat against the fabric.
Step 3: Secure the Tassel Trim (Sew or Glue!)
With your tassel trim perfectly pinned, it’s time to permanently attach it to your curtains. You have two excellent options, depending on your comfort level and available tools:
Option A: Sewing Machine Method (For a Durable Finish)
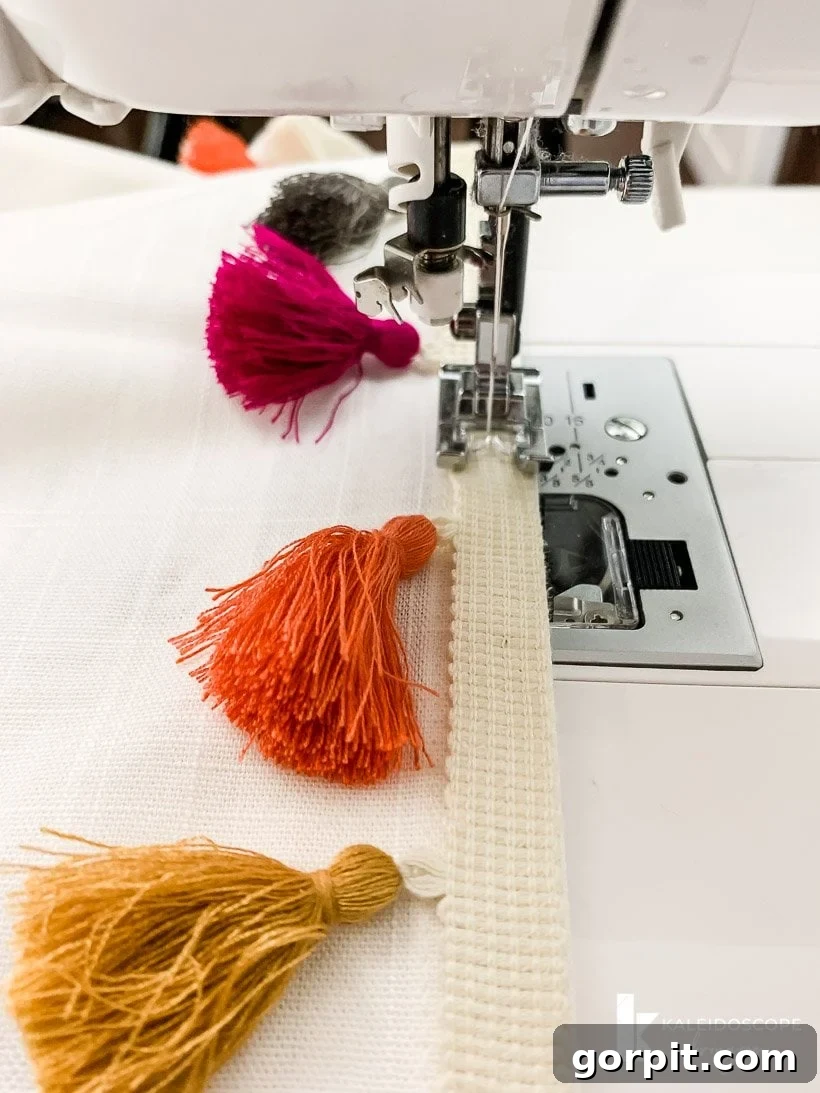
If you have a sewing machine, this method offers the most secure and professional result. I personally prefer sewing mine on. Using a coordinating thread color, sew a straight stitch along the edge of the trim’s webbing, attaching it firmly to the curtain panel. You can choose to attach the webbing on the front of your curtains, making the trim a more prominent feature, or to the back of your panels so that only the delightful tassels peek out, offering a slightly more subtle effect. As you sew, remove one pin at a time just before your needle reaches it, preventing any damage to your machine or uneven stitching. Continue this process carefully down the entire length of the trim until it is fully secured.
Option B: Fabric Glue Method (The No-Sew Secret Weapon)
Don’t have a sewing machine or simply prefer a no-sew approach? Fabric glue is your amazing secret weapon! High-quality fabric glue creates a strong, lasting bond, making it an ideal alternative. Working in small sections, carefully lift a small portion of the trim and apply a thin, even bead of fabric glue to the back of the trim’s webbing. Press the trim firmly onto the curtain panel, holding it in place for a few seconds as the glue begins to set. Remove one pin at a time, just as you would with sewing, and continue applying glue and pressing the trim into place until the entire edge is covered. Be mindful not to apply too much glue, as it can seep through the fabric. Allow ample drying time according to the manufacturer’s instructions, typically several hours or overnight, before handling or hanging the curtains.
No matter which method you choose, the key is patience and precision. Take your time to ensure the trim is attached smoothly and evenly along the entire length of the curtain panel for a truly custom finish.
That’s it! Once your trim is securely attached and any glue has completely dried, your magnificent DIY tassel curtains are ready. Hang them up proudly and step back to admire your handiwork. What do you think of your gorgeous new, high-end window treatments? I bet they look absolutely stunning!

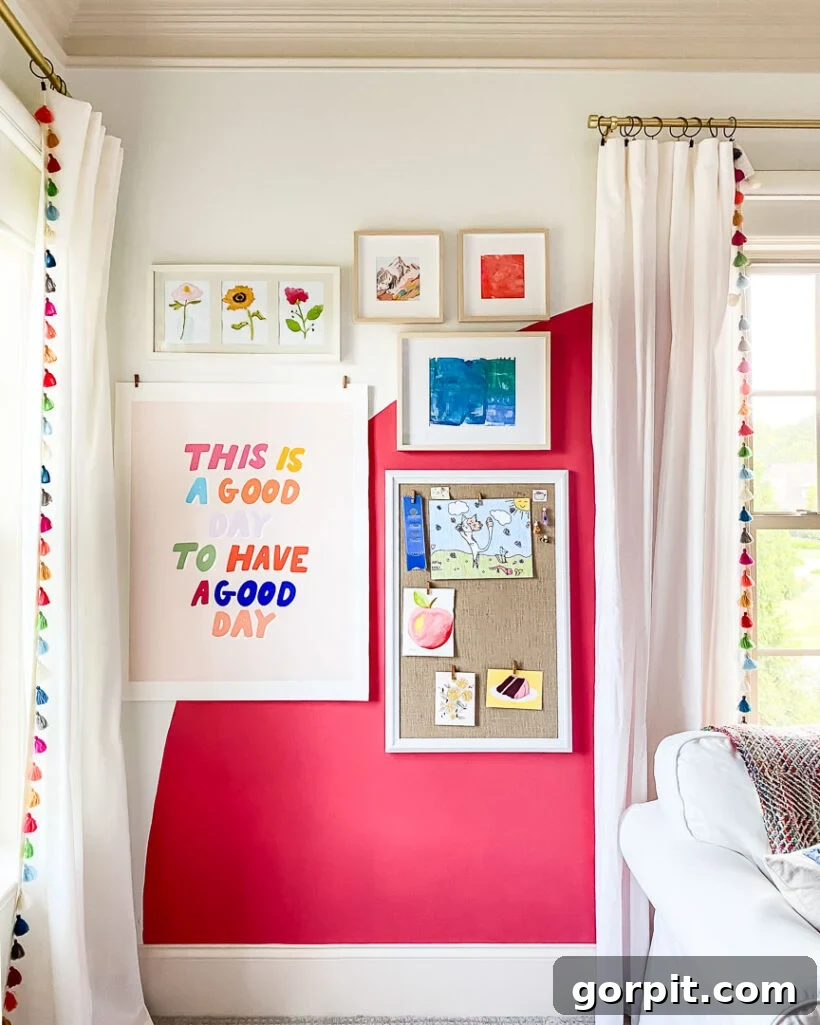
Beyond Tassels: More Creative & Affordable DIY Curtain Ideas
Adding tassels to pre-made panels was definitely not my first adventure in customizing inexpensive, store-bought curtains to achieve a high-end look. The world of DIY window treatments is vast and full of creative possibilities! For instance, I previously created these fantastic no-sew curtains for my daughter’s room several years ago, proving that beautiful results don’t always require a needle and thread.
There are countless brilliant and easy curtain ideas out there that can help you transform your space without draining your wallet. Before you commit to spending a fortune on custom window coverings, I highly encourage you to explore other inspiring options. Check out this curated collection of 22 amazing DIY curtain ideas – you’ll be astonished by how many stunning looks you can achieve with a little creativity and effort!
More DIY Curtains & Home Textile Projects to Inspire You
If you loved this tassel curtain project, you’ll be thrilled to discover more ways to personalize your home with textiles. Explore our other popular DIY guides for curtains, pillows, and more!
SEE ALL TEXTILE POSTS
-
How to Make DIY Curtains With Tassels
-
Cheap & Easy Oversized Lumbar Pillow (No Sewing Skills Needed)
-
How to Make a Pillow Cover With a Zipper
-
22 Amazing DIY Curtains That Look Expensive
-
How to Make Curtains The No-Sew, Lazy Way
-
DIY Bed Canopy from Flat Sheets
Curious about how I approach transforming entire rooms and spaces in our home, achieving a cohesive and stylish look without professional help? You might find my exclusive guide, Designer in a Binder®, incredibly insightful. It’s designed to empower you with the tools and confidence to decorate your home like a pro, all on your own terms and budget.
And if you’re eager for even more exclusive content, behind-the-scenes sneak peeks, and fresh DIY inspiration delivered directly to your inbox, be sure to subscribe to my newsletter before you go! You won’t want to miss out on future projects and design tips.