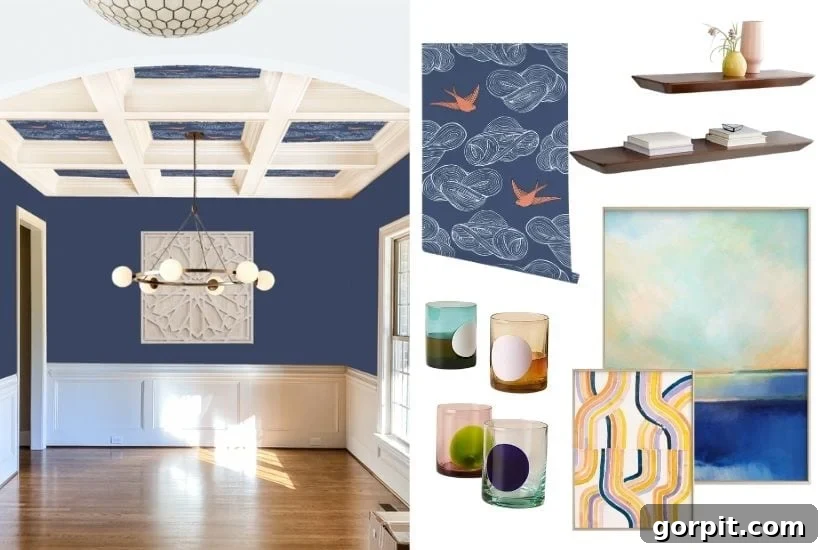
Have you ever invested precious time and money decorating a room in your home, only to step back and feel a pang of disappointment with the final outcome? This common frustration often stems from a lack of a clear, cohesive vision. If you’re seeking a foolproof method to transform your living spaces without unnecessary waste, mastering the art of creating an interior design mood board will empower your decorating journey immensely!
The beauty of a mood board lies in its simplicity and effectiveness. You can craft your very own digital interior design mood boards in mere minutes, even if you consider yourself artistically challenged. Forget about expensive software, complex moodboard creators, or needing advanced graphic design skills. It’s far more straightforward than you might imagine and undeniably crucial for forging a truly cohesive design plan. As a seasoned decorator, I can confidently say I never embark on a room makeover or renovation project without first meticulously creating a mood board. It’s my secret weapon for success!
In this comprehensive guide, I’ll walk you through the essential steps to create an inspiring mood board using Canva. I firmly believe it’s the quickest, most intuitive, and most accessible way for anyone to bring their design visions to life. Canva offers a robust yet completely free platform that simplifies the entire mood board creation process, making professional-looking design achievable for everyone.
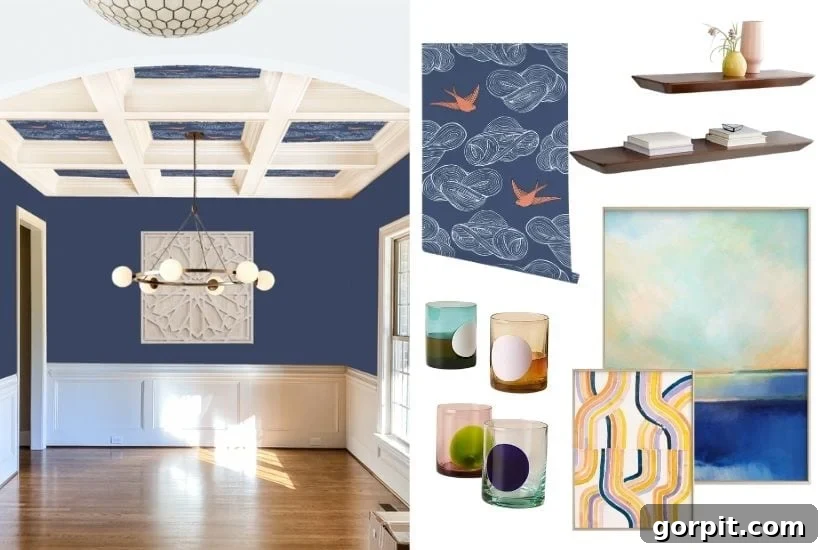
Table of Contents
This post contains affiliate links for your convenience. Click here for my full disclosure policy.
Before we delve into the practical tips and tricks for crafting an impactful interior design mood board, let’s address some of the most frequently asked questions I receive on this topic. Understanding the ‘what’ and ‘why’ will lay a strong foundation for your design success!
What is an Interior Design Mood Board?
Mood boards are known by various names – you might hear them called design boards, inspiration boards, or even concept boards. Regardless of the terminology, an interior design mood board serves as a powerful visual tool. It’s essentially a curated collection of images representing various design elements, meticulously arranged to illustrate your desired aesthetic for a specific room or space. Think of it as your room’s visual blueprint, capturing its essence before any physical changes are made.
Historically, interior designers would meticulously assemble physical mood boards for their clients, using actual paint swatches, fabric samples, wallpaper snippets, and printed images affixed to large foam boards. These tangible collages helped clients visualize the proposed design. However, with the advent of digital tools and the internet, digital mood boards have become the industry standard. They offer unparalleled flexibility, ease of sharing, and the ability to rapidly swap out elements, making the design process more dynamic and efficient.
Ultimately, a well-executed mood board resembles a sophisticated visual collage. It powerfully communicates textures, outlines precise color palettes and schemes, and conveys the overall style and atmosphere you aim to achieve. By creating a mood board, you gain incredible clarity about the direction of your room design. This vital step helps you confirm your choices and avoid costly mistakes, ensuring every purchase contributes to your overarching vision without wasting valuable time or money.
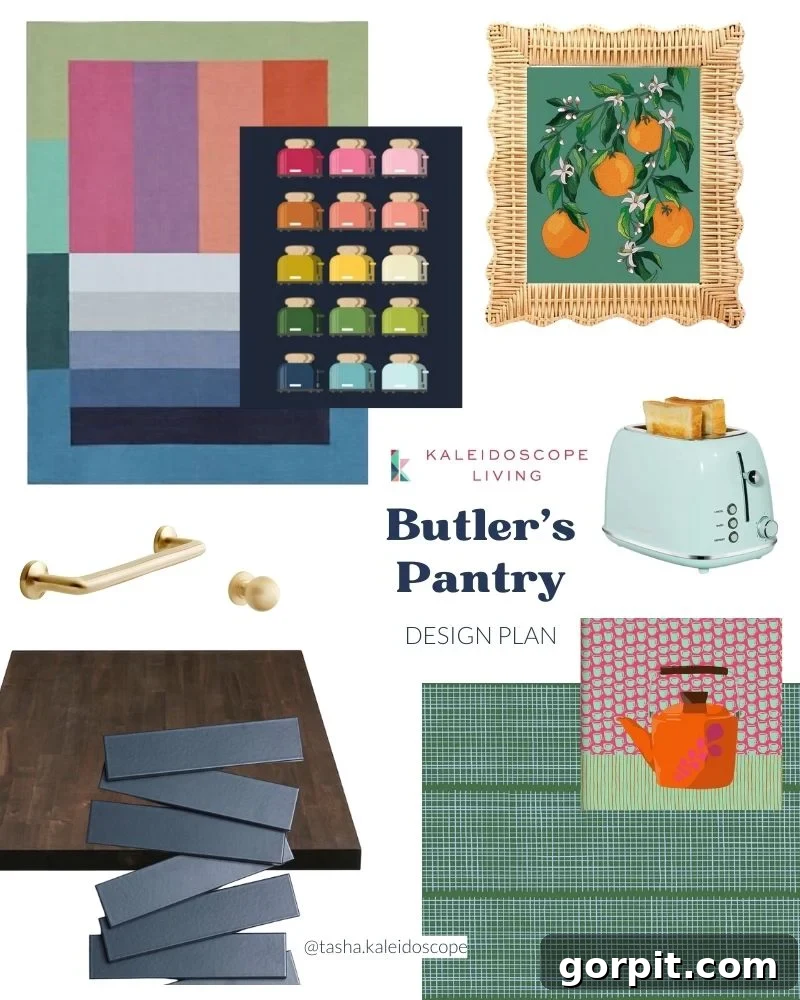
Here is an example of a mood board that I recently put together when designing our butler’s pantry area. Notice how different elements come together to form a cohesive picture:
Why Are Mood Boards Essential for Any Design Project?
My personal design process for transforming rooms in my home is very specific and outlined in detail within my eBook and workbook, Designer in a Binder. A non-negotiable step in this process is always the creation of a mood board. This practice is particularly invaluable for my husband, who, like many, finds it challenging to visualize abstract design ideas without seeing all the proposed elements harmoniously arranged together. It bridges the gap between a concept and a tangible reality.
And it’s not just my husband; a vast majority of people struggle to fully conceptualize a space until they have a visual design board to reference. This is precisely why one of my foremost interior design tips is to always dedicate time to crafting a design board for every single space you intend to work on in your home. Skipping this crucial preparatory step is, in my professional experience, one of the most significant and common interior design mistakes people make, often leading to costly re-dos and dissatisfaction. You can dive deeper into other pervasive design pitfalls in this insightful post about common interior design mistakes.
So, why do so many eager DIY decorators overlook this critical step? There are typically two main reasons: 1) A lack of awareness about what a mood board is and how it functions, or 2) A false assumption that specialized, expensive software and advanced graphic design skills are prerequisites for creating one. The excellent news is that both of these misconceptions are easily dispelled! You can create professional-grade digital design boards absolutely for FREE and without possessing any specific software expertise or design background. This accessibility is what makes mood boards such a powerful tool for everyone.
Choosing the Right Program for Your Mood Board
The landscape of tools available for creating mood boards is quite broad. Design professionals often utilize sophisticated Adobe software like Photoshop or Illustrator for their intricate projects. Additionally, platforms such as DesignFiles cater specifically to interior designers, enabling them to seamlessly create and share mood boards, detailed source lists, and proposals with their clients, streamlining client communication and project management.
However, for the vast majority of homeowners and DIY enthusiasts, I unequivocally recommend using Canva to create your interior design mood boards. Its user-friendly interface and robust features make it the ideal choice. All you need to do is sign up for a free account to unlock its powerful capabilities. For instance, I recently created the mood board for my dining room earlier this week using Canva, showcasing how effortlessly a complex vision can be compiled into a clear, actionable plan. While Canva does offer a Pro version with expanded features like background removal, its free tier is more than sufficient for most personal design projects.
Do I Need Graphic Design Skills to Create Design Boards?
Absolutely not! Let me reassure you with a pinky promise: my twin girls were confidently creating their own mood boards by the time they were just 8 years old. This goes to show how intuitive and accessible the process can be. While being comfortable navigating a computer and basic drag-and-drop functions will certainly help you move more quickly and efficiently, no formal graphic design training or artistic talent is required. The primary goal of a mood board is clarity and communication of your vision, not achieving a masterpiece of digital art. Focus on the content and the overall feel, and Canva will handle the rest.
Preparing for Your Mood Board: First Steps
Before you even open a program like Canva, it’s crucial to lay a solid foundation for your design project. Begin with thoughtful introspection. Consider what you genuinely like and dislike about your current room, how you envision the space being used (e.g., a serene reading nook, a vibrant family hub, a sophisticated dining area), and critically, what emotional atmosphere you wish to cultivate – do you want it to feel relaxing, energizing, cozy, or minimalist? Equally important is establishing a realistic budget, as this will guide your selections and prevent overspending down the line.
Once you’ve clarified these foundational aspects, it’s time to embark on an exciting hunt for inspiration. Pinterest is an incredible resource for this stage. I highly recommend creating a dedicated board for the specific space you’re working on and saving any images that capture your attention or resonate with your desired aesthetic. Beyond Pinterest, explore interior design magazines, blogs, and even real-life spaces that you admire. After you’ve amassed a collection of inspiring images, take the time to critically study them. Look for common threads, recurring themes, specific color palettes, textures, furniture styles, and overall vibes that consistently draw you in. This analytical step is a fantastic way to instinctively discover your true design preferences without overthinking or second-guessing yourself.
If you find yourself struggling with these initial, yet critical, planning steps, fear not! My workbook, a component of Designer in a Binder, provides separate, easy-to-follow worksheets that guide you through each stage, ensuring you build a robust foundation for your design project.
Key Elements to Include in Your Mood Board
Once you’ve gathered your inspiration and either purchased specific pieces, or located high-quality photos of items you plan to incorporate (including those you already own), the primary requirement for creating your mood board is simply having all these images saved to a readily accessible folder on your computer. The comprehensiveness of your mood board will directly impact its effectiveness as a planning tool.
Below is a comprehensive list of design elements you should strive to include images of on your mood board to ensure a holistic and accurate representation of your final vision:
- Flooring: Whether you’re planning new flooring or working with existing, include an image. You can often find suitable stock images in Canva that closely mimic your current flooring if you’re not changing it and don’t have a direct image.
- Wall Treatments: Include a paint color swatch, wallpaper sample, or an image representing any other wall treatment you envision.
- Rugs: If using, incorporate images of your chosen area rug(s), considering their pattern, texture, and size.
- Textiles: This category is broad and impactful. Include images of curtains, throw pillows, blankets, upholstery swatches for furniture, and bedding. Pay attention to how patterns and textures interact.
- Light Fixtures: Overhead lights, lamps, sconces – all contribute significantly to the mood and functionality.
- Furniture and/or Appliances: Major pieces like sofas, dining tables, beds, cabinets, and any significant appliances should be represented.
- Hardware: Don’t overlook details like cabinet pulls, door handles, or curtain rods; they contribute to the overall aesthetic.
- Decor and Accessories: Artwork, mirrors, vases, plants, sculptures, and other decorative objects help define the room’s personality.
- Windows: Images of window styles or specific treatments like blinds or shades can be important.
Step-by-Step Guide: How to Make a Mood Board Using Canva
Before you fully immerse yourself in the creative process of making your own mood board, I highly recommend watching the detailed video tutorial I’ve prepared for you. There’s truly nothing as beneficial as observing a live demonstration to grasp the nuances. You can expand the video to view it in full-screen mode for optimal clarity. Additionally, I have meticulously written out comprehensive instructions below the video for your convenience.
(Video tutorial on how to create a mood board using Canva would be embedded here.)
Time needed: 15 minutes
Follow the directions below to effortlessly create your own professional interior design mood board using Canva!
- Create a Free Canva Account (or Log In).
Your first step is to establish a free account with Canva if you haven’t already. Head over to Canva’s website and sign up. Once registered, log in to access your creative workspace.
- Select Your Design “Canvas.”
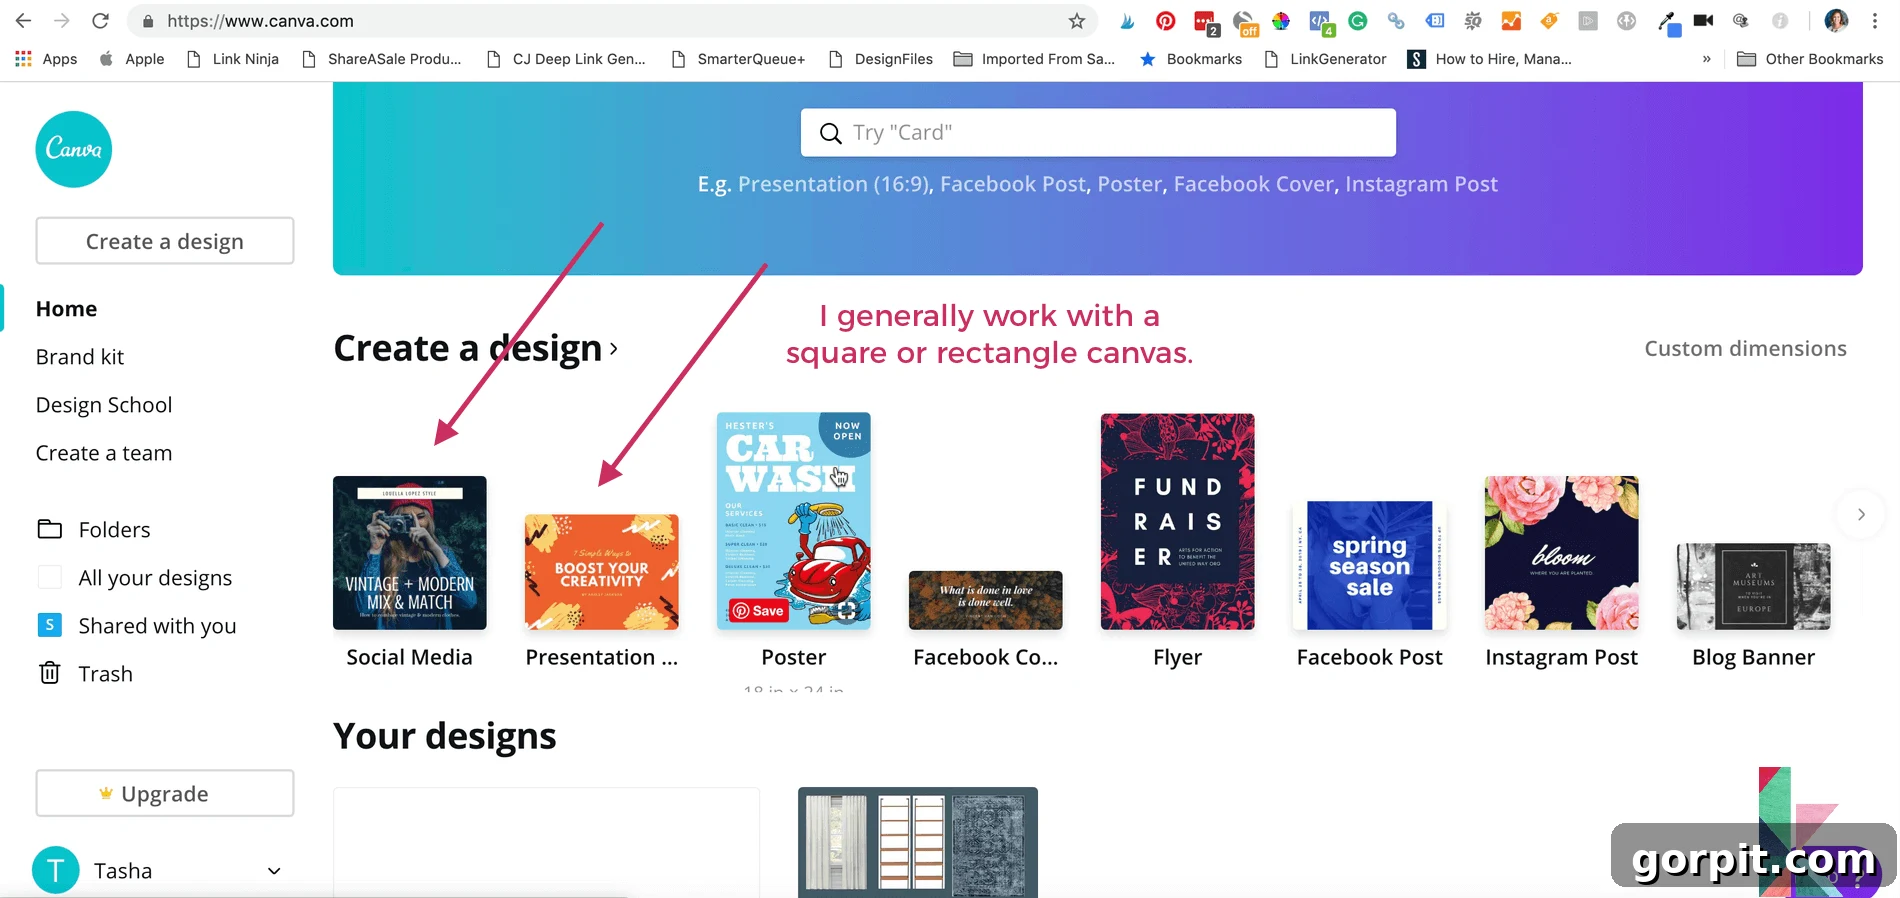
When creating interior design mood boards, I typically find that a square or rectangular canvas offers the most versatility for arranging various design elements. However, if you plan to share your mood board on platforms like Instagram Stories or Pinterest, a vertical template might be more suitable for optimal presentation. Canva provides a range of blank templates, allowing you to choose the dimensions that best fit your project and sharing intentions. This flexibility ensures your mood board looks great wherever it’s displayed.

- Organize and Save Your Images.
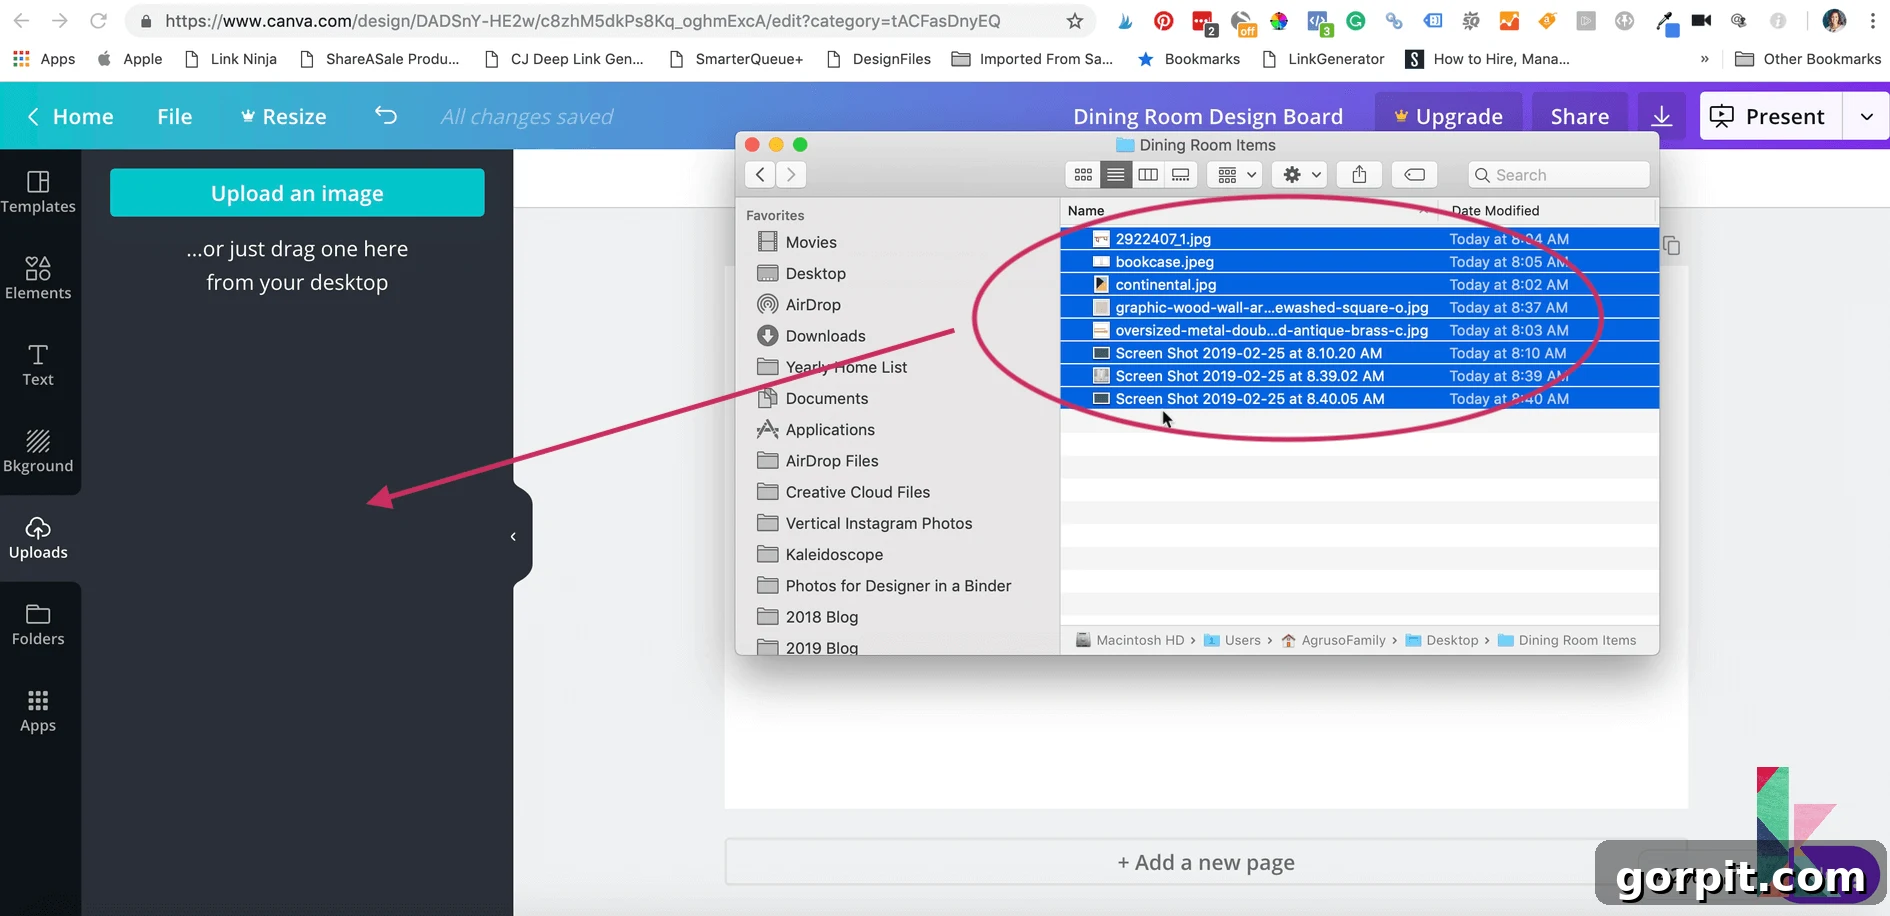
Before uploading, ensure that all the images of the items you wish to feature in your design – whether they are new purchases, existing furniture, or inspirational elements – are neatly saved into a dedicated folder on your computer. Naming your image files clearly will also significantly help with organization once they are in Canva. High-quality images downloaded from retailer websites or design blogs will yield the best results.
- Upload Your Images to Canva.
Now, navigate to the “uploads” section within Canva. You can easily transfer all your saved photos by clicking and dragging them directly into this area. Alternatively, use the upload button to select them from your computer. Canva will quickly process and store these images, making them ready for you to incorporate into your design.
- Arrange Elements on Your Digital Canvas.
Begin populating your mood board by dragging and dropping each item onto your chosen canvas, one at a time. Once an image is on the canvas, you have complete control. Resize elements by simply clicking and dragging their corners. Utilize the crop tool to trim unnecessary parts of an image or the rotate tool to adjust its orientation. Experiment with overlapping and layering elements to create depth and visual interest.
- Refine and Adjust Until Satisfied.
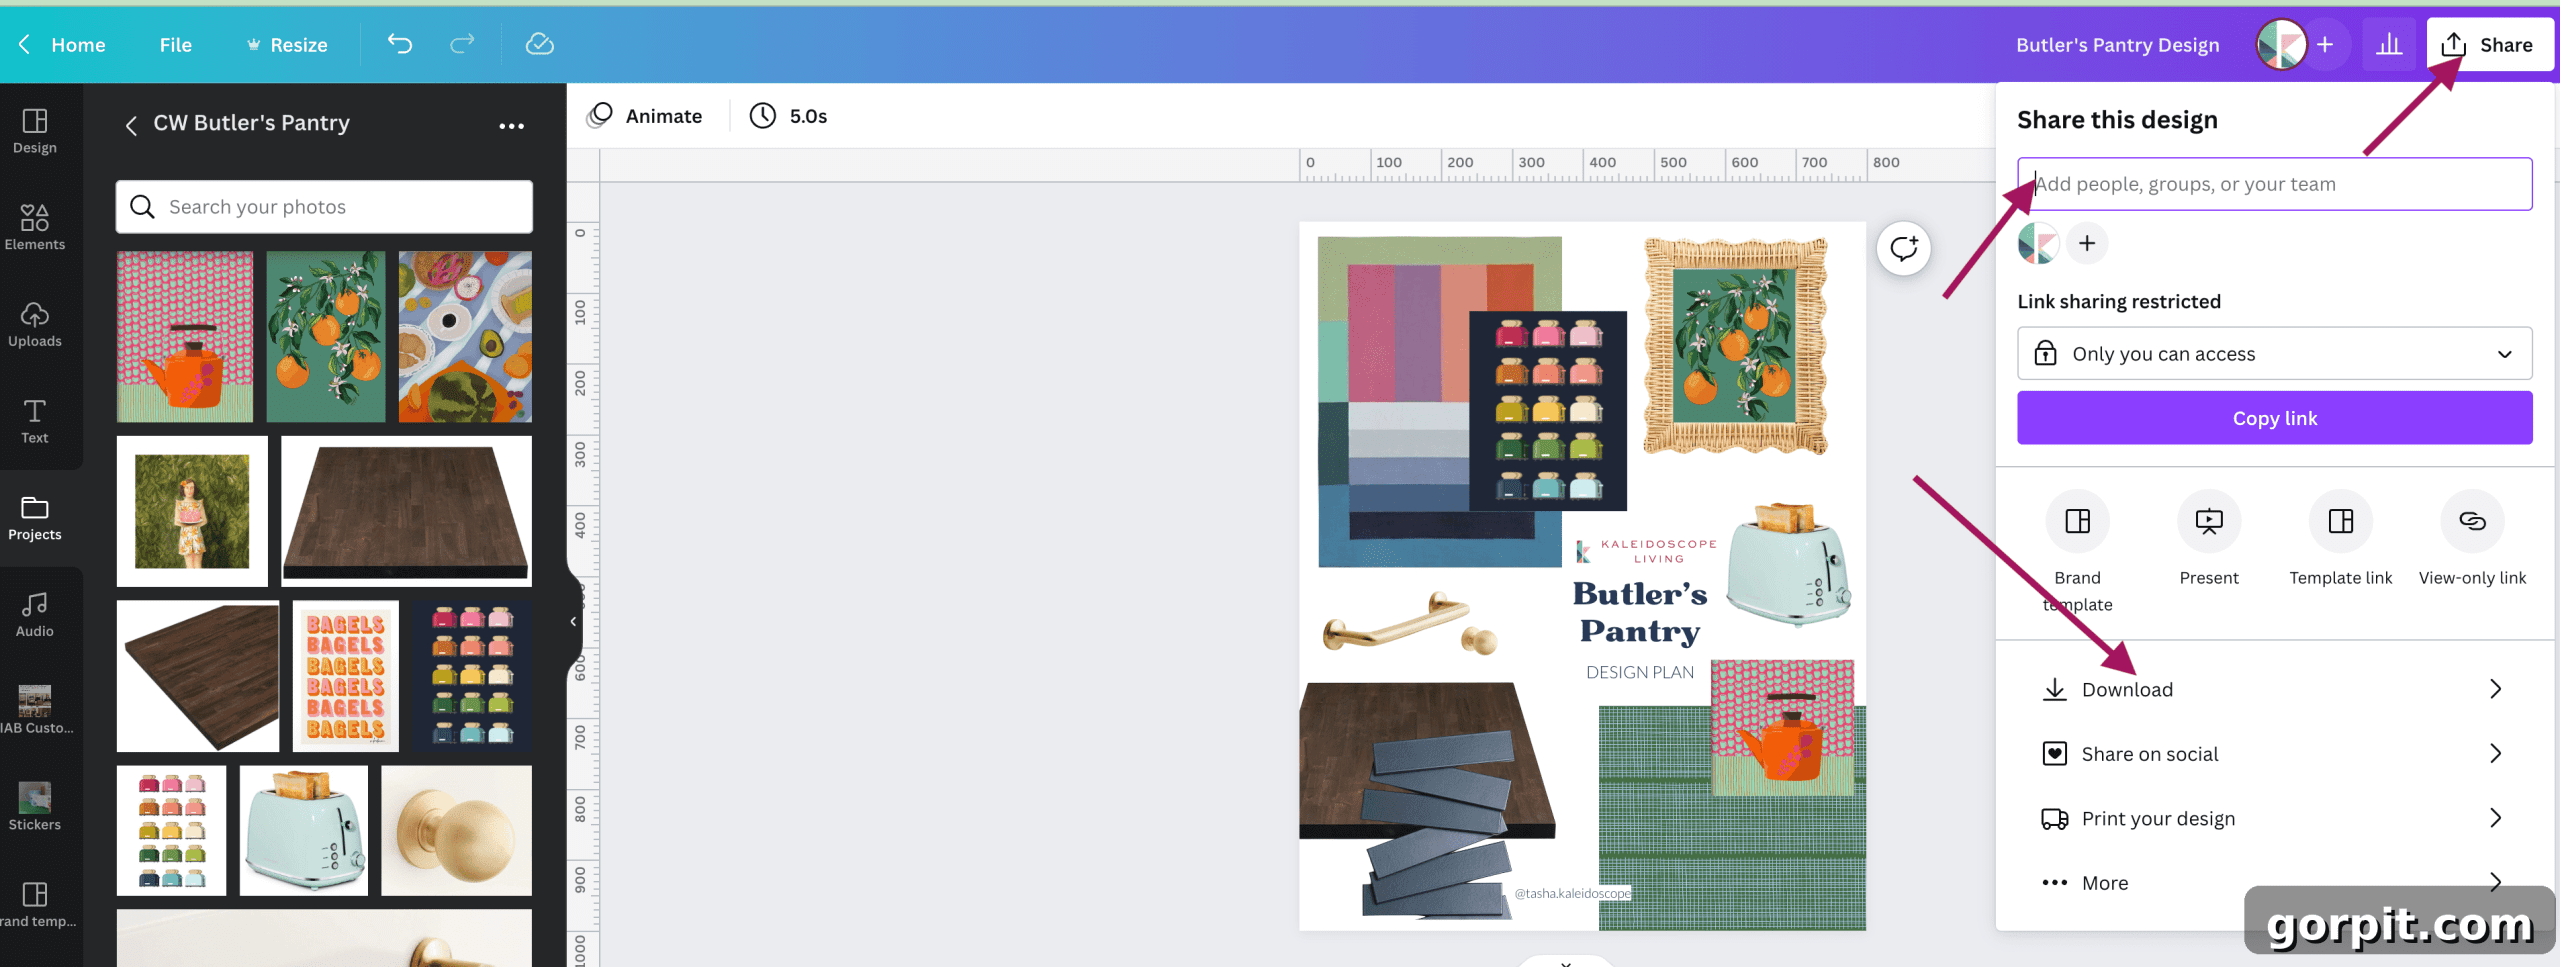
This is the iterative and creative part of the process. Move and resize your elements, experimenting with different layouts until you are completely satisfied with how your design board looks. Pay attention to balance, visual flow, and how the colors and textures interact. Don’t be afraid to rearrange things multiple times. Once your mood board perfectly reflects your vision, click the download button (located next to the share button) in the upper right corner of your screen and save your design board as a .jpg file to your preferred location. Remember, you can always log back into Canva to make further edits at any time.
- Enhance by Removing Image Backgrounds.
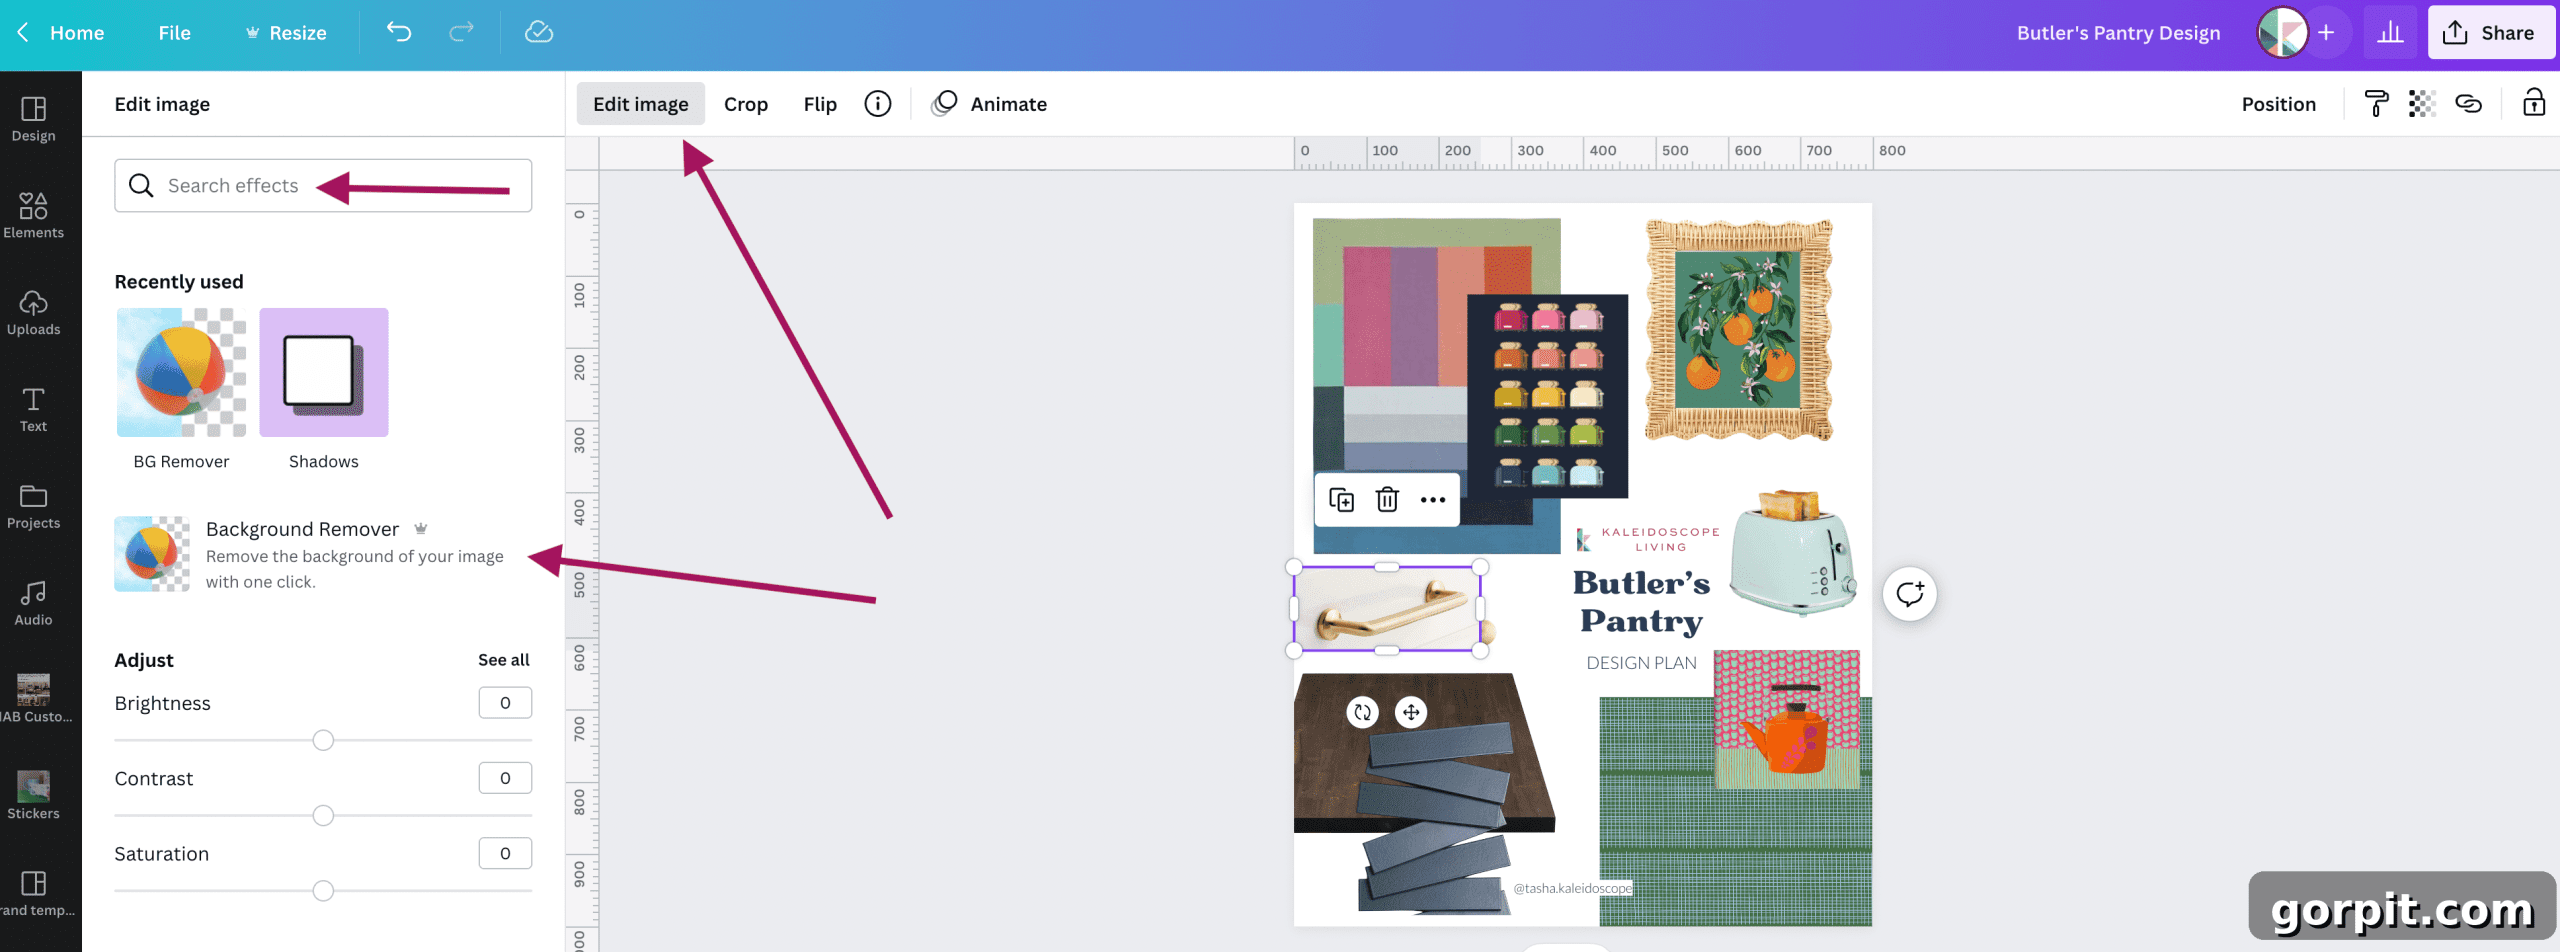
Distracting backgrounds can detract from the professionalism and clarity of your mood board. I highly recommend removing them to give your images a clean, crisp look. If you have a Canva Pro account, this step is incredibly simple: select an image, click “Edit Image,” then use the search box to find and apply the “Background Remover” tool. With a single click, the background will vanish, leaving you with a perfectly cut-out item.
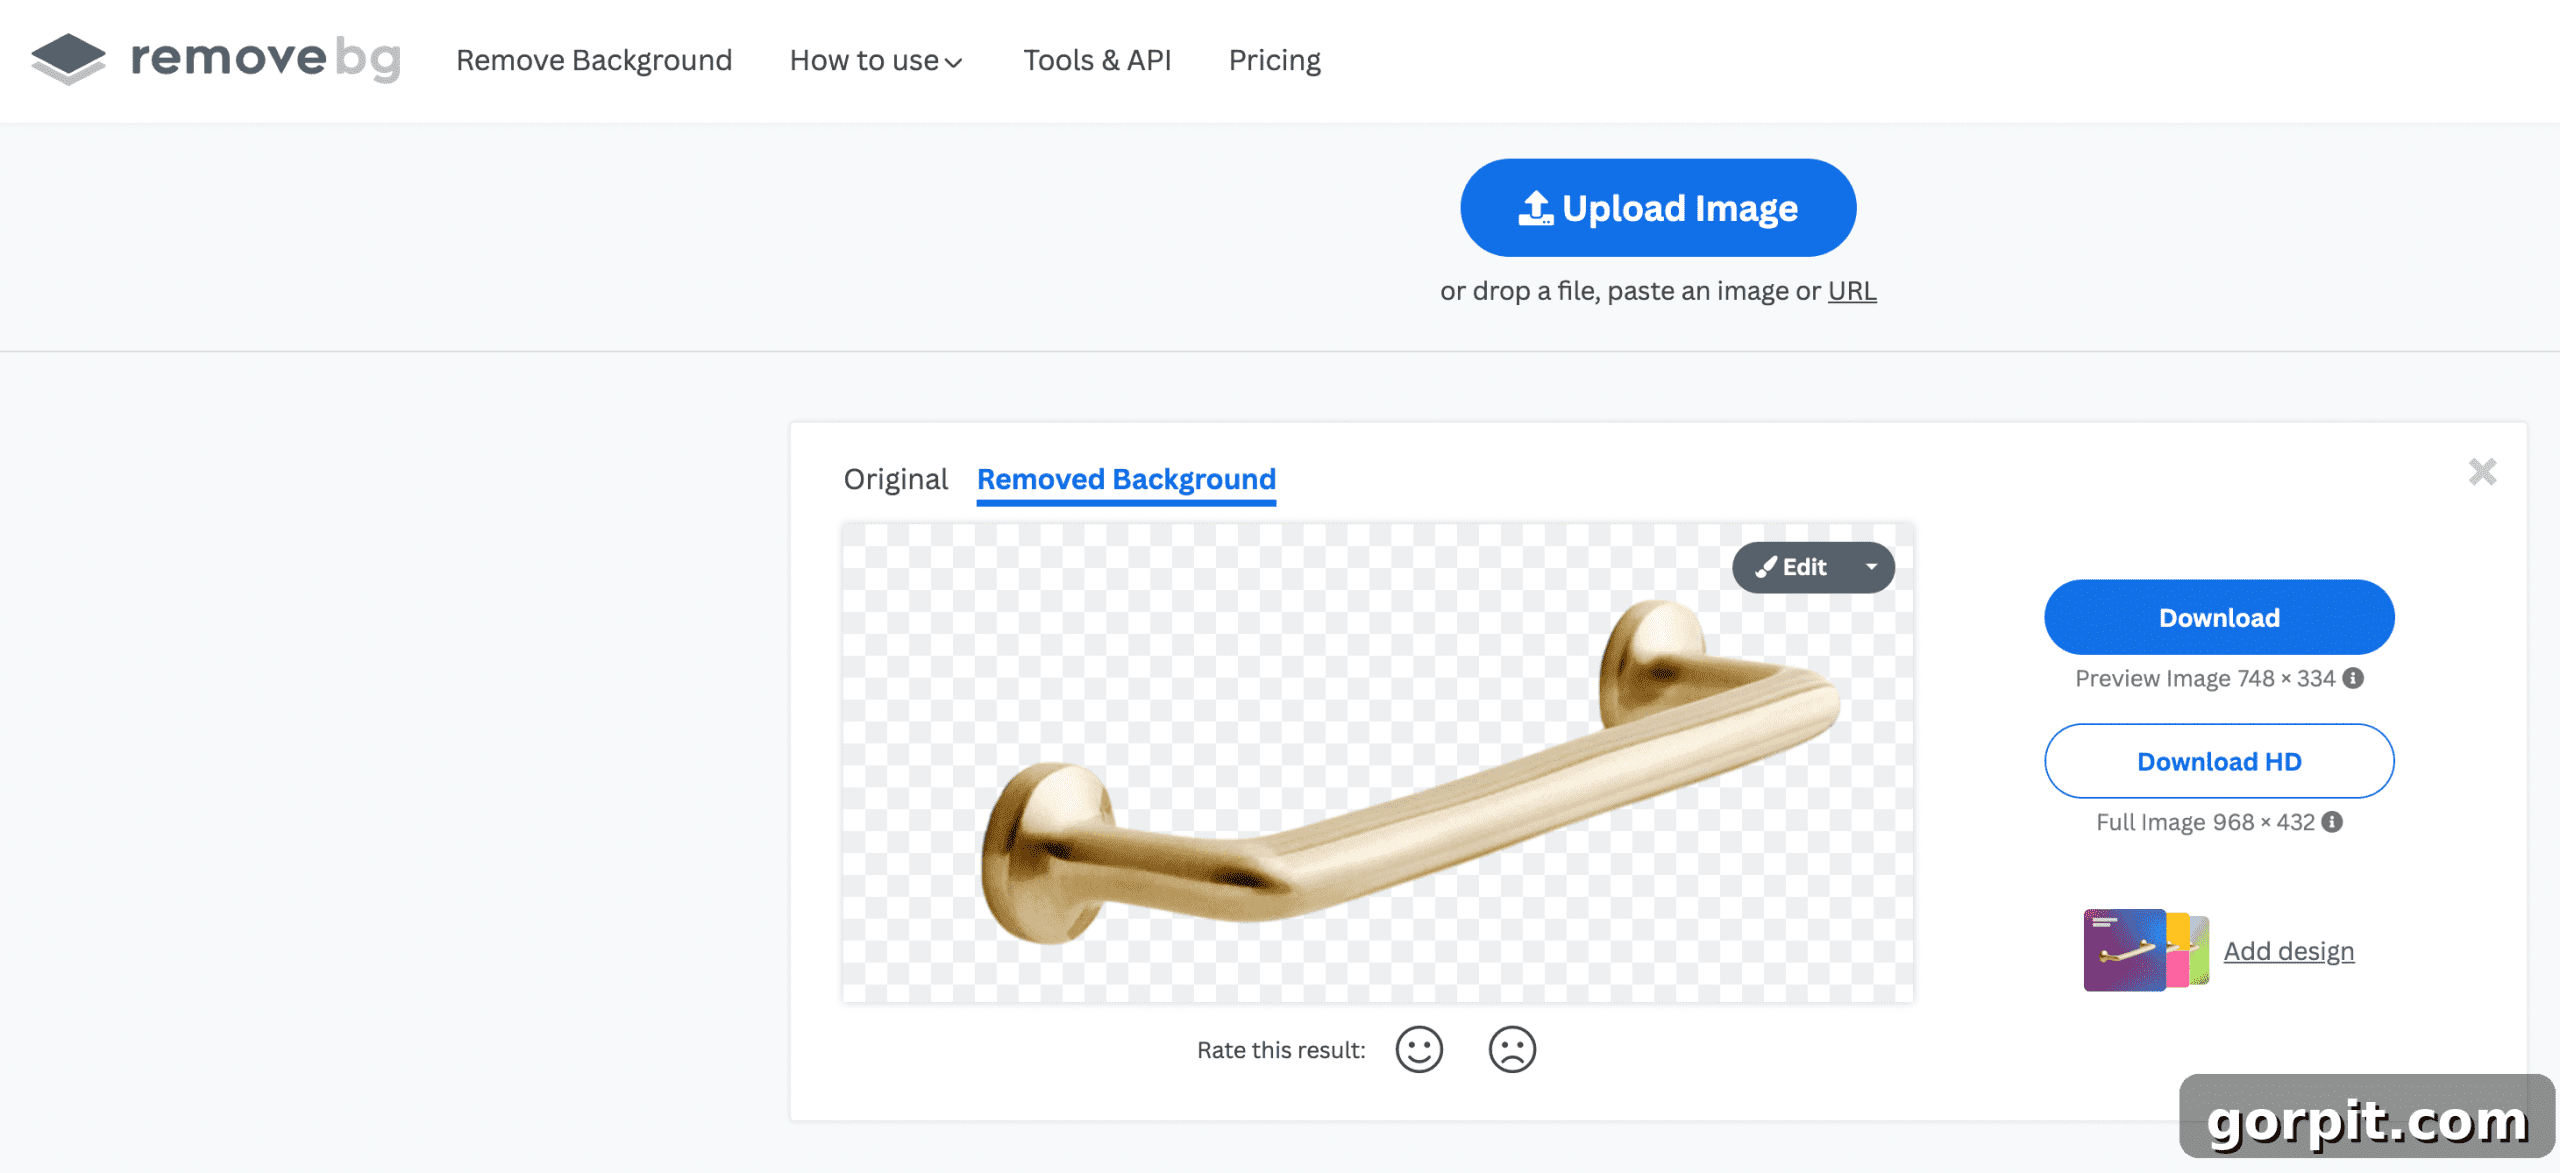
If you’re using the free version of Canva, an excellent alternative is remove.bg. This free website allows you to upload a photo and instantly remove its background with just one click – no account or login required! After the background is removed, you can download the clean, transparent image and then upload it to your Canva project. This simple step elevates the overall aesthetic of your mood board significantly.
- Download or Share Your Completed Mood Board.
Once your mood board is perfected and ready, click the “Share” button located in the upper right-hand corner of your screen. From here, you have several options: you can directly share the design with collaborators or clients via their email addresses, or you can download your finished design. Choose your preferred file format (JPEG for web, PNG for higher quality/transparent backgrounds, or PDF for print-ready) and save it to your computer. Your cohesive design plan is now ready to guide your decorating adventure!
I sincerely hope you found this guide incredibly helpful and empowering. By integrating mood boards into your design process, you’ll approach every space in your home with newfound confidence and clarity, achieving results you truly love. No more wasted effort or disappointing outcomes – just beautifully designed rooms!
Before you head out, explore these other popular posts to further enhance your interior design skills:
- 8 Interior Design Mistakes You Don’t Even Know You are Making (and How to Fix Them)
- How to Choose Paint Colors for Your Home: 5 Simple Tips to Follow
- How to Choose An Area Rug: Rug Placement & Size Guide
- How to Make a Small Room Look Bigger: 9 Simple Tricks
- How to Choose An Area Rug: Rug Placement & Size Guide
Curious about my holistic approach to transforming rooms and spaces in our home? Discover the entire process and unlock your inner designer with Designer in a Binder®.
And for exclusive content, behind-the-scenes sneak peeks, and fresh design inspiration delivered straight to your inbox, be sure to subscribe before you leave!