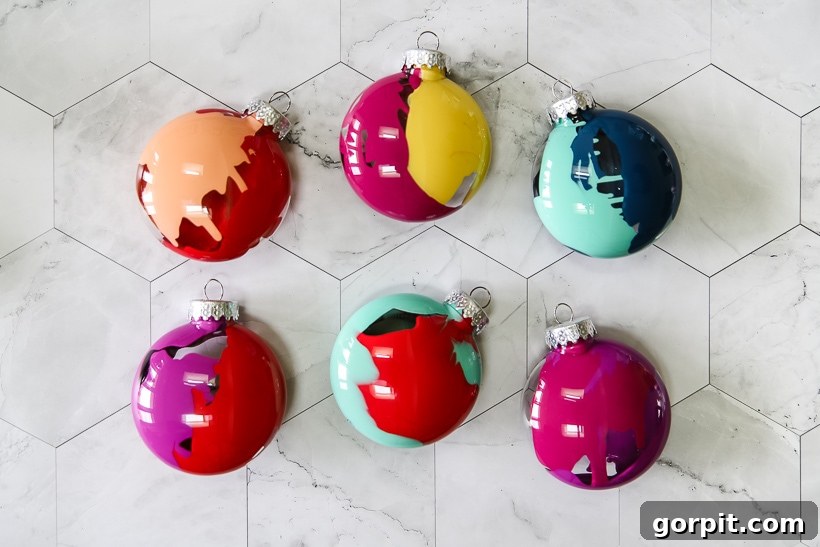
Transform your holiday decor with this incredibly easy, budget-friendly, and absolutely stunning method for crafting your own DIY Christmas ornaments! This creative technique produces a mesmerizing, vibrant marbling effect, and here’s the best part: absolutely no special skill or prior crafting experience is required. These ornaments are wonderfully simple, making them a fantastic activity for kids of all ages, and they double as thoughtful, personalized gifts that friends and family will cherish for years to come.
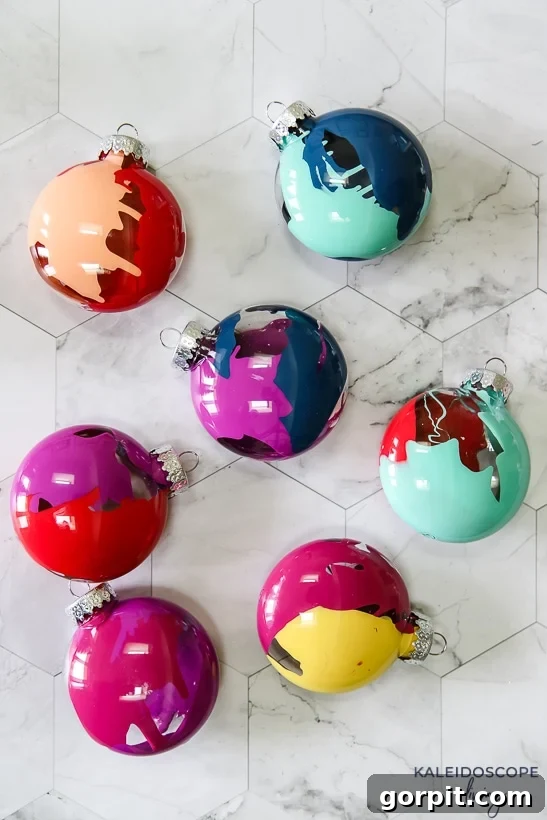
I couldn’t be more thrilled to share this tutorial for making these incredibly colorful and fun DIY Christmas ornaments. This project started without high expectations, proving that sometimes the best creations come from unexpected places and a dash of spontaneity.
My journey into crafting these beautiful ornaments began with a serendipitous find: a sale on plastic ornaments, marked down 70% from their already low price. I scooped them up, not entirely sure what creative endeavor they would inspire. At the same time, I grabbed an assortment of colorful acrylic paints, with a vague idea that perhaps I’d simply paint the ornaments. Little did I know, this simple purchase would lead to one of my all-time favorite holiday crafts.
The very next day, my girls declared themselves “bored” – a common refrain that often signals the start of a new adventure in our home. I playfully asked if they’d like to paint ornaments, and their enthusiastic “yes!” set the stage for what became an instant hit. This project has since earned a spot among my most cherished DIYs, primarily because of its simplicity, stunning results, and incredible affordability. Best of all, these unique, handmade ornaments make truly wonderful and memorable gifts for anyone on your holiday list.
Crafting Joy: The Ultimate Guide to DIY Marbled Christmas Ornaments
Creating your own Christmas ornaments isn’t just a craft; it’s an opportunity to infuse your holiday season with personal charm, creativity, and a touch of magic. Handmade decorations tell a story, evoke cherished memories, and offer a warmth that store-bought items simply can’t replicate. This project, in particular, stands out for its unique marbled finish, which looks sophisticated and complex but is surprisingly simple to achieve.
Beyond personalizing your own tree, these vibrant ornaments are perfect for:
- Thoughtful Gifts: Present them to teachers, neighbors, friends, and family for a truly personal touch.
- Kids’ Craft Sessions: Keep little hands busy and spark their creativity during school holidays.
- Budget-Friendly Decor: Achieve a high-end look without breaking the bank, especially when materials are on sale.
- Holiday Party Favors: Send guests home with a beautiful reminder of your festive gathering.
This post contains some affiliate links for your convenience. Click here to read my full disclosure policy.
DIY Colorful Marbled Christmas Ornaments Tutorial: Step-by-Step Guide
Ready to dive into this delightful project? Here’s everything you’ll need and how to bring your marbled ornament vision to life. This process is designed to be accessible for everyone, from seasoned crafters to complete beginners and even toddlers (with a little supervision, of course!).
Materials Needed: Crafting Your Marbled Masterpiece
Gathering your supplies is the first exciting step in any DIY project. For these marbled ornaments, you’ll find that the materials are not only affordable but also likely items you might already have on hand, or easily accessible at your local craft store or dollar store.
- Inexpensive Plastic Ornaments (like these): Opt for clear, plain plastic or acrylic ornaments. These are ideal because they are durable (no shattered glass disasters!), kid-friendly, and very budget-conscious. You can often find them at The Dollar Store, Walmart, Target, or craft stores like Michaels or Hobby Lobby, especially during major clearance sales after the holiday season. The transparency of the plastic is crucial as it allows the vibrant paint colors to truly shine through, creating that captivating stained-glass effect. Consider different shapes too, like spheres, ovals, or even flat discs, to add variety to your collection.
- Acrylic Paints in Your Favorite Colors: This project is a fantastic way to use up those leftover acrylic paints you might have from other crafts! Acrylic paints are perfect because they are fast-drying, water-soluble for easy cleanup, and available in an endless spectrum of vibrant hues. Choose colors that complement each other or go bold with contrasting shades for a dramatic effect. For a truly marbled look, aim for 2-3 colors per ornament. Avoid using too many colors as they might blend into a muddy mess. Metallic or glitter acrylic paints can add an extra sparkle!
- Paper Towels or Napkins: These are essential for two key reasons: covering the ornament opening during shaking to prevent paint from splattering everywhere, and for setting the ornaments upside down to dry, allowing excess paint to drain. Make sure to have a generous stack handy for both the process and potential cleanups.
- Optional Materials to Enhance Your Ornaments:
- Ribbon or Twine: For hanging your finished ornaments or adding a decorative bow.
- Glitter or Embellishments: If you want to add extra sparkle once the paint is dry.
- Clear Sealer Spray: To protect the paint and give it a glossy finish (optional, as acrylic paint is quite durable).
- Plastic Cups or Small Bowls: For holding ornaments upside down while drying.
- Gloves: To keep your hands clean, especially when crafting with kids.
Steps: Creating Your Colorful Marbled Ornaments
Now that you have all your materials, let’s dive into the fun and surprisingly simple process of creating these gorgeous marbled ornaments. Remember, there’s no right or wrong way – embrace the spontaneity and enjoy the creative journey!
1) Prepare Your Ornament: Carefully remove the metal hanger and cap from the top of your plastic ornament. Set it aside in a safe place, as you’ll need it again for the final step. Removing the hanger provides a clean opening for squirting in the paint and ensures an even coating inside the ornament.
2) Introduce Your First Color: Select your first paint color. Gently squeeze a small amount (about a quarter-sized dollop for a standard round ornament) of this paint into the opening of your ornament. You don’t need a lot – just enough to coat a portion of the interior when spread. Try to aim for the inside wall rather than letting it pool directly at the bottom.
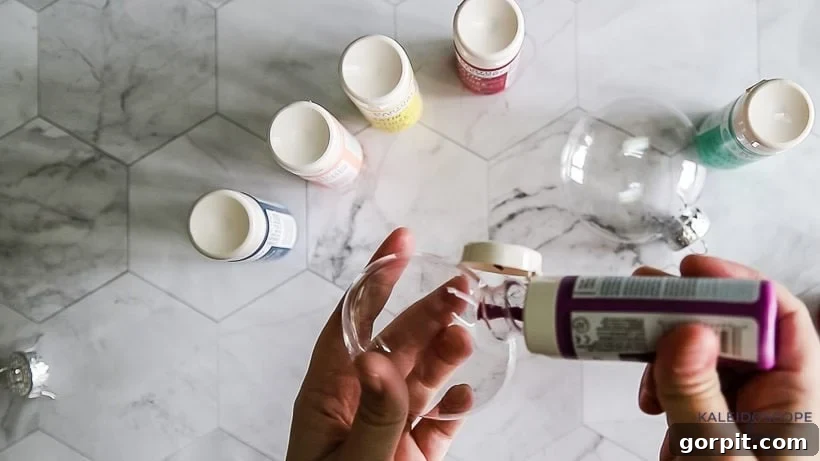
3) Begin the Marbling Magic with Your First Color: Once the first color is inside, cover the opening with a piece of paper towel or a napkin. Hold it firmly in place to prevent any paint from escaping. Now, the fun begins! Shake, swirl, tap, and gently bang your ornament around. The goal is to spread the paint across the entire interior surface of the ornament, creating a random, organic pattern. Experiment with different motions – a gentle swirl will create soft streaks, while a more vigorous shake might produce unique splatters and lines. Continue until you’re happy with how the first color has coated the inside of the ornament. Don’t worry about perfect coverage; the beauty of marbling is its imperfection.
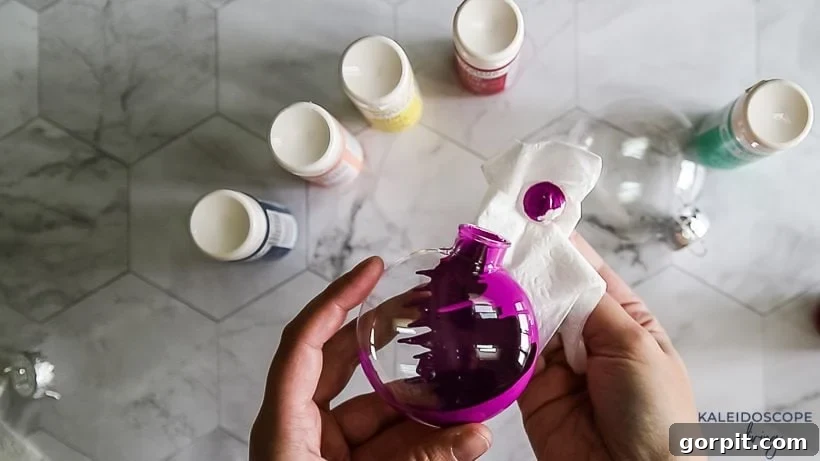
4) Introduce Your Second Color (and marble again!): Now, repeat the process with your second color. Squirt a similar small amount of paint into the ornament. For best results and to maintain distinct marble patterns, try to squirt the second color into an area that your first color didn’t fully cover. This helps prevent the wet paints from mixing too much, which can sometimes result in “muddy” or less vibrant colors. Once the second color is inside, cover the opening again with a clean piece of paper towel or napkin and resume your shaking, swirling, and tapping routine. Observe as the two colors blend and swirl, creating unique patterns. You can even add a third color if you wish, repeating the same steps. Keep going until you are delighted with the finished marbled look inside your ornament.
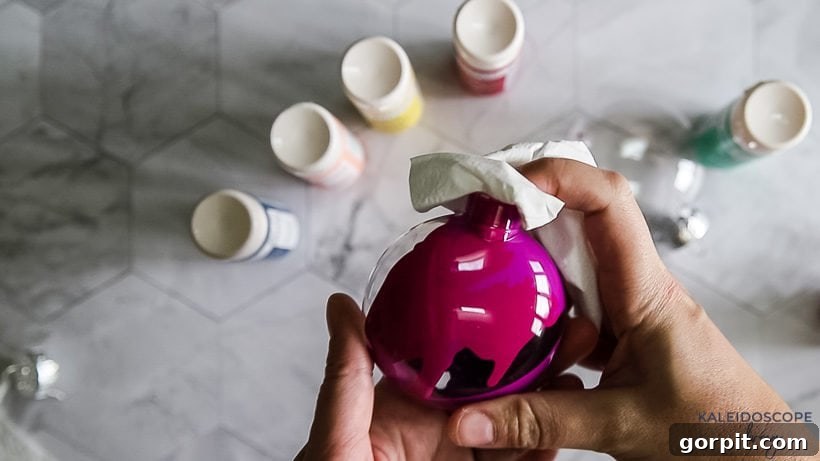
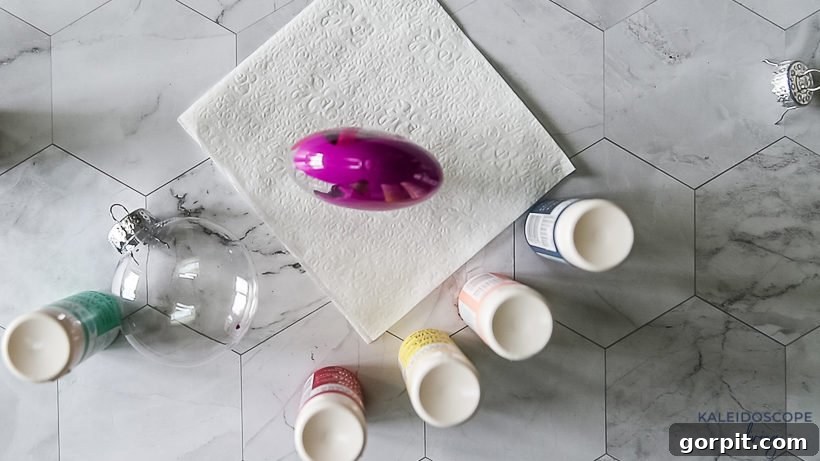
5) Allow to Dry Completely: This is a crucial step for preventing paint drips and ensuring the durability of your ornament. Once you’re satisfied with your marbled creation, remove the paper towel and turn the ornament upside down. Place it on a clean paper towel, napkin, or even a small plastic cup (if the opening can rest on the rim) to allow any excess paint to slowly drain out. Let it dry overnight, or for at least 12-24 hours, to ensure the paint is fully cured. Patience here will yield the best, mess-free results.
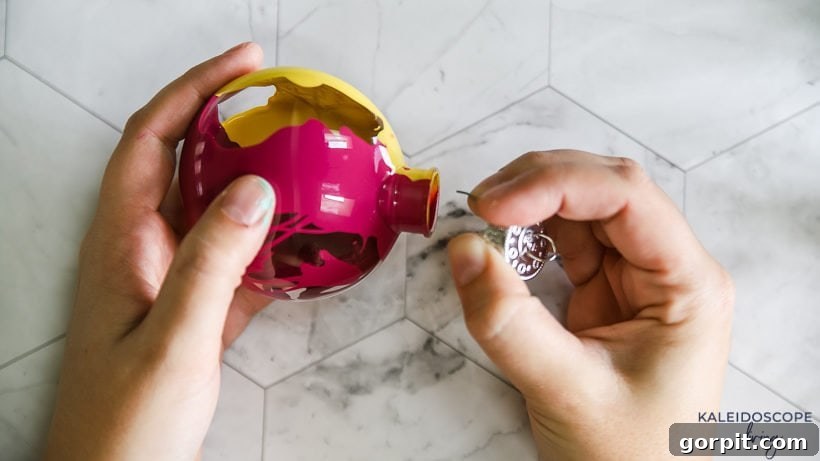
6) The Finishing Touch: Reattach the Hanger: Once the paint is completely dry to the touch and no longer tacky, carefully replace the metal hanger and cap onto the top of your ornament. You might need to gently widen the metal prongs slightly to fit them back into the opening. Your stunning, one-of-a-kind marbled Christmas ornament is now ready to adorn your tree or be gifted!
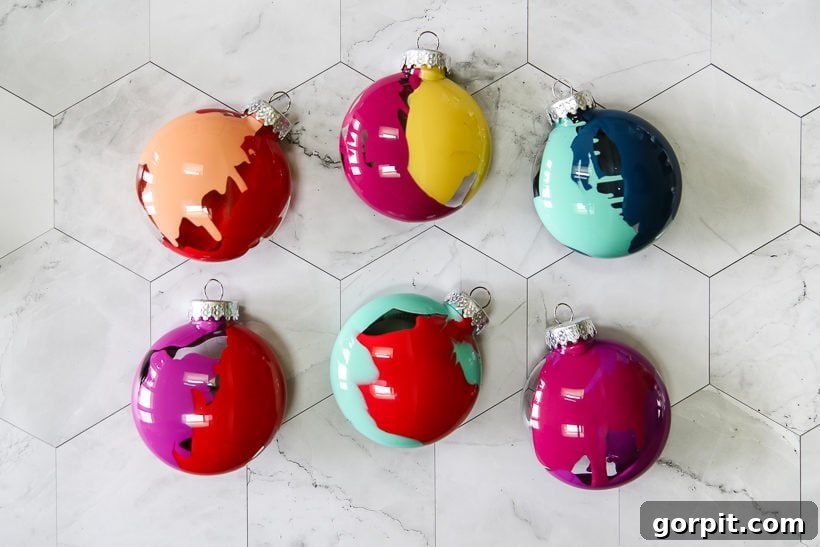
That’s it! Aren’t they absolutely gorgeous? What I love most about this project is the literally endless possibility of color combinations and patterns you can create. Each ornament turns out uniquely beautiful, a true testament to the magic of simple DIY. I already plan to stock up on as many of these inexpensive ornaments as possible during Christmas clearance sales so we can make even more next year!
Tips for Crafting the Perfect Marbled Ornaments
To ensure your marbled ornaments turn out beautifully every time, here are a few extra tips and tricks:
- Color Pairing Guide: Experiment with different color palettes. For a festive look, try classic reds and greens, or elegant golds and silvers. For a modern vibe, opt for bright jewel tones or serene pastels. Complementary colors (like blue and orange) create high contrast, while analogous colors (like blue, teal, and green) offer a smoother transition.
- Involving Young Crafters: This is an excellent project for children! Let them choose their favorite colors and take charge of the shaking. Just be sure to supervise, especially during the paint squirting and hanger reattachment steps. It’s a fantastic way to develop fine motor skills and creative expression.
- Clean-up Made Easy: Acrylic paint cleans up with soap and water when wet. Tackle any spills immediately. For dried paint, a bit of rubbing alcohol can help, but prevention is key!
- Troubleshooting Common Issues:
- Paint too thick? If your paint seems too viscous to spread, you can add a tiny drop of water (literally a drop!) and mix it well before squirting it into the ornament. Don’t overdo it, or the paint will be too runny.
- Muddy Colors? This usually happens if you overmix too many wet colors. To avoid this, choose just 2-3 colors per ornament and try to layer them strategically rather than vigorously mixing them together.
Unlock More Creativity: Variations & Personalization
While the marbled effect is stunning on its own, don’t hesitate to take your ornaments to the next level with these creative ideas:
- Beyond the Sphere: Experiment with different clear ornament shapes. Stars, hearts, teardrops, or even flat acrylic discs can all be marbled, offering a diverse collection for your tree.
- Adding Sparkle & Shine: Once your paint is completely dry, you can add extra glitter! Squirt a small amount of clear glue inside the ornament, then add glitter and swirl it around. Or, use a thin brush to paint glitter glue onto the exterior.
- Personalized Touches: Use a permanent paint pen to write names, dates, or small messages on the outside of the dried ornaments. This makes them even more special as gifts or keepsakes.
- Gift Packaging Ideas: For gifting, place your finished ornament in a small gift box filled with tissue paper, or tie it to the top of a beautifully wrapped present. Add a handwritten tag with the year to make it a memorable annual tradition.
More Seasonal Posts
SEE ALL holiday POSTS
-
The Most Realistic Faux Garlands for 2025
-
Stunning Light-Up Paper Snowflake Lanterns
-
How to Decorate Bedroom Doors to Look Like Apartment Doors
-
DIY Santa Sacks Your Kids Will LOVE!
-
Magical Light-Up Paper Christmas Lanterns
-
Inspiring Front Porch Christmas Decorations & Tips
Wondering how I approach transforming rooms and spaces in our home, much like I transformed a simple plastic ornament into a work of art? Check out Designer in a Binder®. It’s my comprehensive, affordable, and simple method for decorating your home with confidence and style.
And if you want exclusive content, behind-the-scenes sneak peeks, and fresh inspiration delivered straight to your inbox, be sure to subscribe before you head out! Don’t miss out on more easy DIYs and home design tips.