
Conquer Your Paper Clutter: A Comprehensive Guide to Going Paperless the Easy Way
In a world increasingly driven by digital convenience, the sheer volume of paper that flows through our homes can feel overwhelming. From bills and bank statements to school notices, medical records, and endless junk mail, paper clutter quickly accumulates, turning tidy spaces into chaotic zones. If you’re tired of sifting through stacks of documents, constantly searching for misplaced important papers, or feeling buried under an avalanche of administrative tasks, you’re not alone. The journey to a paperless or significantly reduced-paper lifestyle might seem daunting, perhaps even impossible, but it’s far more achievable than you might think. This guide will walk you through effective strategies to stop drowning in paper, streamline your document management, and securely store your important information digitally for effortless access, transforming your home into a more organized and stress-free environment.
This post contains affiliate links for your convenience. Click here for my full disclosure policy.
Table of Contents
What Does It Mean to “Go Paperless”?
The term “going paperless” often conjures images of a home completely devoid of physical paper, which can feel incredibly overwhelming and, frankly, unattainable for most families. However, true paperless living isn’t about eliminating every last scrap of paper from your life. Instead, it’s about smart, efficient paper management and prioritizing digital storage for your important documents. It means moving away from a reliance on physical paper copies and embracing a system where your essential information is stored, organized, and easily accessible digitally.
This approach allows you to declutter your physical space, reduce stress from disorganization, and enjoy the peace of mind that comes with knowing your vital records are secure and always within reach – whether on your computer, tablet, or even your smartphone. It’s about creating a streamlined workflow that minimizes the amount of new paper entering your home and intelligently processes the paper that must remain. Ultimately, “going paperless” signifies freedom from paper mountains and a shift towards modern, accessible information management.
How to Reduce Your Paper Clutter
Designate a Spot for Your Paper
The first and most critical step in taming paper clutter is to establish a single, designated location for all incoming paper. This might seem overly simple, but its effectiveness cannot be overstated. When paper enters your home – whether it’s mail, school notes, or receipts – it needs a “landing zone.” I highly recommend making this spot visible and easily accessible, not hidden away in a filing cabinet or office drawer where it’s likely to be forgotten. A simple stack on a countertop, a decorative basket, or even basic letter trays like these I crafted years ago can serve this purpose perfectly.
The psychology behind this is powerful: a visible designated spot acts as a constant reminder to process your paper. It prevents the insidious habit of setting papers down “just anywhere,” which quickly leads to scattered piles and overwhelming clutter. While it may take a little time to retrain yourself and your family to use this spot consistently, trust the process. Consolidating all new paper into one specific location is the foundational step that makes all subsequent decluttering and paperless strategies possible.

Set Up a Family Command Center
Beyond a simple designated spot, a well-organized family command center is an absolute game-changer for busy households. It’s not just about aesthetics; it’s about creating a central hub for communication, scheduling, and efficient paper processing. For our family, this vital organizational tool lives in our kitchen, strategically placed where we naturally “check-in” and “check-out” every time we leave or enter the house. This ensures that any paperwork entering the home is immediately routed to its proper place.
Our command center features designated slots for items to shred, bills to pay, records to file, and receipts to scan. It’s also the trusty home for our car keys, ensuring they are never lost. Setting up a family command center is relatively straightforward, but its success hinges on one crucial factor: consistent daily use. When you make it a non-negotiable habit, staying on top of bills, receipts, school forms, and all other incoming paper becomes second nature. While one family member might initially resist, creating a user-friendly system and encouraging consistency will eventually establish a seamless routine for everyone.
The photo below showcases our Pottery Barn Daily System in black from our old house. We’ve relied on this system for effective paper sorting and organization since 2006, long before we even had children! It has seamlessly transitioned to our new house, now hanging conveniently off our kitchen in the hallway leading to the mudroom.

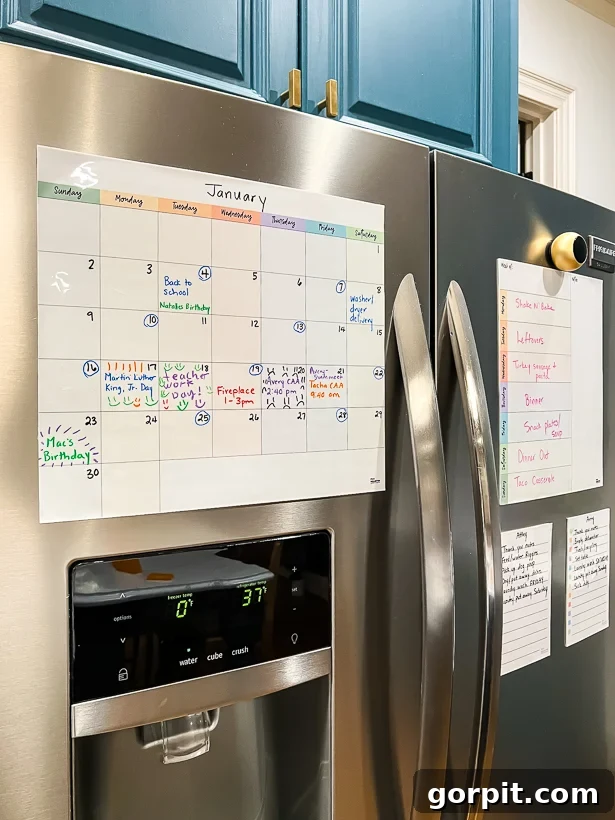
In addition to our traditional command center, we’ve integrated MC Squares Reusable White Boards, and they have been a truly revolutionary addition. These versatile boards adhere to any smooth, shiny surface – think cabinets, mirrors, or refrigerators – and are available in a wide array of options. I highlighted them on Instagram, and the enthusiastic response was immediate! We adore them for creating quick to-do lists, shopping lists, meal plans, chore charts, and more; their utility is practically boundless. They work flawlessly with both wet and dry-erase markers (a bundle often includes one) and are incredibly simple to clean. Now, when any paper containing scheduling information – be it field trip permission slips, birthday invitations, or swim meet details – comes home, we promptly transfer the date to our digital or dry-erase calendar and immediately discard the physical paper. This simple habit prevents a build-up of temporary yet important papers.
Deal With Your Daily Paper
Daily Mail and Paper Sorting
The “one-touch” rule is invaluable for managing daily paper: touch it once, deal with it immediately. Every day, as mail arrives or school papers come home with the children, we implement a simple yet highly effective sorting system. We categorize each piece of paper into one of three piles: keep, trash/recycle, or shred. Anything that can be immediately discarded, like advertisements or irrelevant flyers, goes straight into the trash or recycling bin. Papers containing sensitive information that could lead to identity theft, such as credit card offers or old statements, are placed into a designated shred bin within our command center (or you could simply have a dedicated shred pile). We then set aside a few minutes to shred the accumulated papers once the bin is full, preventing a mountain of documents needing disposal.
Next, let’s address “action required” paper – those documents that demand your attention or a specific task. These are items like bills that need paying, forms requiring completion and return to school, or invitations needing an RSVP. Such papers need a temporary, dedicated home until the required action is taken. In our system, these “action required” documents are placed in a specific bin within our command center. You could also use a designated tray on a desk or a wall pocket. The key is that these papers should only reside in this temporary holding area until the task is complete. Once a bill is paid or a form is returned, you no longer need the physical paper and can either shred it or scan it for digital safekeeping, if necessary. This routine ensures that nothing slips through the cracks and that paper is processed efficiently rather than allowed to linger and contribute to clutter.
Reduce the Amount of Mail You Receive
One of the most proactive steps you can take to go paperless is to significantly reduce the sheer volume of paper that enters your home in the first place. Managing your bills and statements online is a powerful way to achieve this. Many of our monthly bills are set up for automatic payment, eliminating the need for paper bills entirely – these are undoubtedly our favorites! For other accounts, while email delivery is often an option, my husband Joe prefers to receive a paper bill as a reminder, but he still pays them online. The crucial point here is that once paper bills are paid, you absolutely do not need to retain the physical copies; they can be promptly shredded.
Beyond bills, the constant deluge of junk mail is another major source of paper clutter. Fortunately, you can dramatically decrease the amount of unsolicited mail you receive with services designed specifically for this purpose. Tools like PaperKarma and Catalog Choice empower you to easily opt-out of unwanted catalogs, credit card offers, and other direct mail solicitations. Furthermore, take a moment to evaluate your magazine and newspaper subscriptions. Could you read these publications online instead? If so, canceling your physical subscriptions is an easy win for reducing paper and embracing digital alternatives. By taking these proactive steps, you’ll find less paper to sort, store, and dispose of, making your paperless journey much smoother.
How to Go Paperless With What You Can’t Just Trash or Recycle
All You Really Need is a Smartphone
In the early days of digital filing, acquiring a dedicated scanner was a necessary investment for converting physical documents into digital files. However, thanks to rapid technological advancements, all you truly need today is the powerful device already in your pocket: your smartphone! Modern smartphones are equipped with sophisticated cameras and built-in scanning features, or you can leverage third-party apps, to effortlessly and quickly scan documents directly into your digital system. This capability is genuinely mind-blowing in its convenience and efficiency.
We routinely use our smartphone’s in-app camera, integrated with an application like Evernote (more on this fantastic tool next!), to scan various documents. This includes everything from everyday receipts and warranties to crucial tax documents and even dynamic schedules for school events or swim meets. The speed and simplicity of mobile scanning mean you can digitize a document the moment it enters your home, eliminating the need for piles of paper waiting to be processed by a bulky, traditional scanner. The digital image quality is often more than sufficient for record-keeping, and the ability to immediately file or tag the scanned document on the go makes maintaining a paperless system remarkably seamless.
Learn to Use Evernote
Once you grasp its full potential, Evernote will likely become your ultimate digital filing cabinet. In my opinion, it’s one of the most indispensable apps available for personal and family organization. Imagine a digital system that not only stores your documents but also possesses the incredible ability to read and understand their content. Evernote accomplishes this through OCR (Optical Character Recognition) technology, making every document you scan completely searchable. This means you can find any piece of information within your digitized papers simply by typing a keyword, just as you would search the internet. It’s truly revolutionary for information retrieval!
We initially adopted Evernote years ago primarily for organizing receipts, tax documents, contracts, and insurance policies. However, its versatility extends far beyond basic document storage. You can snap a photo of a coupon you intend to use, save it to Evernote, and then confidently discard the physical paper. Beyond paper documents, Evernote allows you to save web pages, voice memos, and even manage comprehensive shopping lists, turning it into a central hub for all your information. Evernote offers a robust FREE personal version that caters to 99% of what most individuals and families require, meaning you can embark on your paperless journey without any initial financial investment. We only upgraded to a paid plan to unlock specific advanced features for business use.
The most significant advantage of Evernote is the unparalleled convenience of having every essential document accessible at all times. With the app installed on your phone and computer – and even accessible via a web browser on any device – your digital files are always with you. Need your child’s vaccination records for camp registration? No problem! A quick search for “vaccination” within Evernote, powered by its OCR technology, will instantly bring up the relevant documents. This eliminates frantic searches through physical files and provides immediate access to critical information whenever and wherever you need it.
While Evernote is intuitively designed, there is a small initial learning curve to master its full capabilities. My friend, Abby Lawson, was instrumental in teaching me the ropes of paperless living and first introduced me to Evernote. She and her husband, Donnie, have refined their paperless system over more than a decade, resulting in their exceptional course, Paperless Made Simple. This practical, step-by-step program guides you through the essential theory, technical details, and daily workflow required to create and effectively utilize your digital filing cabinet. Integrating their streamlined paperless workflow into your routine will be a total game-changer, eliminating paper clutter without demanding significant extra time from your busy schedule. Once you’ve established the workflow, going paperless will become a natural, almost subconscious habit.
Even better, you can access the crucial “getting started” lessons from the Paperless Made Simple course for absolutely free! These free introductory lessons include:
- A comprehensive “Getting Started” video that outlines expectations and illuminates the myriad benefits of embracing a paperless lifestyle.
- An insightful overview of their proven paperless workflow, allowing you to visualize the entire process from inception to completion.
- A detailed guide for setting up Evernote correctly, ensuring you build a solid foundation from day one.
- A special bonus gift as a token of appreciation for engaging with the free introductory class!
A Word About Digital Security
Understandably, concerns about the security of storing highly sensitive and important documents digitally are common. It’s a valid consideration in our increasingly connected world. However, reputable digital organization platforms like Evernote prioritize security with robust measures designed to protect your information. Evernote, for instance, incorporates excellent built-in security features, including comprehensive encryption for data both in transit and at rest (meaning when you upload, download, and when it’s stored on their servers).
Furthermore, it offers essential user-controlled security options such as two-factor authentication (2FA), which adds an extra layer of protection beyond just a password, and a passcode feature for the mobile app, preventing unauthorized access if your phone falls into the wrong hands. While no system is entirely impervious, these measures significantly reduce risks compared to, say, having physical documents susceptible to fire, flood, or simple misplacement. Always remember to use strong, unique passwords for all your online accounts, enable 2FA whenever available, and be mindful of the security practices of any digital service you choose to use. With a combination of platform security and good personal digital hygiene, you can feel confident in the safety of your digitized records.
What to Do With Old Paper In Your House
If you’re like many households, you likely have old file folders, overflowing binders, or even entire boxes brimming with paperwork accumulated over years, much of which you probably no longer need. Confronting this backlog can feel overwhelming, but tackling it systematically will dramatically accelerate your journey to a paperless home. Below are my practical tips and suggestions for how to process and ultimately get rid of this legacy paper clutter.
DISCLAIMER: The suggestions below are general guidelines only. Opinions and legal requirements for retaining records can vary, so please consider these as basic recommendations and consult with a professional if you have specific concerns about legal or tax retention periods.
What to Scan & Then Shred/Trash
The beauty of digital organization is that many documents no longer require physical retention once scanned. This process can be remarkably swift, especially when you leverage smartphone scanning capabilities to digitize documents directly into a searchable system like Evernote. After scanning, these items can be confidently shredded or recycled:
- Paid Bills: Once paid, you typically only need proof of payment, which can be digital. Keep for about one year, then shred, especially if you’ve transitioned to online bill-pay for future statements.
- Important Receipts: Scan and keep for one year, particularly those for tax-deductible items, major purchases for warranty purposes, or items you might return.
- Magazine Articles, Recipes, and Inspiration: If you find an article you love, a recipe you want to try, or an inspiring image, scan it and save it to a digital “inspiration” notebook. You then free up physical space.
- Medical Receipts and Claims: Once processed and you’ve received your Explanation of Benefits (EOB), scan these for your records. The digital copy usually suffices.
- Car Repair Documentation and Receipts: Keep digital records for maintenance history.
- School Calendars and Non-Critical Notices: Once dates are transferred to a digital or family calendar, these can be discarded.
- Expired Insurance Documentation: Keep current policies physically (or scan and keep digital), but old, expired documents can be shredded after ensuring current coverage is documented.
- Dependent Care Documentation: Receipts for childcare can be scanned for tax purposes.
- 401(k)/Investment Statements: The most recent annual statement is generally sufficient; previous quarterly statements can be shredded after a year, especially if you access them online.
- Bank Statements: Like investment statements, annual summaries are often enough, especially if you reconcile your accounts digitally. Keep for about one year.
- Immunization Records: Scan and keep these for easy access for school or travel. A physical copy might also be needed occasionally, but digital access is invaluable.
What to Scan & Keep in a Fire-proof Box and/or Safe Deposit Box
While going paperless is highly encouraged, there are certain irreplaceable and legally vital documents that should always be kept in their original physical form. These items warrant secure storage in a fire-proof box at home, a safe deposit box at your bank, or both, in addition to having digital scans for convenience and backup. This dual approach ensures maximum security and accessibility:
- Birth and Death Certificates: Original copies are often required for legal matters.
- Social Security Cards: Essential for identification and official purposes.
- ID Cards and Passports: While you carry them, secure copies of renewal information or old expired passports can be useful.
- Marriage License: A critical legal document.
- Annual IRA or Other Investment Contribution Statements: Especially those that prove contributions for tax purposes.
- Pension/Profit-Sharing Informational Returns: Important for retirement planning.
- Business Licenses and Legal Documents: Articles of incorporation, partnership agreements, etc., are fundamental legal records for business owners.
- Legal Claims and Documents: Any ongoing or settled legal documents, court orders, etc.
- Pension Plan Documents: Keep records of any pension benefits.
- Military Discharge Papers (DD-214): Extremely important for veterans’ benefits.
- Original Insurance Policies: While summaries are online, the original full policy document can be crucial.
- Wills, Living Wills, and Powers of Attorney: These are among the most critical legal documents; original signatures are often required.
- Vehicle Titles: Proof of ownership.
- Loan Documents: Original agreements for mortgages, car loans, student loans, etc.
- House Deeds and Mortgage Documents: Proof of property ownership and mortgage details.
That’s it! If this entire process, particularly the concept of leveraging tools like Evernote, sounds daunting, I assure you it’s not. It’s perfectly normal to feel a bit overwhelmed when learning about new organizational systems. I distinctly remember feeling that exact way when my family first embarked on our paperless journey years ago. However, once you establish a routine and get into the groove, the process becomes incredibly quick and painless. In fact, you’ll discover that digitizing and managing your documents this way is far easier, more efficient, and ultimately less stressful than the traditional method of physically filing papers into cumbersome cabinets or boxes.
Embrace this shift, start with one small step, and soon you’ll enjoy a home that’s free from paper clutter, with all your important information securely organized and instantly accessible. The benefits to your peace of mind and productivity are truly immense!
Other posts you may enjoy for further home organization and decluttering tips:
- How to Organize Your Life With Work + Kids
- Learn How to Declutter Your Home: A Realistic Guide
- How to Conquer the Emotions of Decluttering
- Mind-Blowing Alexa Hacks that Make Life Easier
- 5 Organizing Mistakes That Make Your House Look Messy (and How to Fix Them)
Wondering how I approach transforming rooms and spaces in our home? Check out Designer in a Binder®.
And if you want exclusive content and behind-the-scenes sneak peeks, be sure to subscribe before you head out!
Join our community for exclusive tips and updates!