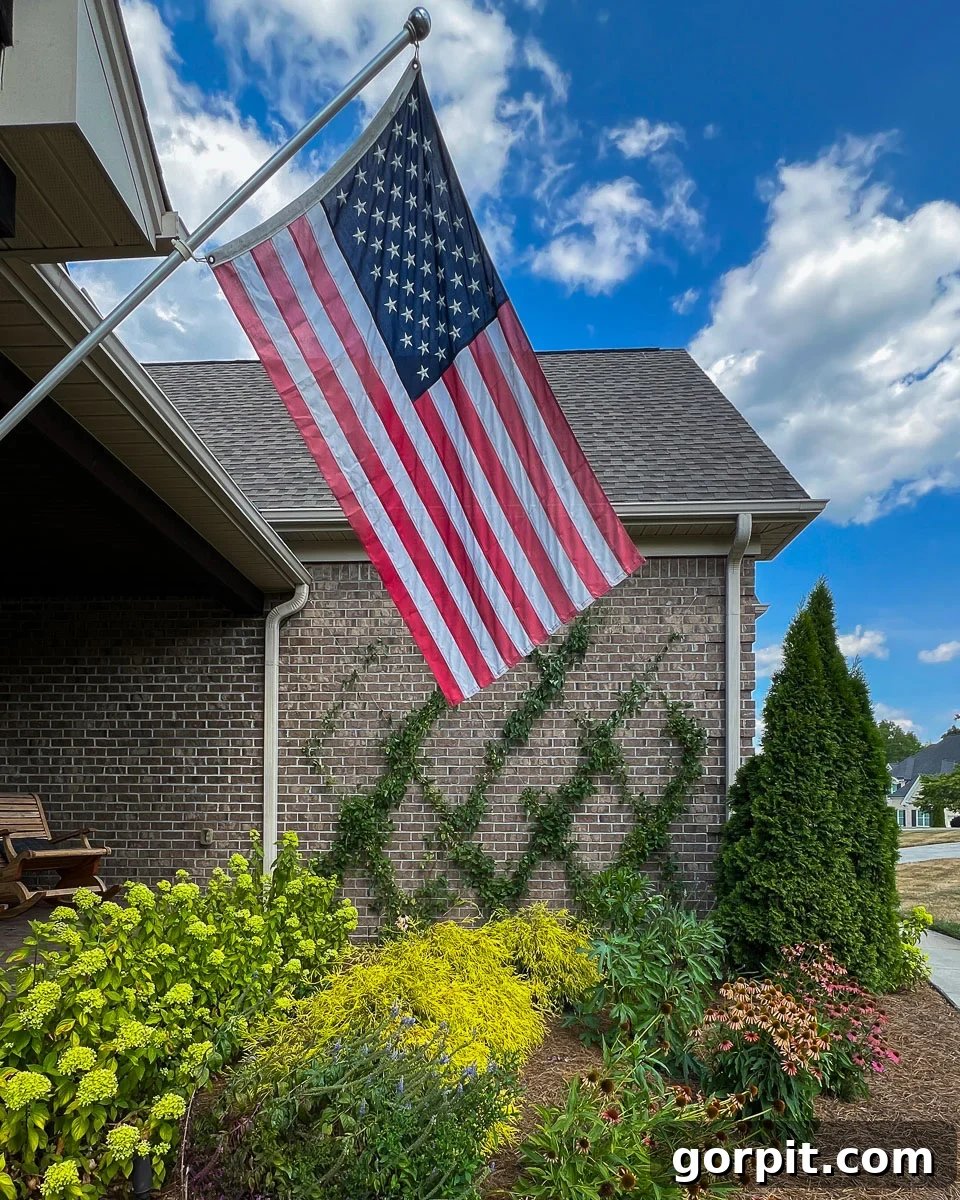
Transforming the exterior of your home doesn’t have to be an expensive or complicated endeavor. One of the most enchanting and cost-effective ways to elevate your home’s curb appeal is by installing a stunning DIY wire trellis adorned with a lush climbing vine. This simple yet impactful project can revitalize a dull facade, bringing life, texture, and sophisticated visual interest to any blank wall. We recently embarked on this very journey, upgrading an expansive, uninspired brick wall on our home with a custom-designed diamond pattern wire trellis, and the results have truly exceeded our expectations. The beauty and charm it adds are simply captivating. If you’re looking for an affordable, rewarding DIY project that dramatically enhances your home’s aesthetic, you’ve come to the right place. Join us as we guide you through a comprehensive, step-by-step tutorial to create your own bespoke wire trellis.
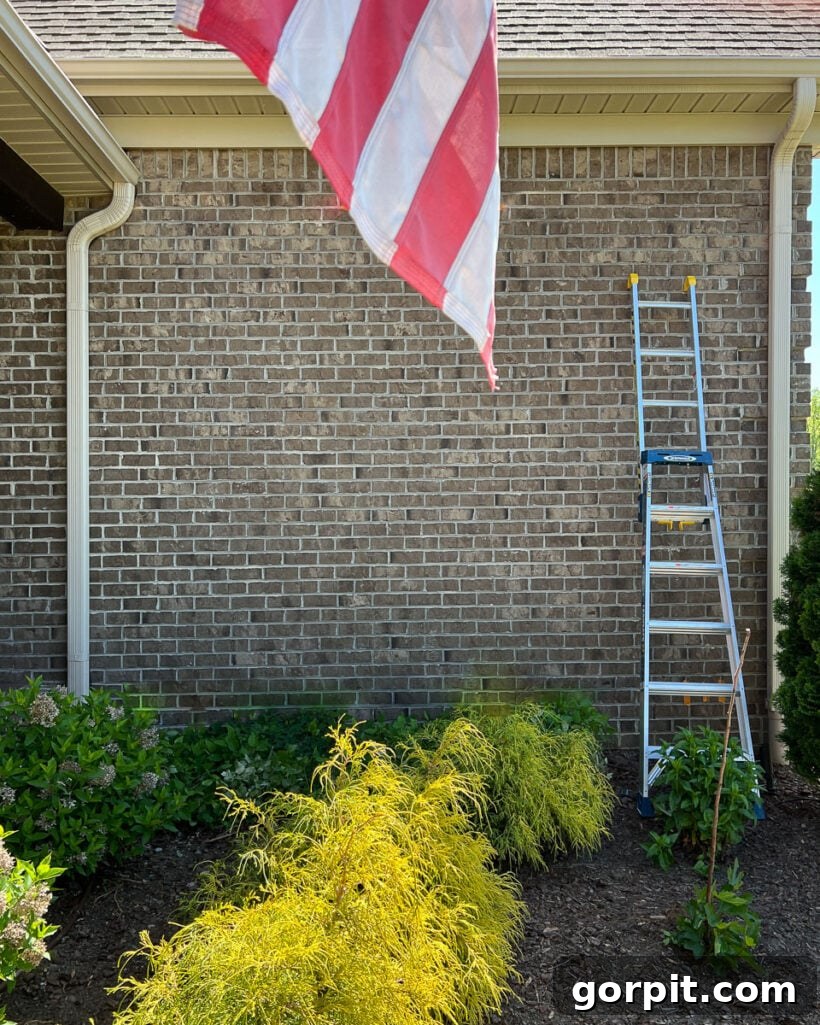
Like many homeowners, we sometimes grapple with elements of our home’s exterior that don’t quite align with our aesthetic vision. For us, the color of our brick home has always been a point of contention. We explored various solutions, including limewashing, a popular technique for softening and brightening brick. However, after obtaining several quotes, it became clear that this option was prohibitively expensive, pushing us to seek more budget-friendly alternatives.
Determined to enhance our home’s curb appeal without breaking the bank, we began brainstorming creative ways to inject beauty and character into our exterior. Our research led us to discover the elegant appeal of diamond-shaped wire trellises for climbing vines. We’d admired these stunning architectural features in various settings and were particularly drawn to designs like this one. The idea quickly took root: installing a DIY wire trellis on the large, otherwise blank brick wall adjacent to our front porch seemed like a remarkably affordable and relatively straightforward solution to add significant visual interest.
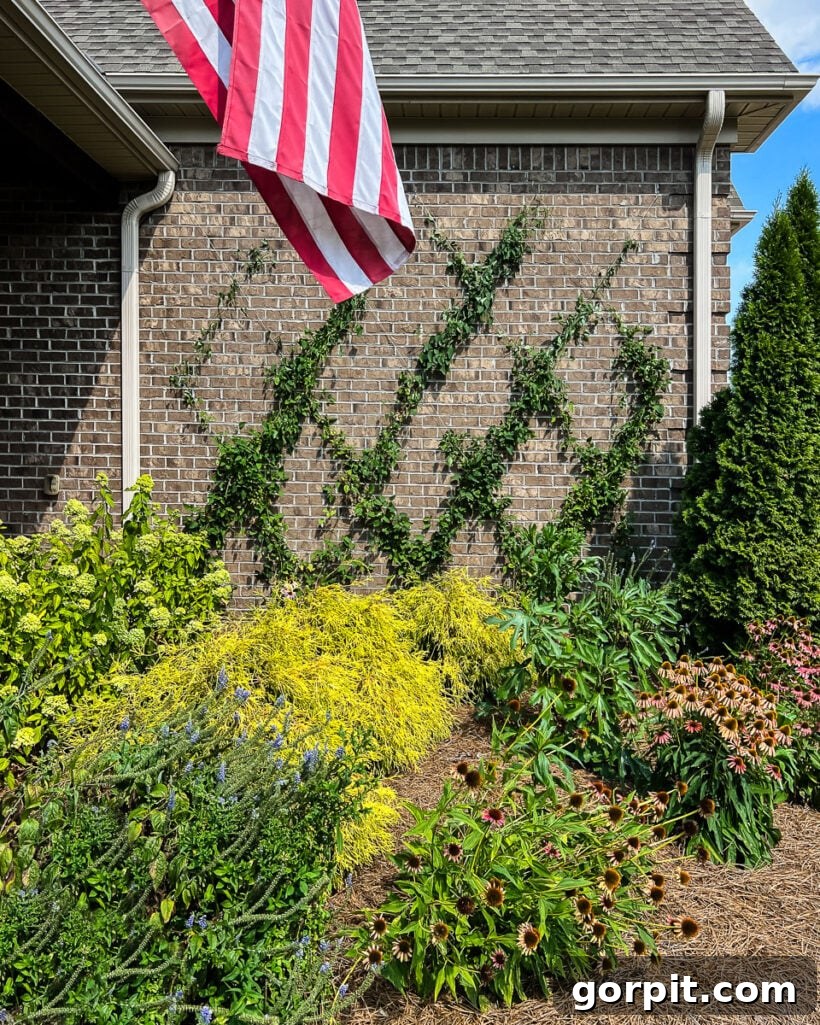
The transformation has been nothing short of delightful! We are incredibly happy with how this project turned out, proving that a thoughtful DIY approach can yield truly remarkable results. To give you a taste of the impact, here’s a compelling before and after comparison, offering a glimpse of the dramatic change before we delve into the detailed tutorial.
How to Make a Diamond-Shaped Wire Trellis
Ready to embark on your own home exterior upgrade? This guide provides a comprehensive, step-by-step walkthrough to construct a durable and beautiful diamond-shaped wire trellis. While a short video overview (originally provided here) can be incredibly helpful for visual learners to contextualize the process, the detailed written instructions and materials list below are designed to equip you with everything you need for a successful DIY project.
This post contains affiliate links for your convenience. Click here for my full disclosure policy.
Materials Needed
While convenience often leads to readily available wire trellis kits (you can explore various kit options here), we opted for the flexibility of purchasing individual components. This approach, though requiring a bit more organization upfront, allowed us to customize every aspect of our trellis, ensuring it perfectly met our design and structural needs. If you prioritize control over ease, buying separate components is a great choice. Here’s a detailed list of what we used, along with considerations for each item.
- Measuring tape: Essential for precise planning and marking. A sturdy, long tape measure will be invaluable.
- Painter’s tape for rough surfaces: Crucial for temporarily marking your design on brick or stucco without damaging the surface. Ensure it’s specifically designed for rough textures to prevent it from peeling off prematurely.
- Drill & masonry drill bits: A powerful drill is necessary for brick or mortar. Masonry bits are specifically designed to bore through these hard materials efficiently and cleanly. Make sure the bit size matches the diameter of your concrete anchors.
- Hammer: For gently tapping concrete anchors into place after drilling.
- Screwdriver: Useful for getting extra leverage when screwing in the eye hooks, especially if they’re stiff. The neck of the screwdriver can provide additional grip.
- 1/16th galvanized wire rope + aluminum ferrules: We specifically chose 1/16th inch galvanized wire rope for its strength, durability, and resistance to rust and corrosion, making it ideal for outdoor use. Galvanization protects the steel from the elements, ensuring your trellis stands the test of time. The bundle we purchased included 328 feet, which was more than enough for our project, leaving plenty for future use. Aluminum ferrules are vital for securing the wire ends into loops.
- Wire cutters: Absolutely critical for cleanly cutting the galvanized wire rope. Invest in a pair of heavy-duty, sharp wire cutters. Dull cutters will make the job frustratingly difficult and can fray the wire.
- Pliers: Essential for clamping the aluminum ferrules securely onto the wire rope, creating strong, permanent loops. A good pair of crimping pliers or sturdy regular pliers will work.
- Screw eye hooks: These serve as the anchor points for your wire rope. Ensure they are robust and weather-resistant.
- Concrete anchors: These must correspond in size to your chosen screw eye hooks. For brick or concrete walls, anchors provide the necessary stability for the hooks to bear the tension of the wire and the weight of the growing vine. We utilized these concrete anchors, which proved highly effective.
- A climbing vine: The star of your trellis! Selection is critical for success, considering your climate and specific wall conditions. (More on this in Step 5!)
Step 1: Plan your wire trellis layout
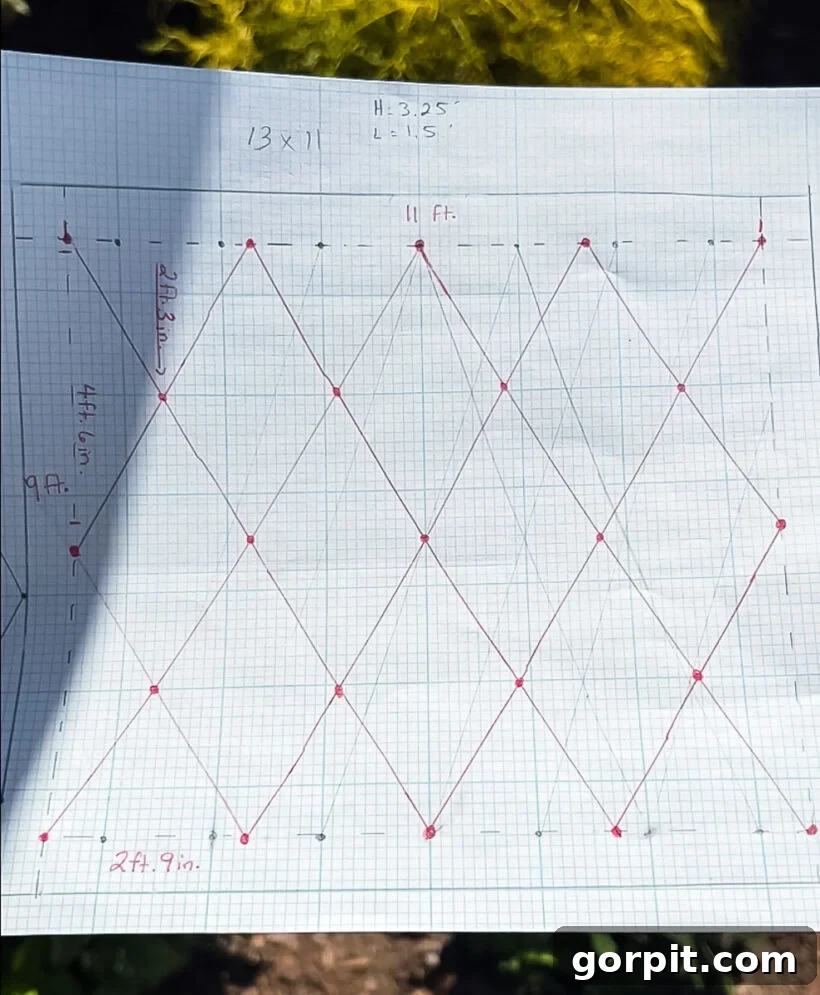
This initial planning phase is, without a doubt, the most challenging yet crucial part of the entire project. The success and aesthetic appeal of your DIY wire trellis hinge almost entirely on a well-thought-out design. Begin by meticulously measuring the entire surface area where your trellis will be installed – height and width. This detailed measurement will form the basis of your design.
We highly recommend using graph paper to sketch out various layouts to scale. This allows you to experiment with different diamond sizes, shapes, and densities without making irreversible marks on your wall. For instance, we spent considerable time refining our design, going through several iterations as you can probably infer from our planning photos. Our goal was to create diamonds that were sufficiently large and wide to remain distinct and visually impactful, even after the climbing vine had fully matured and filled in the pattern. We also favored a more elongated, less square diamond shape, which we felt added a more sophisticated and modern touch compared to some trellises we had observed.
Beyond aesthetics, practical considerations are paramount. When working with brick, we strategically planned our anchor point placements to align with the mortar lines rather than drilling directly into the bricks themselves. Drilling into mortar is generally easier, reduces the risk of damaging the bricks, and provides a more predictable drilling experience. This involved a fair amount of “mathing” – calculating precise spacing and angles – but taking the time to plan this meticulously saved us significant headaches during the installation phase. Consider the overall balance, how the trellis will interact with nearby windows or architectural features, and the eventual growth pattern of your chosen vine.
Step 2: Tape your design onto your exterior wall
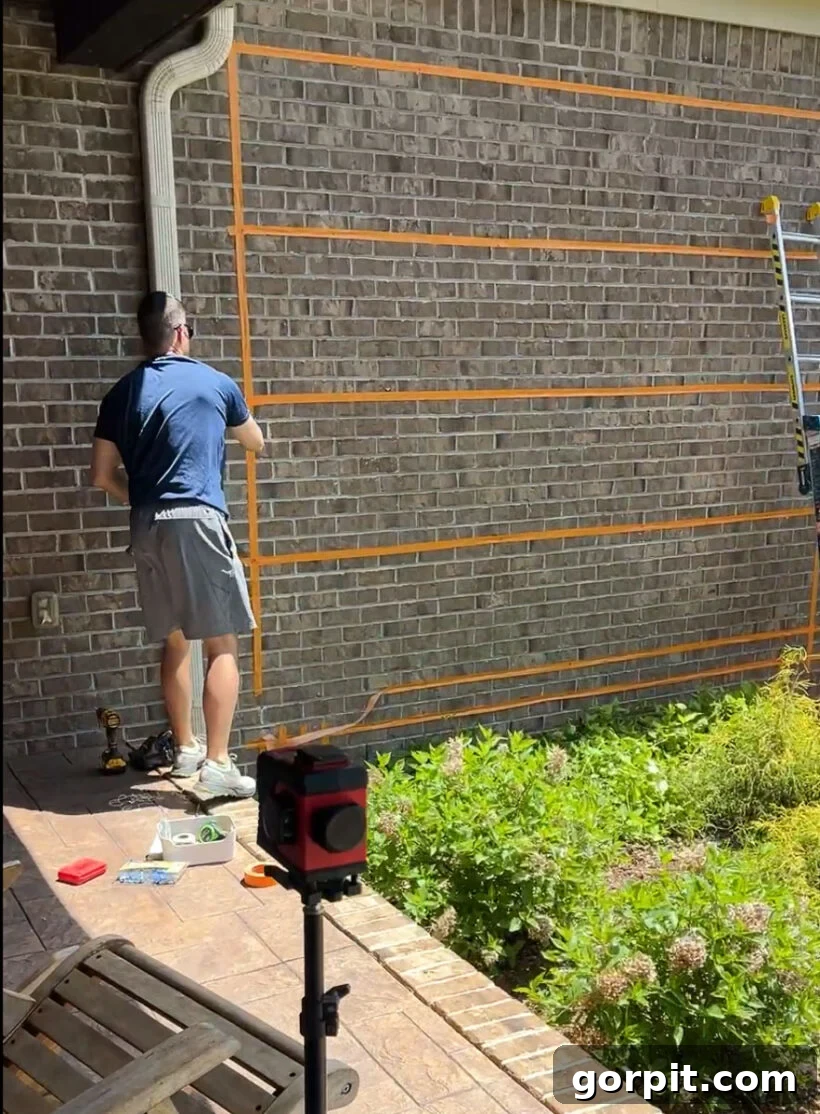
Never underestimate the value of a visual dry run. What looks perfect on paper might not translate as beautifully to a large exterior wall. This step, while seemingly an “extra,” is invaluable for ensuring your trellis design achieves its full potential. We used painter’s tape specifically formulated for rough surfaces to temporarily outline our planned wire trellis design on the brick wall. This allowed us to step back, observe the proportions, and make real-time adjustments before any drilling began.
This preparatory step proved incredibly insightful. As you can see in the accompanying photograph, we made a crucial adjustment to the placement of the trellis’s bottom edge after seeing the taped design on the wall. While we didn’t tape out every single diamond, we meticulously used a Sharpie to mark the exact locations where each screw eye hook needed to be installed. This combination of visual assessment and precise marking ensures accuracy and allows for final tweaks that are much harder to implement once anchors are in place.
Step 3: Install your anchors and screw eye hooks
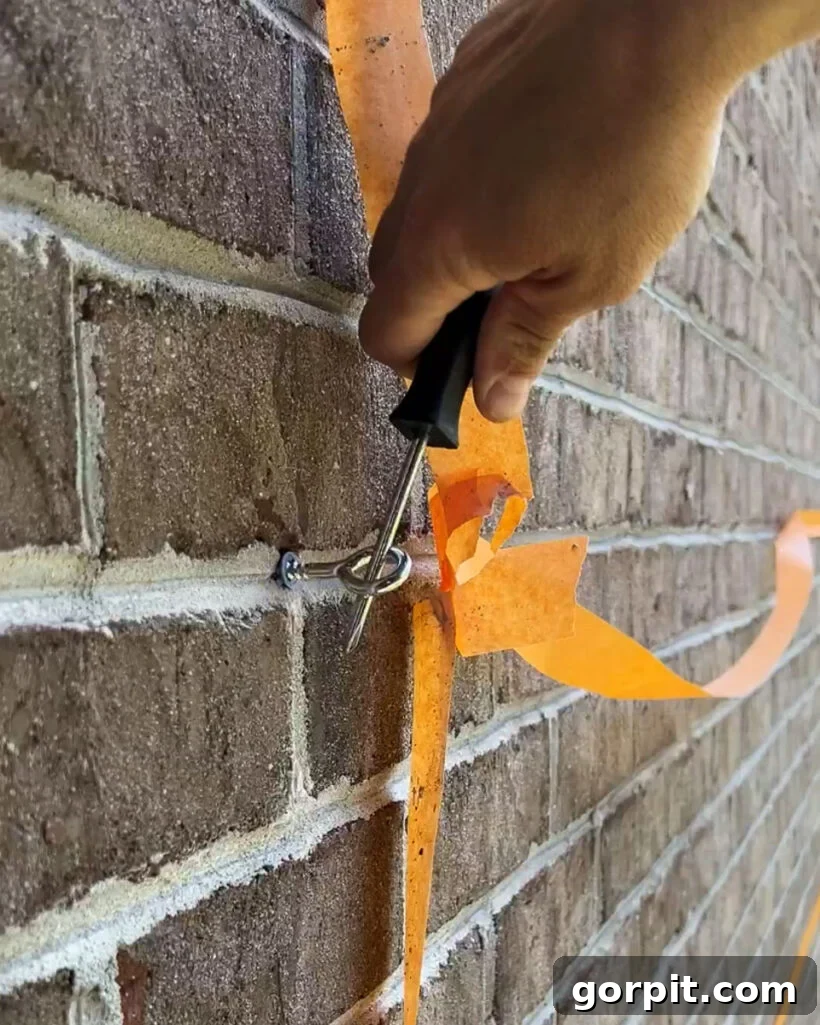
With your design meticulously taped and marked, it’s time to bring it to life by installing the anchor points. Using a powerful drill fitted with the correct size masonry bit (always refer to the manufacturer’s recommendations for your specific concrete anchors), carefully drill holes at each marked location. It’s important to apply steady pressure and allow the drill to do the work. Remember to wear appropriate safety glasses to protect your eyes from dust and debris.
Once the holes are drilled, gently tap the concrete anchors into place using a hammer. They should sit flush with the surface of the wall. Avoid excessive force, as this can damage the anchors. Finally, install your screw eye hooks into the firmly seated concrete anchors. We found that using the shaft of a screwdriver threaded through the eye of the hook provided excellent leverage, making it much easier to screw them in completely and securely. Each hook should be tightly fastened, creating a robust anchor point for your wire trellis.
Step 4: Install your wire rope
Now for the intricate part: installing the galvanized wire rope to form your diamond pattern. As detailed in our materials list, we utilized 1/16th galvanized wire rope along with aluminum ferrules. Our generous 328-foot supply of wire rope and accompanying ferrules ensured we had ample materials for the entire project and more.
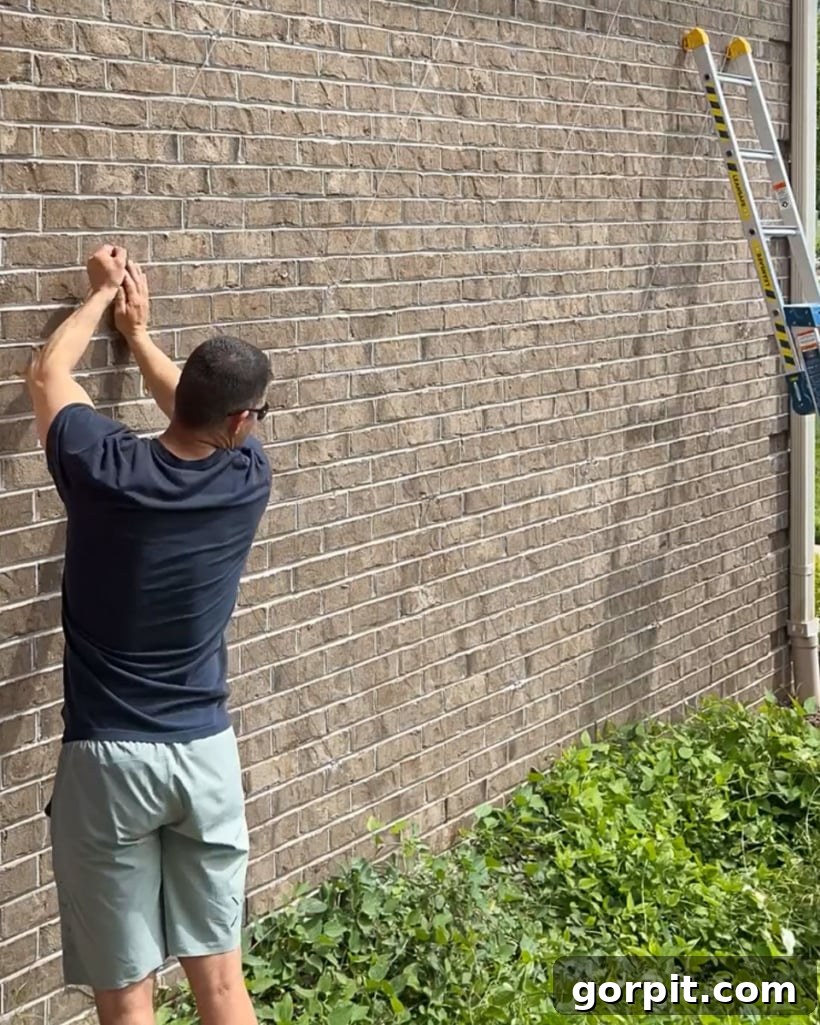
While you could theoretically use a separate length of wire for each segment of your diamond pattern, a more efficient approach involves strategically threading longer pieces. My partner devised a clever method that minimized cuts and anchor attachments by utilizing only three distinct lengths of wire to create our elaborate diamond design. While his exact threading path was a marvel of problem-solving, the core principle is to feed the wire through the eye hooks according to your planned diamond pattern. This requires patience and careful attention to detail.
The thin nature of the wire rope can make it challenging to see against the brick, especially from a distance. However, upon closer inspection, you’ll begin to discern the emergence of the diamond pattern as you thread the wire, gradually bringing your design to life.
Regardless of your threading strategy, you will inevitably need to cut the wire rope at certain points. For this, truly SHARP wire cutters are non-negotiable. We learned this the hard way with dull cutters, which made cutting the robust galvanized wire an arduous task. Investing in quality, sharp wire cutters will save you immense effort and frustration.
To securely attach the end of a wire rope segment to a screw eye hook, follow these steps:
- First, thread the wire rope through an aluminum ferrule. These small cylindrical sleeves are crucial for creating a secure loop.
- Next, feed the end of the wire rope through the screw eye hook on your wall.
- Then, loop the wire back and thread it through the same aluminum ferrule you started with, effectively creating a closed loop around the eye hook.
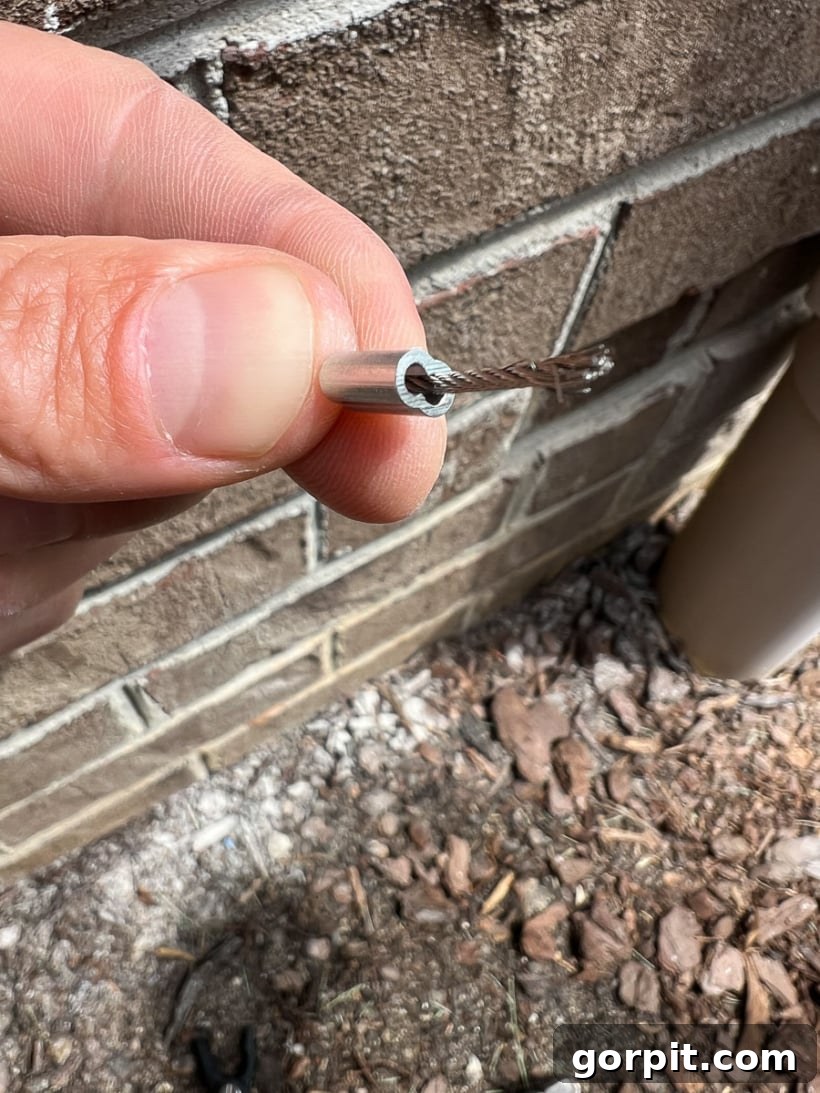
At this critical juncture, you need to pull the wire taut. Achieving optimal tension is key for a neat, durable trellis that can adequately support your climbing vine. Once the wire is stretched to your desired tautness, use sturdy pliers (or a specialized crimping tool if you have one) to firmly clamp down the aluminum ferrule onto both strands of the wire rope. This action creates a powerful bond, permanently securing the loop. This step is often best performed with two people: one to maintain tension on the wire, and the other to clamp the ferrule. I held the wire firmly taut while Joe expertly crimped the ferrules into place.
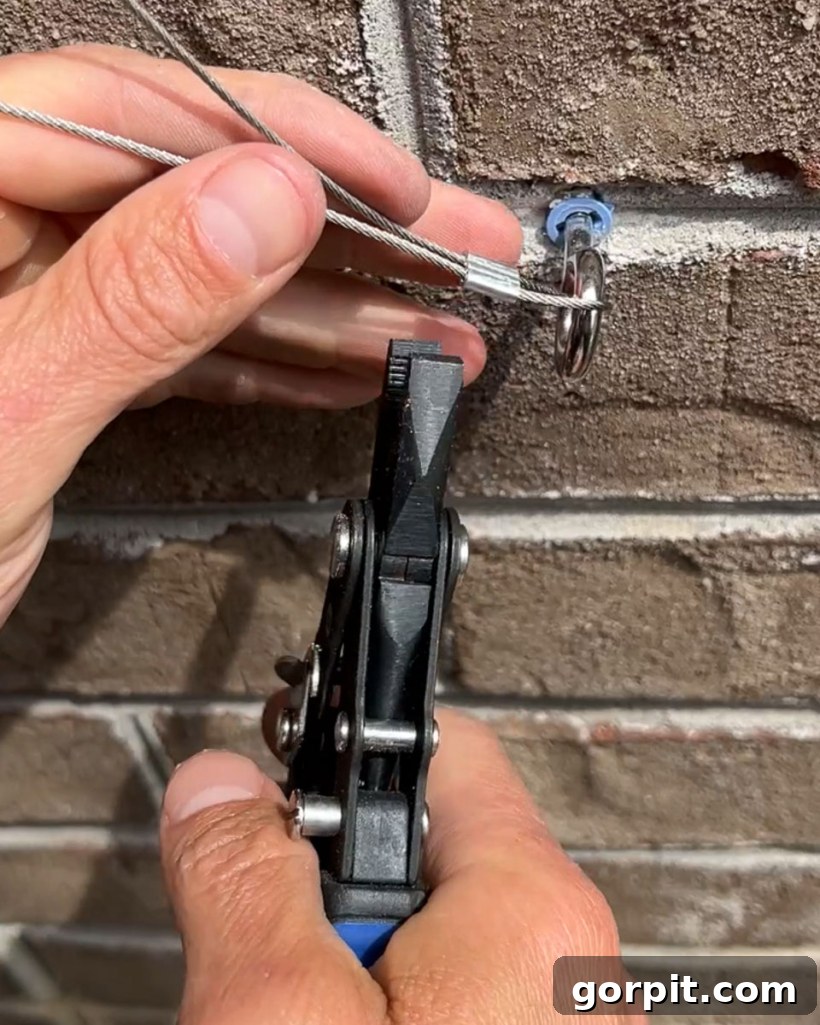
Continue this threading and anchoring process, working methodically across your wall, until your entire diamond trellis pattern is fully formed and all wire segments are securely fastened and taut. This systematic approach ensures a consistent and strong structure for your future climbing vine.
Step 5: Add a climbing vine to your wire trellis
The final and most rewarding step is introducing the living element to your newly constructed wire trellis: a beautiful climbing vine. Choosing the right vine is crucial for the success and longevity of your exterior display. Consider your specific climate zone, sun exposure on the wall, desired growth rate, mature size, and flowering characteristics.
Here in Zone 7b of North Carolina, we carefully weighed our options. Initially, we were drawn to a fragrant Jasmine vine, but concerns about its resilience during rare but possible harsh freezes led us to reconsider. Ultimately, we opted for the Sweet Autumn Clematis Vine. This particular variety is known for its vigorous growth, beautiful fragrant white flowers in late summer to early fall, and excellent hardiness in our region. It’s a truly spectacular choice that quickly creates a lush, vibrant display.
A crucial note on timing: We regretfully planted our Clematis vines approximately nine months before our wire trellis was installed. We emphatically do not recommend this approach! The vine grew significantly in the interim, resulting in considerable untangling, pruning, and wasted growth during the training process. Ideally, plant your chosen vine once your wire trellis is fully constructed and ready to receive its green companion. This synchronization ensures optimal growth and minimizes post-planting work.
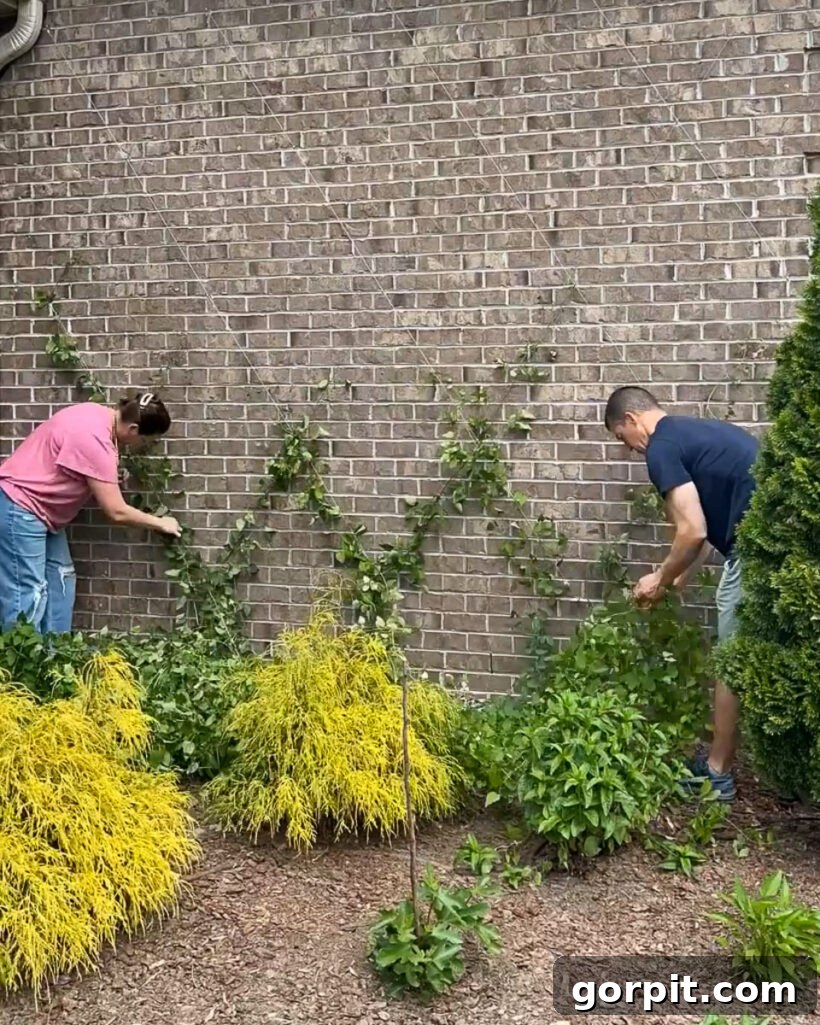
Once planted, gently guide the young tendrils of your vine towards the wire trellis. Clematis, for example, climbs by wrapping its leaf petioles (leaf stems) around supports. You may need to use soft garden ties or clips initially to help new growth latch onto the wire, especially in the early stages. Continue to gently weave and tie new shoots onto the wire frame as they grow, encouraging the vine to spread and fill out your diamond pattern. Regular maintenance, including light pruning to direct growth and remove dead material, will help maintain the desired shape and health of your vine.
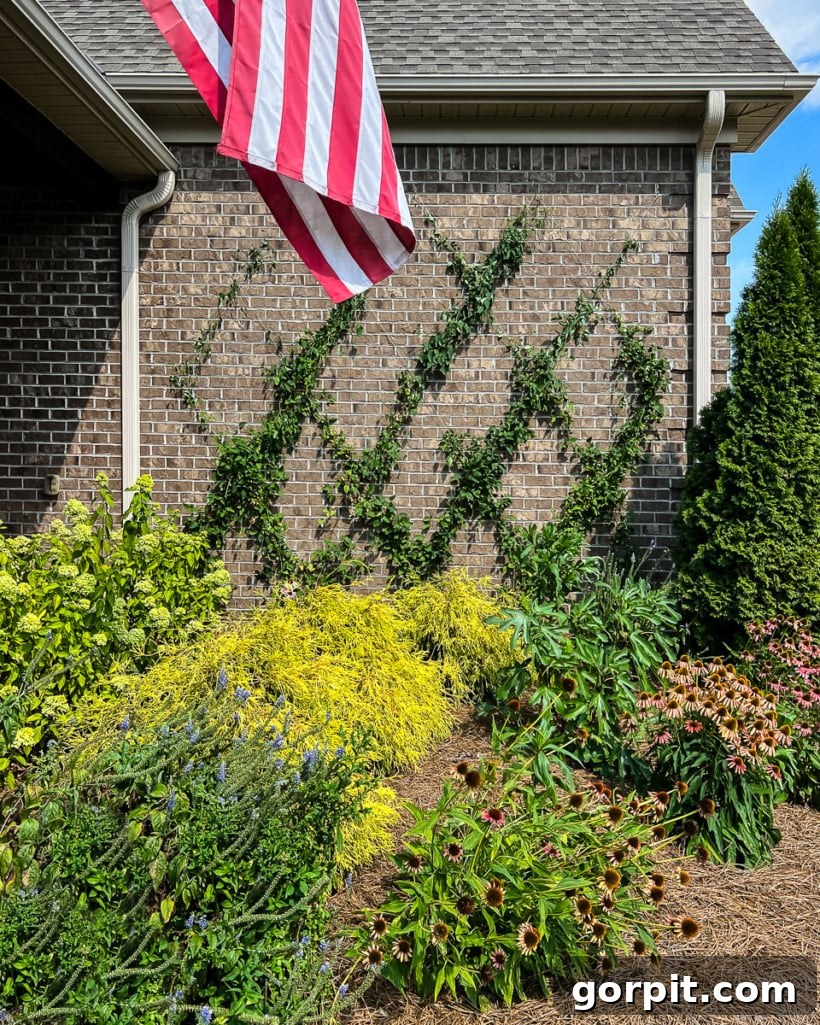
We completed the installation of our DIY wire trellis at the end of April, and it has been incredibly rewarding to watch the Sweet Autumn Clematis vine steadily fill in the pattern. The transformation from a bare wall to a verdant tapestry has been truly captivating. Here’s how it looks now, a testament to the beauty and effectiveness of this simple DIY project!
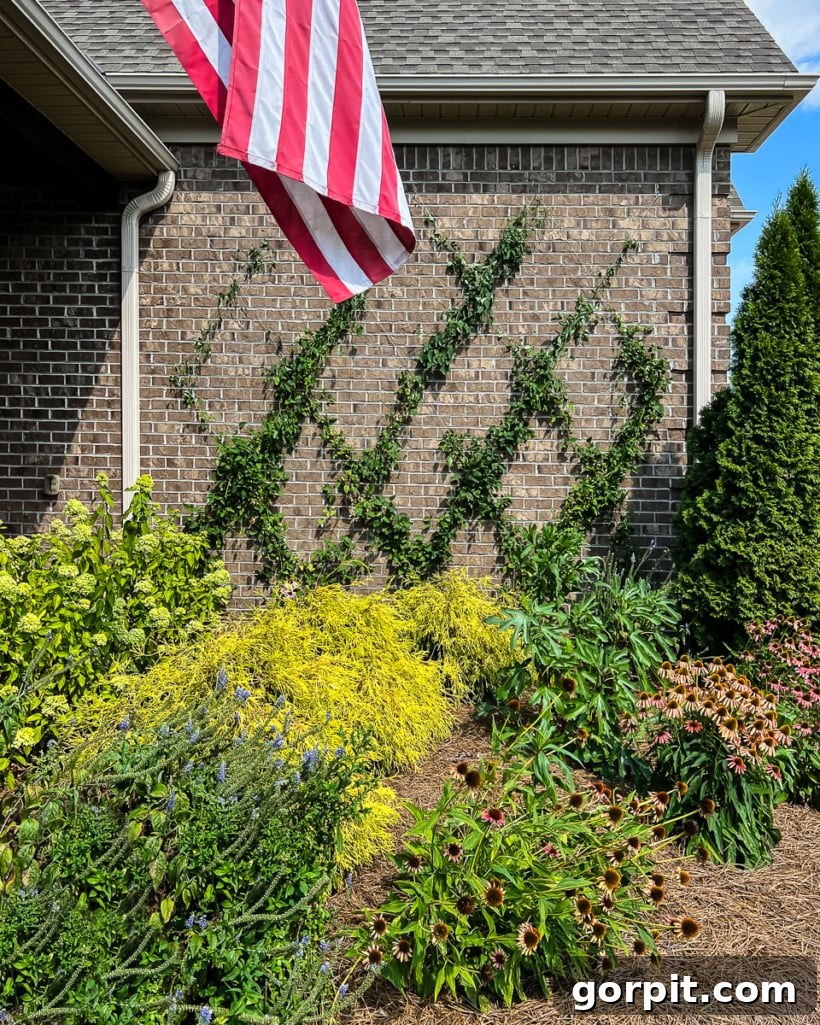
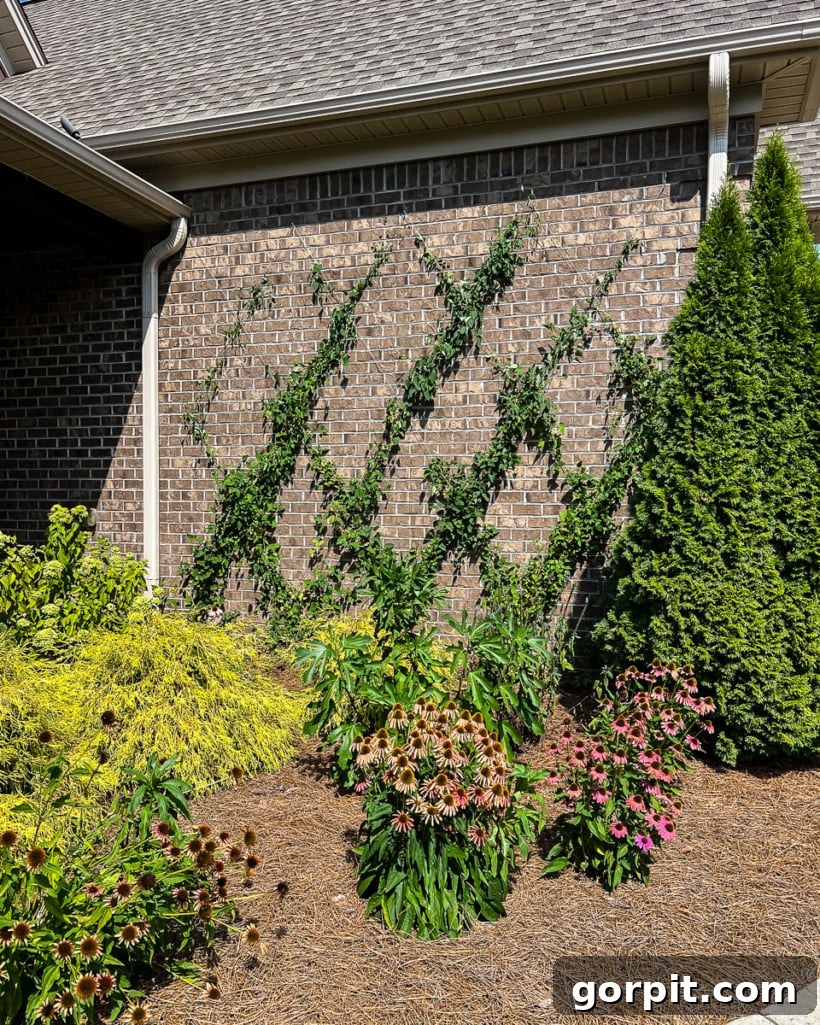
The addition of this DIY wire trellis and its vibrant climbing vine has dramatically enhanced the beauty and visual interest of this section of our home. We couldn’t be more pleased with the outcome, and the positive feedback from our neighbors, who are now considering similar projects for their own homes, truly affirms its success. What are your thoughts on this simple yet impactful exterior upgrade?
If you’re interested in exploring other trellis options, we’ve also crafted DIY garden trellises using metal fence panels, which offer a distinctively gorgeous and modern aesthetic for your garden. Be sure to check them out for more creative outdoor ideas!
More OUTDOOR IDEAS
SEE ALL outdoor POSTS
-
Fire Pit Ideas for Every Outdoor Space
-
How to Make a DIY Outdoor Chandelier
-
Modern DIY Garden Trellis
-
DIY Outdoor Electrical Box Cover
-
DIY Diamond Wire Trellis for a Vine
-
A Complete Review of Vego Garden Beds: Pros, Cons, and Everything In-between
Curious about how we approach transforming rooms and spaces throughout our home? Discover the strategies and insights within Designer in a Binder®, our ultimate guide to affordable and stylish home decorating.
For exclusive content, behind-the-scenes glimpses, and the latest design tips delivered straight to your inbox, be sure to subscribe to our newsletter before you go!