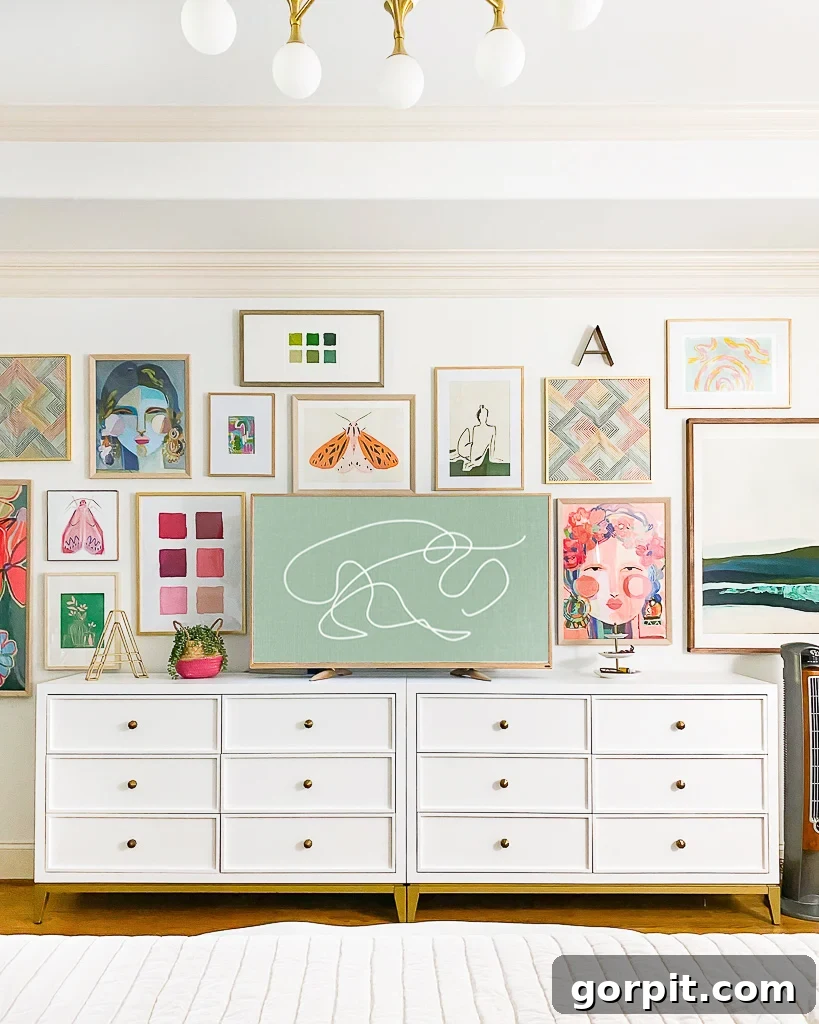
Have you ever admired how some televisions seamlessly blend into a room, appearing more like a carefully curated piece of art than a modern electronic device? If you’ve wondered how to achieve this sophisticated look without investing in a costly Samsung Frame TV, you’ve come to the perfect place. The good news is, you don’t need a premium device to transform your screen into a stunning display. All that’s required is a smart TV, which is a feature nearly all modern televisions possess. Take a look at the TV integrated into the gallery wall in our bedroom below – it’s an ordinary, budget-friendly smart TV, yet it radiates elegance, doesn’t it? Read on to discover the simple steps I followed to create this effect, and how you can easily replicate it in your own home to elevate your interior design.
Table of Contents
In recent years, the trend of displaying art on televisions has surged across social media platforms. Many homes now feature Samsung Frame TVs, specifically designed to mimic framed artwork when not in active use. While Frame TVs are undoubtedly stylish and effective – we even have one gracing our family room fireplace – their considerable price tag can be a deterrent for placement in less prominent areas of the home. You can read my comprehensive review on whether the Samsung Frame TV truly justifies its cost here.
However, an expensive Frame TV is not a prerequisite for transforming your living space. If you’re seeking a budget-friendly yet impactful solution, you can absolutely display captivating digital art on *any* smart TV you own. Furthermore, you can even enhance the appearance of your TV’s basic plastic frame to better integrate it with your decor. This article will guide you through both processes, offering a highly affordable and effective alternative to a Frame TV – consider it your ultimate TV art hack!
Why You Should Display Art on Your TV
The concept of using your television as an art canvas has resonated deeply with many, particularly after I first shared it on Instagram. Let’s be honest: televisions, despite their functionality, are often visual disruptions in a thoughtfully designed room. They present as large, dark rectangles that rarely harmonize with existing home decor. More often than not, they command attention as an unintended and unwelcome focal point due to their size and central placement.
Displaying beautiful digital art on your smart TV when it’s not in use offers a transformative solution. Instead of being an eyesore, your television can become a dynamic, beautiful focal point that enhances your room’s aesthetic. This simple change allows your tech to complement your interior design, rather than detract from it. It also introduces an exciting opportunity for personalization and creativity. Imagine effortlessly changing your room’s ambiance by simply updating the art displayed on your TV to match your mood, the current season, or a special holiday. This versatility adds a layer of sophistication and personal touch that traditional wall art might not offer with such ease.
I personally experienced this dramatic transformation with a very basic Amazon Fire TV in our bedroom. For less than $15 and about 15 minutes of effort, the impact on our space was immense. Just observe the remarkable difference it made in the “before” and “after” images below!
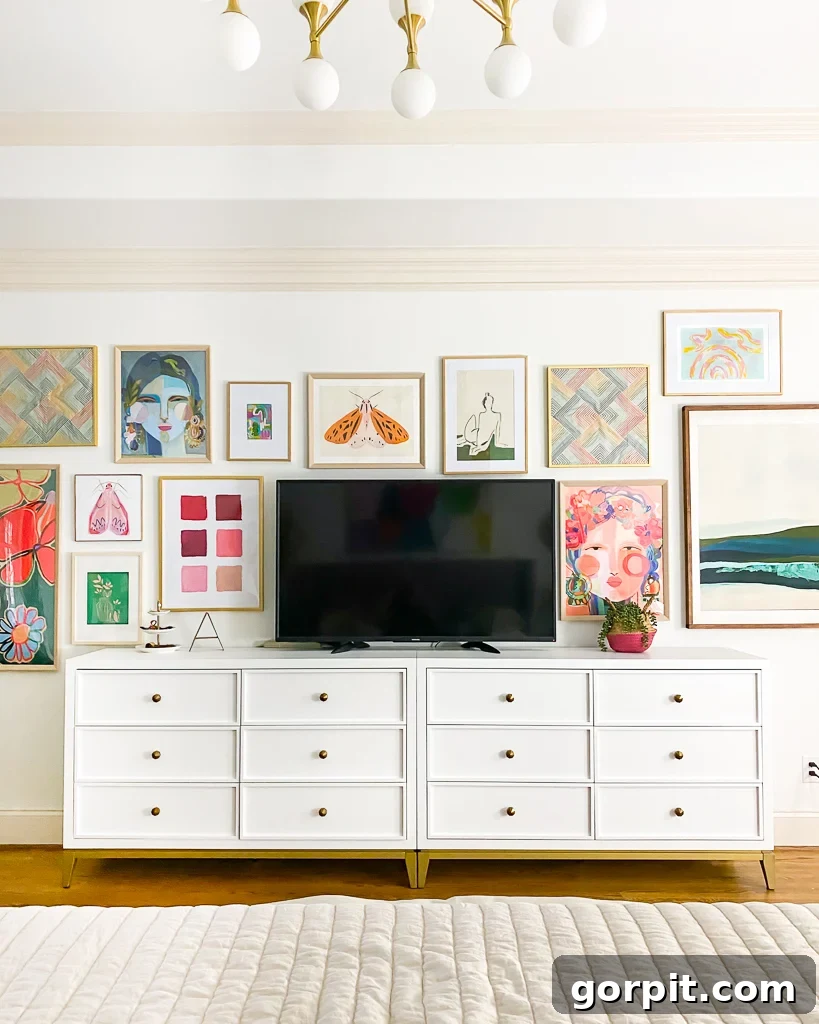
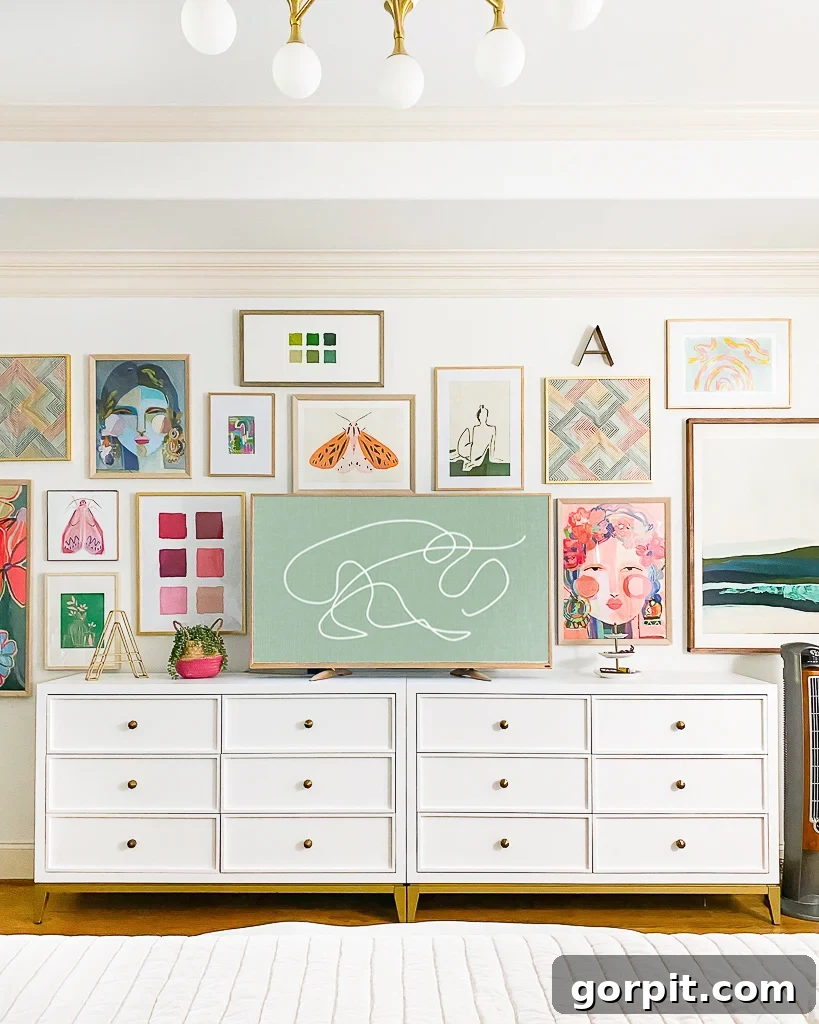
You might have noticed the TV’s plastic frame transitioned from its original black to a elegant gold. Don’t forget to explore how I upgraded the basic plastic frame on our TV to a stunning gold finish for roughly $5. This extra step is highly recommended, especially if your goal is to seamlessly integrate your TV into a captivating gallery wall. For further inspiration and tips, you can discover my favorite gallery wall ideas and practical advice here.
Finding and Displaying Art on a Smart TV
The journey to turning your smart TV into an art display begins with selecting the perfect digital art. The excellent news is that acquiring stunning digital art for your TV is both incredibly easy and surprisingly affordable. You can typically find a vast array of high-quality digital art pieces, ranging from minimalist designs to vibrant landscapes, for anywhere between $2 and $6 per download. Popular platforms like Etsy are treasure troves for unique digital art, but you can also find options on specialized art sites. When choosing your art, consider the resolution – for the best display quality on your high-definition TV, opt for images with a high resolution (e.g., 4K or higher) to prevent pixelation. I’ve curated some of my favorite digital art selections, including many that we’ve personally used, at the bottom of this section for your convenience.
Click on any image below for full product details.
Product details for digital art downloads (content not available in static HTML).
Once you’ve chosen and downloaded your preferred digital TV art, you have two primary methods for displaying it on your smart TV. The initial article included a helpful video outlining both options. While the video itself cannot be embedded in pure HTML, here’s a summary of its content: it demonstrated two straightforward ways to add art to any smart TV, providing a visual overview that makes the detailed instructions below much clearer.
Video content: “How to Display Art on a Smart TV” – This video demonstrates two easy options for adding art to any smart TV, proving you don’t need a Samsung Frame TV to display art on your screen.

Option 1: Transform Your TV into an Art Screensaver
Utilizing your chosen digital art as a screensaver is an excellent, hands-off approach to displaying art on your TV. When your TV goes idle, instead of a blank screen or a default animation, it will gracefully transition to your chosen artwork. The exact steps to set this up can vary slightly depending on your specific smart TV model and its operating system, as settings menus are often updated. Even if the directions provided below aren’t an exact match for your device, they should offer a solid framework to guide you through the process, helping you navigate your TV’s unique menu options effectively.
How to Display Art on an Amazon Fire TV
Amazon Fire TVs offer a seamless way to display personal photos and digital art using Amazon Photos, transforming your TV into a dynamic art piece when idle. Here’s a detailed guide:
1. **Access Amazon Photos**: Begin by downloading the Amazon Photos app on your iOS or Android device. Alternatively, and often more conveniently, you can sign in directly via a web browser on your computer, especially if you’ve purchased and downloaded your digital art files to your computer.
2. **Upload Your Art**: Once logged into Amazon Photos, upload the digital art pieces you intend to display. For optimal organization, I highly recommend creating a dedicated folder, perhaps named “TV Art,” to easily manage your collection. This makes selecting them later a breeze.
3. **Navigate Fire TV Settings**: On your Fire TV device, access the main “Settings” menu. From there, select “Display & Sounds.”
4. **Select Screensaver**: Within the “Display & Sounds” menu, scroll down until you locate the “Screensaver” option. Click on it to proceed.
5. **Choose Your Art Folder**: In the Screensaver settings, you’ll be prompted to select the source for your screensaver. Choose “TV Art” (or whatever specific name you gave your art folder in Amazon Photos). This tells your Fire TV to pull images from that particular collection.
6. **Configure Display Settings**: Finally, customize how your art is displayed. I prefer my art to appear after 5 minutes of inactivity. Crucially, to ensure a clean, unobstructed display of your artwork, turn off “Smart Captions,” “Alexa hints,” and “Date & Clock.” This prevents any text overlays or system messages from appearing over your beautiful digital art, allowing it to be the sole focal point.
How to Add Art to a Chromecast TV
Chromecast devices are fantastic for turning your TV into a personalized gallery with art from Google Photos. Here’s how to set up your digital art as an Ambient Mode display:
1. **Prepare Your Google Photos Gallery**: Start by uploading all your chosen digital art pieces to a dedicated album or gallery within Google Photos. Ensure these photos are accessible via your Google account.
2. **Open Google Home App**: On your smartphone or tablet, launch the Google Home app. This app serves as the central control for your Chromecast devices.
3. **Select Your Chromecast Device**: Within the Google Home app, identify and select the specific Chromecast device you wish to use for displaying your art.
4. **Configure Ambient Mode**: Tap on the “Settings” icon for your selected Chromecast. Then, navigate to “Ambient mode” and choose “Art Gallery” (or the name of the specific Google Photos album you created for your art). This tells Chromecast to pull images from your chosen source when the TV is idle, effectively turning it into a dynamic art display.
How to Add Art to a Roku TV
Roku TVs now offer incredibly user-friendly ways to display digital art, allowing you to transform your screen into an engaging art canvas. With the introduction of the “Backdrops” feature, this process is simpler than ever. Here’s how to make the most of it:
In Fall 2024, Roku launched its innovative “Backdrops” feature, designed to effortlessly display digital art on your Roku TV. This essentially converts your TV into a sophisticated art canvas, offering a vast library of thousands of free 4K photographs and works of art. More importantly, it also allows you to upload and display your own custom images, including your curated digital art collection.
Here’s how to harness the power of Backdrops on your Roku TV:
- **Enable the Backdrops Feature**: First, you need to activate Backdrops. Navigate your Roku TV’s menu by going to *Settings* > *Home Screen Menu* > *Backdrops* > *Open Backdrops app*. If for any reason you don’t see it there, try using the search function in your TV’s app store to locate “Backdrops” and install it.
- **Choose Your Art**: Once inside the Backdrops App library, you can browse and select either a pre-curated image or an entire collection that appeals to you.
- To create a rotating display from a collection of images, simply select “Set as Backdrop” or “Start Backdrops” from the collection’s page.
- If you prefer to showcase a single image as your Backdrop, click on that specific image and then select “Start Backdrops.” When only one image is displayed, you can press the ‘*’ button on your remote to open the Backdrops Options menu and ensure “Image Duration” is set to “Don’t Change” to keep it static.
- **Upload Your Personal Collection**: To display your own digital art or photos, go to the “Add your photos” section within the app. Select “Upload photos” and follow the clear on-screen instructions to transfer your images. As an alternative, you can choose “Connect Google Photos” to easily import photos directly from your Google Photos account.
- **Activate and Automate Backdrops**: After enabling and configuring Backdrops, a quick tap of your remote’s power button will activate the feature, turning your screen into an art display. If you wish to power off your TV completely, press and hold the power button until the screen goes dark. For automatic art display when your TV is idle, go to *Home* > *Settings* > *System* > *Power* and ensure “Auto Power Savings” is turned on.
Should the Backdrops feature not be available on your Roku TV, or if you simply prefer an alternative method, you can still add digital art to your Roku TV! Here’s the tried-and-true method that works across many Roku models:
- **Upload to Google Photos**: Begin by uploading your chosen digital art pieces to a dedicated gallery within Google Photos. This centralizes your art collection and makes it accessible.
- **Install Photo View Channel**: Search for and install the “Photo View” channel from the Roku Channel Store. This application allows your Roku TV to access images from your Google Photos account.
- **Sign In**: Open the “Photo View” channel and sign in using your Google account credentials. This links your Roku TV to your Google Photos library.
- **Select Your Art Album**: Once signed in, navigate to and select the specific Google Photos album containing the digital art you wish to display.
- **Set as Screensaver**: Go to your Roku TV’s “Settings,” then “Screensaver,” and choose “Change Screensaver.” From the available options, select “PhotoView.” This designates your curated Google Photos album as the default screensaver.
- **Adjust Wait Time**: Finally, adjust how long your TV waits before the screensaver activates. In the Roku settings, go to “Settings” > “Screensaver” > “Change wait time” and set your preferred duration.
Years ago, before the intuitive Backdrops feature was integrated, this second method was our go-to for adding digital art to the Roku TV in our family bonus room, and it performed flawlessly.
How to Add TV Art to an Apple TV
Apple TV owners can effortlessly display their favorite digital art using iCloud integration, turning their television into a stunning visual centerpiece. Here’s a simple guide to get your personalized art flowing:
1. **Upload Art to iCloud**: First, ensure your chosen digital art pieces are uploaded to a specific album within your iCloud Photos. This makes them accessible across your Apple devices.
2. **Enable iCloud on Apple TV**: On your Apple TV, go into the settings and activate iCloud integration. An important note: when prompted, **do not turn on Photo Stream**. This ensures that only your selected album is used, giving you more control over what appears.
3. **Access Screensaver Options**: From the Apple TV’s main settings menu, navigate to the screensaver options.
4. **Select Photos from iCloud**: Within the screensaver settings, choose “Photos” and then specify “iCloud” as your source.
5. **Choose Your Album**: Finally, select the specific album from iCloud that contains the digital art you wish to display. Your Apple TV will now use these images as its screensaver, providing a beautiful, rotating art gallery in your living space.
Option 2: Display Art on a TV Using YouTube
While the screensaver method offers a passive display of art when your TV is idle, the YouTube method provides greater control over when and for how long your chosen art is showcased. This approach is ideal for those who want to actively display a specific piece of art on demand. Essentially, you will be playing a video of a static image that can loop for an hour or even longer, effectively turning your TV into a continuous art display without waiting for the screensaver to kick in.
Here’s how to utilize YouTube for displaying art on your smart TV:
- **Ensure Internet Connection and YouTube App**: Confirm that your smart TV is connected to the internet. If you don’t already have the free YouTube app installed, you can easily download it from your TV’s app store. Most smart TVs come with YouTube pre-installed, making this step often unnecessary.
- **Select Your Art Content**: YouTube is a rich resource for TV art. You can simply search for “tv art,” “digital art for TV,” or “4K art display” to find a plethora of free options. Many digital art sellers also provide a YouTube link with your purchase, allowing for easy display. For example, we’ve begun offering this convenient option with the new TV art designs available in our Kaleidoscope Living shop!
- **Press Play and Enjoy**: Once you’ve found the digital art video you wish to display, simply select it and press play. Your chosen artwork will then be showcased in full glory on your TV screen, providing an instant and captivating visual element to your room. This method is particularly useful for setting a specific mood for an event or simply enjoying a favorite piece without interruption.
Option 3: Utilize Samsung’s Ambient Mode (for specific Samsung TVs)
For owners of certain Samsung TVs, particularly Samsung QLED models and the Samsung Frame TV (which typically run on Samsung’s proprietary operating system, not FireTV or Roku), there’s a unique feature called “Ambient Mode.” This mode allows your TV to blend seamlessly into your home environment, displaying content like decorative art, useful information (weather, news), or even mimicking the wall texture behind it. It’s designed to make your TV disappear into its surroundings, eliminating the black screen when not in use.
If Ambient Mode is a feature on your Samsung TV, follow these instructions to use it for displaying art via the SmartThings App. You can also explore additional methods for setting up Ambient Mode directly on your TV here.
1. **Save Images to Your Phone**: Begin by saving the digital art images you wish to display directly onto your smartphone. This ensures easy access through the SmartThings app.
2. **Download and Connect SmartThings App**: Download the SmartThings App to your phone. Follow the on-screen instructions within the app to connect it with your compatible Samsung TV. This app acts as your central control hub for Ambient Mode.
3. **Select “Art Mode”**: Once your TV is connected in the SmartThings app, navigate to and select the “Art Mode” option. This is your gateway to customizing your TV’s display.
4. **Add Your Photos**: Tap on the “Add photos” icon within Art Mode. From your phone’s gallery, select and add the image(s) you want to feature on your TV.
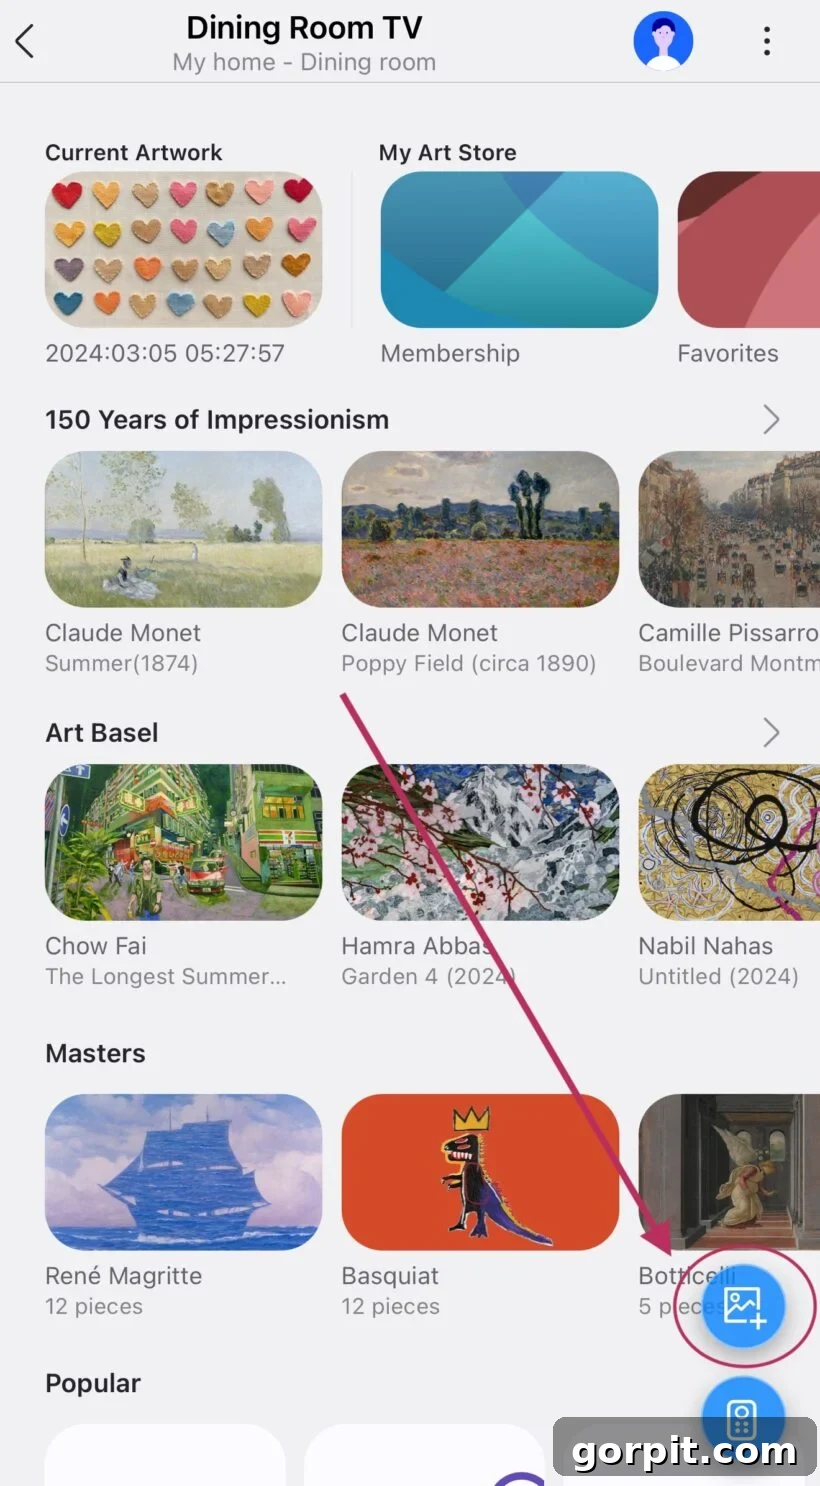
5. **Set on The Frame (or QLED)**: After selecting your images, click “Set on The Frame” (or a similar option for QLED TVs). This sends your chosen artwork to your television for display.
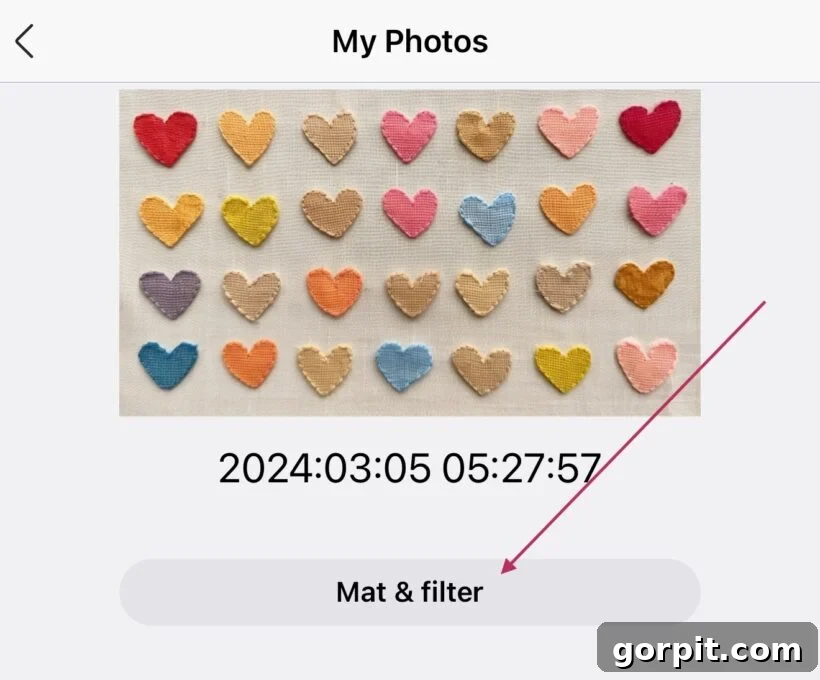
6. **Customize with Mat & Filter**: To further enhance the aesthetic, click on “Mat & filter.” Here, you can experiment with various display options, such as adding a digital mat around your image to give it a framed look, adjusting the brightness to match your room’s lighting, and fine-tuning the color temperature for optimal visual harmony. This allows for a truly personalized art display that integrates flawlessly with your home’s decor.
Frequently Asked Questions About Displaying TV Art
This is a fantastic and very common question! Displaying digital art on your TV is indeed a fabulous way to transform your space, but it’s wise to be aware of the potential for screen “burn-in.”
Screen burn-in refers to the permanent discoloration of certain areas on an electronic display. It occurs when a static image, or a distinct pattern, is shown consistently on the screen for very prolonged periods. Essentially, the pixels in those areas degrade at a different rate than the rest of the screen, leaving a faint, ghost-like image or color shift even when other content is displayed. This could potentially happen if a single piece of digital art is left on your screen for an extremely long time without any variation.
However, it’s crucial to understand that not all TV screens are equally susceptible to burn-in. OLED (Organic Light Emitting Diode) screens, known for their vibrant colors and deep blacks, can be more vulnerable to burn-in due to the nature of their organic pixels. On the other hand, traditional LCD (Liquid Crystal Display) and LED TVs are significantly less prone to burn-in compared to older Plasma TVs and even modern OLEDs. Furthermore, advanced televisions like Samsung’s The Frame TV incorporate special algorithms and pixel-shifting technology specifically designed to minimize the risk of burn-in, even when displaying static images for extended periods. Roku’s newer Backdrops feature also includes built-in OLED burn-in protections.
To further mitigate any risk and enjoy your TV art worry-free, here are some practical tips:
- **Regularly Change Your Art**: Avoid leaving the same piece of digital art on your screen for days or weeks on end. Swapping out your artwork, even once a day or every few days, significantly reduces the risk.
- **Vary Content**: Interspersing art display with regular TV viewing, gaming, or other dynamic content helps keep all pixels active and prevents static image retention.
- **Adjust Brightness**: Avoid using your TV at full brightness for extended periods when displaying static art. Lowering the brightness slightly can prolong the life of your pixels and reduce burn-in risk.
- **Utilize TV Features**: If your TV has specific settings for “pixel refresh,” “screen shift,” or “burn-in protection,” make sure they are enabled.
The exact timeframe for when burn-in might occur varies widely and depends on multiple factors: the display technology, the brightness settings, the specific image’s contrast, and the duration of static display. Generally, with modern LCD/LED TVs and sensible usage, the risk is minimal for casual art display. We comfortably display digital art on our LCD TVs for up to 2-hours at a time without experiencing any screen burn-in, and many users enjoy it for much longer with regular content changes. Prioritize variation and moderate brightness for peace of mind.
The frequency with which we change the art on our TVs depends on the room and its purpose. For instance, the TV in our bonus room rarely has its image changed; it maintains a consistent aesthetic. However, for the TVs located in our family room and primary bedroom, I enjoy changing the art seasonally and for holidays. This allows us to effortlessly refresh the decor, match the current mood, or celebrate special occasions, adding a dynamic and personalized touch to our living spaces.
You’ve hit on a crucial point! When you transform your TV into a piece of art, visible cords can significantly detract from the polished, seamless look you’re trying to achieve. Just as a beautiful painting needs a clean background, your digital art display benefits immensely from proper cord management. While I haven’t personally tackled this DIY, my friend Ashley has an excellent, comprehensive guide on how to hide TV cords on your wall, along with other unsightly cables. Her post offers practical solutions to help your TV art truly shine without the visual clutter of wires.
You can find links to some of my favorite options for seasonal and holiday art by clicking on one of the images below.
More ART & Wall Decor IDEAS
SEE ALL ART POSTS
-
How to Display Art On Almost Any Smart TV
-
How to Make Faux Oversized Poster Hangers
-
DIY Light Up Wall Art
-
Make Large DIY Picture Frames For Less than $20 Each
-
DIY Magnetic Poster Hangers
-
27 Gallery Wall Ideas + Practical Tips to Inspire You
Curious about my personal approach to transforming rooms and spaces within our home? Be sure to explore Designer in a Binder® – your affordable and simple guide to home decoration.
And for exclusive content and behind-the-scenes sneak peeks into our design projects, make sure to subscribe before you leave!
Join our community for exclusive content and updates.