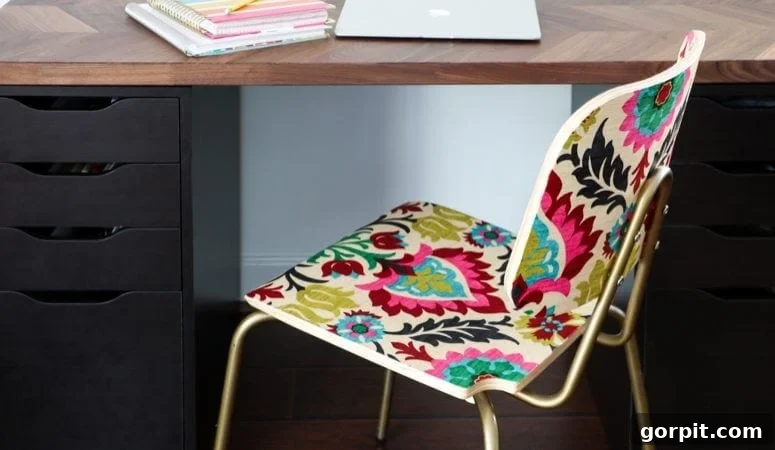
Are you searching for an innovative, cost-effective way to transform an ordinary piece of furniture into a statement work of art? Decoupaging furniture with fabric offers an incredibly budget-friendly and surprisingly simple solution, allowing you to infuse personality and unique style into your home décor without picking up a paintbrush. Utilizing everyday materials like Mod Podge and your favorite fabric, you can effortlessly give old or inexpensive wood pieces a custom, high-end makeover. This versatile DIY technique not only breathes new life into tired furniture but also provides an opportunity to create truly bespoke items that reflect your individual taste and design aesthetic.
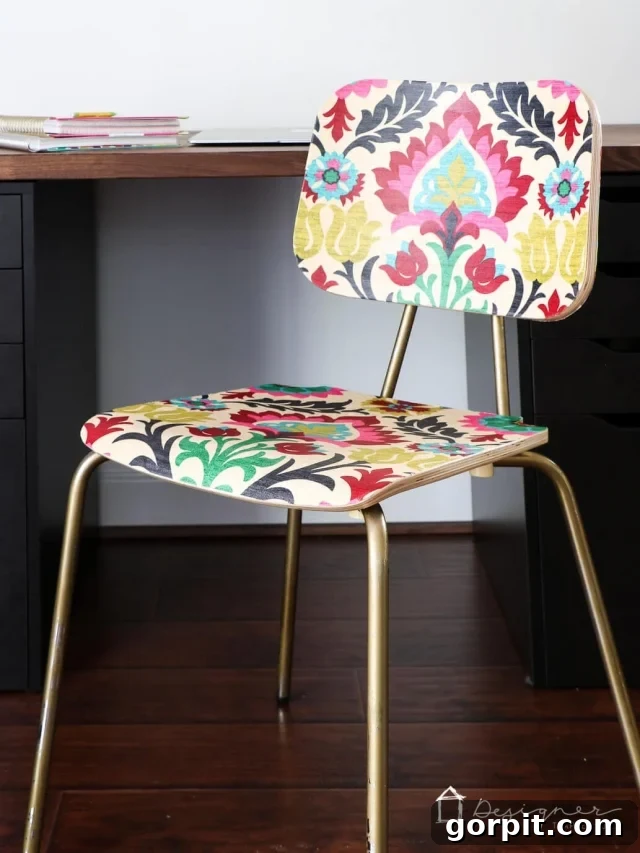
The inspiration for this project stemmed from a common design dilemma: falling in love with a piece far beyond budget. While conceptualizing my new home office and craft room, I embarked on an extensive search for the perfect desk chair. My heart, however, was set on a luxuriously upholstered chair boasting an exquisite fabric pattern. Its price tag of $445 was significantly more than my entire room’s budget, making it an impossible purchase. Yet, the vision of that chair, with its elegant fabric, continued to captivate me.
Determined to achieve the desired aesthetic without the exorbitant cost, I knew I had to get creative. The challenge transformed into an exciting DIY opportunity. By sourcing a basic, affordable wood chair and a stunning piece of fabric that echoed the high-end design, I set out to recreate my dream chair. The outcome was nothing short of spectacular – a custom piece that perfectly matched my vision, at a mere fraction of the original price. This project proved to be not only easy but immensely satisfying, and I’m thrilled to share the complete, step-by-step tutorial so you can achieve similar transformations in your own home!
This post contains some affiliate links for your convenience. As an Amazon Associate, I earn from qualifying purchases. Click here to read my full disclosure policy.
How to Decoupage Furniture: A Comprehensive DIY Tutorial
Decoupaging furniture is an art form that allows you to customize pieces with fabric, paper, or even napkins, creating a unique finish that looks professionally done. This guide focuses on fabric decoupage, offering a durable and visually striking “upholstered” effect without the complexities of traditional upholstery. This method is perfect for adding a pop of pattern, color, or texture to any room, transforming plain items into personalized treasures.
Essential Materials Needed to Decoupage Furniture
Gathering your supplies before you begin will ensure a smooth and efficient crafting process. Each item plays a crucial role in achieving a flawless finish for your decoupaged furniture project.
- Fabric: The amount you need will vary based on the size of your furniture piece and how you plan to position the pattern. For a standard chair seat and back, approximately 1 yard is often sufficient. Consider durable fabrics like cotton, linen, or lightweight canvas for best results. Choose a pattern that complements your existing decor or makes a bold statement.
- Furniture Piece (Chair, Table, Dresser): I utilized a basic $45 wood chair I sourced online, which is no longer available. However, for even greater savings and unique character, I highly recommend exploring consignment stores, thrift shops, or garage sales. Look for solid wood pieces that are structurally sound, as these provide the best foundation for decoupage.
- Matte Mod Podge (or another decoupage glue): Mod Podge is a craft essential, functioning as an adhesive, sealer, and finish all in one. The matte finish offers a subtle, non-glossy appearance that beautifully mimics the look of real upholstery. Ensure you have enough for multiple coats.
- Gold Spray Paint (Optional): If you wish to customize other elements of your furniture, like metal legs or hardware, spray paint is an excellent choice. I used gold spray paint to transform the silver metal legs of my chair, adding a touch of elegance that tied into the fabric’s design. Choose a high-quality paint + primer for optimal adhesion and durability.
- Exacto Knife or Sharp Craft/Utility Knife: A very sharp blade is critical for precise trimming of excess fabric, ensuring clean, crisp edges that define a professional finish. Keep extra blades on hand as they dull quickly when cutting fabric.
- Foam Paint Brush(es): Ideal for applying Mod Podge smoothly and evenly without leaving brush strokes. Have a few on hand, or be prepared to wash them thoroughly between coats.
- Optional but Recommended Tools:
- Scissors: For initial fabric cutting.
- Pencil or Fabric Marker: For tracing patterns onto fabric.
- Brayer or Credit Card: Extremely useful for smoothing out bubbles and wrinkles when adhering fabric to the surface.
- Screwdriver/Wrench: For disassembling and reassembling your furniture.
- Drop Cloth or Newspaper: To protect your work surface.
- Damp Cloth: For wiping away excess Mod Podge before it dries.
For a visual walkthrough of the project, you can watch the video below (it will play after a short ad). It provides an excellent overview before you dive into the detailed instructions!
Time needed: 3 hours
Transform your wood furniture with a fabric decoupage technique. Follow these steps to achieve a beautiful, custom look. The estimated time to complete the project does not include essential drying times.
- Disassemble and Prepare Your Furniture.
For any decoupage project, especially with a larger piece like a chair or table, disassembling the furniture into its individual components will make the application process significantly easier and result in cleaner edges. This is particularly true if you are working with a pre-owned item. Since I began with a new wood chair, I could skip the initial cleaning and minor repair steps often needed for older pieces. However, I took this opportunity to personalize the chair further by spray painting the metal legs a lustrous gold, ensuring they matched my desired aesthetic. If your furniture requires painting, do so before decoupaging, allowing ample drying time. Ensure all surfaces are clean, dry, and free of dust or grease.
- Trace and Precisely Cut Your Fabric Pieces.
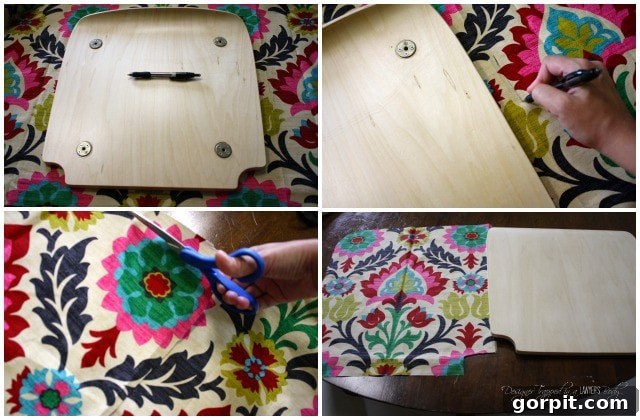
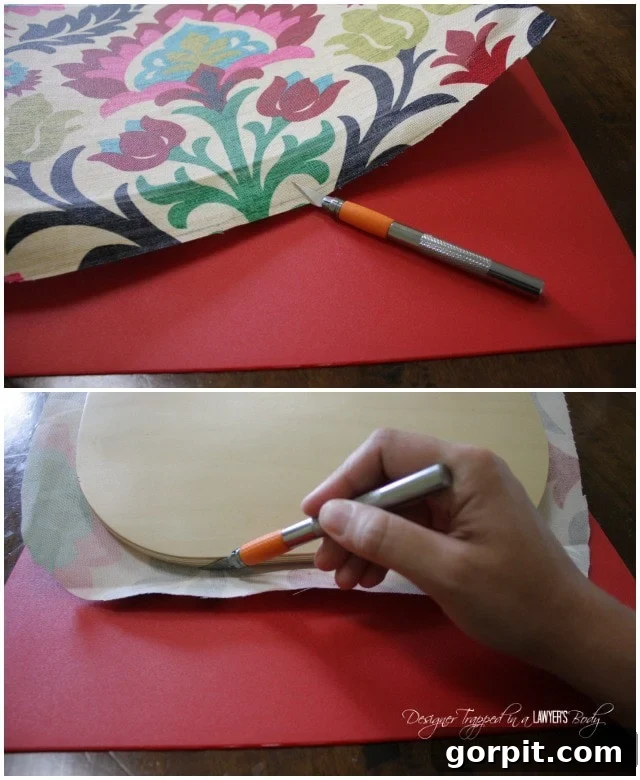
Carefully lay your chosen fabric onto a clean, flat surface, ensuring it is smooth and free of wrinkles. Place the individual furniture components (like the chair seat or back) on top of the fabric. Using a pencil or fabric marker, meticulously trace the perimeter of each wood piece. It is crucial to trace approximately 1 inch beyond the actual wood surface. This allowance provides sufficient overhang to ensure full coverage and allows for precise trimming later, preventing any gaps or exposed wood edges. Once traced, use sharp scissors to carefully cut out each fabric piece, following your marked lines with precision. If your fabric has a directional pattern, pay close attention to alignment when tracing.

- Apply Fabric to Wood with Mod Podge.
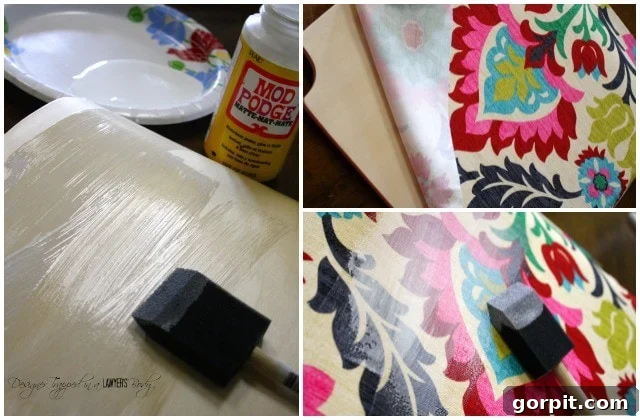
Now for the core of the decoupage process. Using a foam brush, apply a generous, even layer of Mod Podge (or your preferred decoupage medium) directly onto the surface of the furniture piece you are working on, covering it completely. Carefully position your pre-cut fabric piece onto the wet Mod Podge, aligning it precisely. Work quickly but meticulously to smooth out any wrinkles or air bubbles from the center outwards using your hands, a brayer, or a credit card. Pay special attention to the edges. For components like chair seats that have hardware holes, don’t worry about them at this stage; the Mod Podge will secure the fabric over them, and they can be easily pierced or re-drilled later during reassembly. Once the fabric is perfectly positioned and smooth, apply another liberal coat of Mod Podge over the entire top surface of the fabric. This acts as both a sealant and a protective finish. Allow the piece to dry completely overnight (at least 12-24 hours) to ensure maximum adhesion and rigidity.
- Trim Excess Fabric for a Clean Finish.
By the next morning, your fabric should feel firm and tightly bonded to the wood, especially around the edges. This stiffness indicates it’s ready for trimming. Using a very sharp Exacto knife or craft knife, carefully and steadily trim away the excess fabric. Use the edge of your furniture piece as a guide, cutting as close to the wood’s perimeter as possible. A fresh blade will make this task much easier and prevent snagging or fraying. Should you encounter any stubborn stray threads after trimming, carefully snip them off with small scissors. As a final step, apply an additional thin coat of decoupage glue along the entire perimeter of the decoupaged surface. This extra seal will flatten any remaining minuscule threads and, more importantly, prevent any future fraying, ensuring a durable and professional-looking edge.
- Repeat for All Remaining Components.
Continue the process, meticulously following steps 2 through 4 for all other wood pieces of your furniture that you intend to decoupage with fabric. Maintain consistency in your tracing, cutting, and application of Mod Podge to ensure a cohesive and uniformly beautiful final result across the entire piece. Patience during drying times is key for each component.
- Reassemble Your Custom Furniture and Enjoy!
Once all decoupaged components are completely dry and trimmed, carefully reassemble your furniture piece. Take your time to ensure all parts fit together correctly and securely. Step back and admire your handiwork – you’ve just created a stunning, custom-designed piece of furniture that reflects your unique style and craftsmanship! This transformed item is now ready to take its place as a focal point in your home.
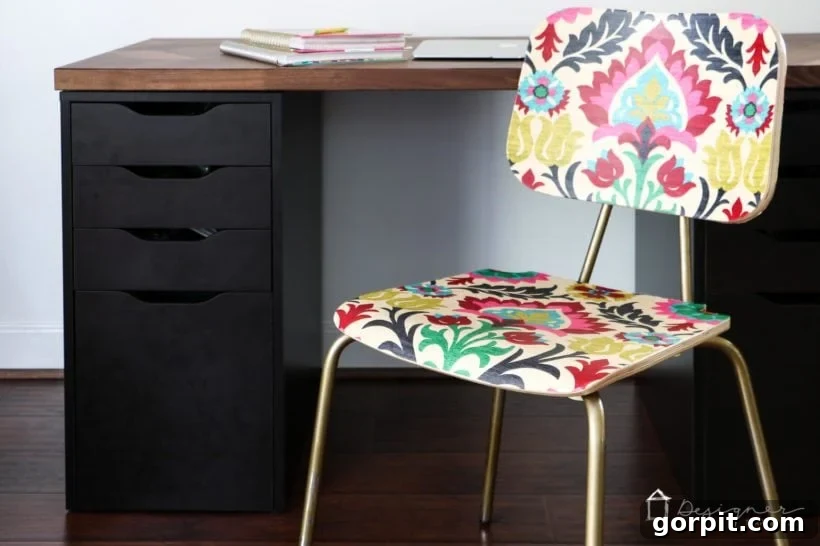
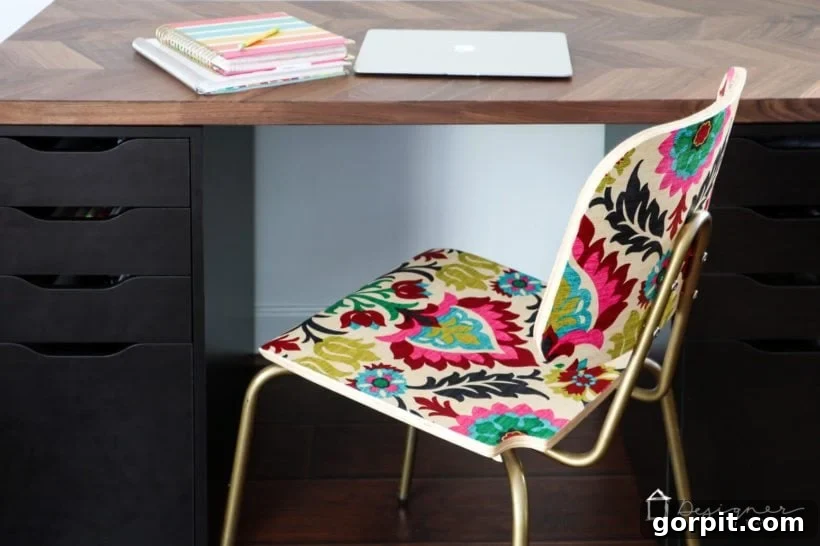
And there you have it! For an investment of roughly $60, I managed to create a totally custom chair that mirrors the aesthetic of my $445 inspiration chair, all at a mere fraction of the cost. The simplicity of this process is truly remarkable; there’s no need for tedious priming or sanding, making it an incredibly accessible project for DIY enthusiasts of all skill levels. I absolutely adore the outcome!
Having used this decoupaged chair extensively for quite some time now, I can attest to its durability. Occasionally, I find myself trimming a few stray threads that emerge, and I’ve applied a small touch-up of Mod Podge to one corner where the fabric began to lift ever so slightly. As for the spray-painted legs, they have indeed required a few touch-ups over the years, a consequence of my initial haste in only applying a single coat. The key takeaway here is that with minimal, easy maintenance, my decoupaged chair has held up wonderfully, even with frequent use. It remains a beloved and functional piece in our home.
This project stands out as one of my all-time favorite makeovers. While it might be one of the simplest furniture projects I’ve tackled and certainly among the most budget-friendly, its impact is undeniably high. It proves that significant style doesn’t require a significant investment.
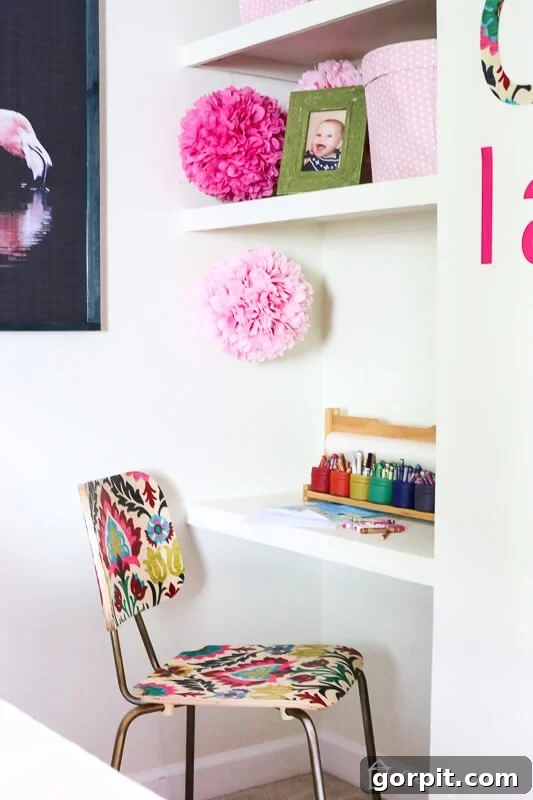
Years after its initial creation, this versatile chair found a new purpose when I upgraded my desk chair. It transitioned seamlessly into my daughter Attley’s “big girl” room, perfectly complementing her custom decoupaged wall quote. The coordinated elements created a charming and cohesive space, proving the adaptability and timeless appeal of a well-executed decoupage piece.

Unleashing Creativity with Decoupage
Decoupage truly is an unsung hero in the vast landscape of DIY projects, celebrated for its incredible versatility and transformative power. It’s a fantastic technique for adding visual interest and a personal touch to an astounding array of surfaces, not just furniture. The creative possibilities are genuinely limitless, whether you’re working with fabric, decorative paper, maps, photos, or even wallpaper. This craft encourages imagination, allowing you to salvage and revitalize items that might otherwise be discarded. So, arm yourself with your chosen furniture piece, your favorite decoupage material – be it paper, fabric, or wallpaper – a trusty bottle of Mod Podge, and prepare to embark on an exciting journey of creative transformation!
More Inspiring DIY Projects You’ll Love
If you enjoyed this project and are looking for more ways to infuse creativity into your home, explore these other popular DIY tutorials and ideas:
- How to Decoupage Napkins to Customize Anything! – Discover a charming way to use decorative napkins for unique embellishments.
- 50 of the Best IKEA Hacks I’ve Ever Seen – Get inspired by ingenious ways to customize affordable IKEA furniture and decor.
- 17 Easy DIY Projects to Do While You’re Stuck At Home – Find simple, engaging projects perfect for any skill level.
- DIY Photo Canvas Prints With Authentic Texture – Learn to create personalized wall art with a professional touch.
- 14 Inspiring IKEA Desk Hacks – Transform basic IKEA desks into functional and stylish workspaces.
- Sherwin-Williams Pure White Color Review with Pictures – A detailed guide to choosing the perfect white paint for your interiors.
Curious about my holistic approach to transforming rooms and spaces within our home? Dive into Designer in a Binder®, my comprehensive system designed to simplify the decorating process for stunning results.
And for exclusive content, behind-the-scenes sneak peeks, and fresh DIY inspiration delivered straight to your inbox, be sure to subscribe to our newsletter before you go!